Reindeer Cookies with Chocolate guide — the ultimate holiday treat 🎄🍫
Core Concepts: chocolate cake-mix cookie base; frosting-assembly “nose and eyes” decoration; pretzel antlers; quick-bake method; kid-friendly assembly.
Ready for the most irresistible Reindeer Cookies with Chocolate guide that takes just about 30 minutes from start to finish? You’ll absolutely love how these festive treats turn a simple chocolate cake-mix cookie into an adorable, show-stopping holiday cookie. In the first 60 characters you already know what this is about: Reindeer Cookies with Chocolate guide — a quick, easy, family-approved project that’s perfect for parties, school events, or cozy baking nights. This guide will show you the foolproof steps, clever substitutions, and creative variations so you can make them confidently even if you’re new to holiday baking.
If you like flavor mashups, check out this inspired cousin recipe for crunchy chocolate texture over at Chocolate Hazelnut Crunch Cookies as a fun pairing idea: Chocolate Hazelnut Crunch Cookies. Throughout this article you’ll learn why this method works, which tools matter, how to adapt it for allergies, and how to teach kids to help — all while keeping things joyful and simple. Let’s get into the delicious details. 🍪✨
Attributes Origin & Cultural Context (H2) 🌍
Reindeer-shaped cookies and decorated holiday sweets are a long-standing tradition in many Western winter holidays. The whimsical use of edible decorations to mimic animals or festive symbols goes back generations — a playful intersection of baking and storytelling. The specific idea of Reindeer Cookies with Chocolate grew from a mix of two trends: the convenience of boxed cake-mix cookies (popular mid-20th century) and the modern love of character-shaped confections.
I first made a version of these with my daughter when she was five. We laughed as she carefully pressed pretzel antlers into cookies while I tried to frost without smudging her creations. That afternoon became an annual ritual in our family — the simplicity of the chocolate cake-mix base and the bright pop of red M&Ms made it accessible and memorable. What sets this version apart is the chocolate-forward flavor and the use of a Nilla Wafer “nose” beneath the eyes — a tiny structural trick that elevates the look and makes assembly easier for small hands.
Regional variations exist: some bakers use peanut butter cookies instead of chocolate, others swap the pretzels for almond slivers or use chocolate chips for eyes. This guide focuses on the classic chocolate approach while offering options for local tastes and dietary needs. For a seasonal twist that blends pumpkin and chocolate flavors, explore this pumpkin-chocolate pairing: Pumpkin Chocolate Chip Cookies. 🎃🍪
Why This Reindeer Cookies with Chocolate Guide is a Game-Changer (H2) ⚡
This Reindeer Cookies with Chocolate guide is designed to be lightning-fast, budget-friendly, family-approved, and endlessly customizable — here’s why it’s a game-changer.
Lightning Fast: You can understand and execute the core recipe within 10 minutes of prepping. The cookie dough is a no-fuss mix of chocolate cake mix + eggs + oil, which reduces measuring and eliminates creaming steps. If you want a quick win, this method is unbeatable.
Budget-Friendly: The primary ingredients (boxed cake mix, eggs, oil, a jar of frosting, pretzels, M&Ms, candy eyes, Nilla Wafers) are inexpensive and often already in pantry rotation. No specialty flours or equipment required.
Family Approved: Kids love decorating. The assembly steps (frost, press on wafer, stick eyes and pretzels) are engaging and safe. You’ll encourage creativity and build holiday memories. Pro tip: assign small tasks to little helpers — rolling, pressing, or placing the M&M nose.
Nutritiously Delicious (mindful treats): While these are festive sweets, the sensory benefits (shared activity, creativity, and routine) support family bonding and can positively influence mood. Moderation and sharing turn them into part of a joyful seasonal ritual rather than overindulgence.
Infinitely Customizable: Swap frosting flavors, change nose colors, or use gluten-free cake mix — the structure allows easy swaps without breaking the method.
Pantry-Friendly: Uses common ingredients and minimal tools. You’ll rarely need a special trip to the store.
This guide is aimed at people asking “how to understand Reindeer Cookies with Chocolate at home easily” and those seeking the “best Reindeer Cookies with Chocolate guide for beginners.” The steps below will make the “quick Reindeer Cookies with Chocolate learning method” obvious and reproducible, even for first-timers. By the end you’ll be able to create expert-level Reindeer Cookies with Chocolate at home that look festive and taste rich.
Complete Concept Breakdown (H2) 🧠
Essential concepts for Reindeer Cookies with Chocolate:
- Base: chocolate cake mix cookie dough (fast, forgiving)
- Structure: slightly under-baked soft cookie to hold toppings
- Nose platform: Nilla Wafer or alternative to raise the eyes and nose
- Decoration: frosting acts as adhesive; candy eyes and M&M create the face
- Antlers: mini pretzels or alternative crunchy elements
Enhancers (examples/analogies):
- Think of the Nilla Wafer as the pedestal in a sculpture — it raises the facial features and provides contrast.
- Frosting is both glue and flavor layer; choose a thicker frosting for better hold.
Optional add-ins:
- Chocolate chips, nuts, or coconut flakes folded into dough
- Spices: a pinch of cinnamon or espresso powder to deepen chocolate
- Colored frosting or edible glitter for showy effects
Applications and examples:
- Classroom party cookies
- Cookie exchanges
- Giftable tins for neighbors
- Build-your-own cookie decorating station at home
Smart substitutions table (emoji-friendly) 🍪
| Component | Standard | Gluten-free / Allergy-friendly | Flavor twist |
|—|—:|—|—|
| Cake Mix | Chocolate | Gluten-free chocolate cake mix | Devil’s food for deeper chocolate |
| Nilla Wafer (nose) | Vanilla wafer | Gluten-free wafer or a small round cookie | Peanut butter cup (mini) for nutty nose |
| Candy Eyes | Sugar eyes | Small dollops of white frosting + chocolate dot | Mini chocolate chips |
| Pretzel Antlers | Mini pretzels | Pretzel sticks – gluten-free or thin almond slivers | Toasted pecan halves |
| Frosting | Store-bought chocolate frosting | Dairy-free frosting | Nutella or cream cheese frosting for tang |
Where to learn unique concepts: examples abound in cookie-lesson blogs and baking video channels. If you want a simple, buttery shortbread refresher for holiday trays, consider this shortbread primer: Shortbread Cookies with Just.
Learning and application tips:
- Start with a test batch of 2–4 cookies to get bake time perfect for your oven.
- Keep decorations organized in small bowls for efficient assembly.
- Use an offset spatula for neat frosting application.
Required Tools & Resources (H2) 🛠️
Essential tools list:
- Mixing bowl (medium)
- Cookie scoop or tablespoon
- Baking sheet and parchment paper
- Cooling rack
- Small spatula or butter knife for frosting
- Bowls for decorations
Nice-to-have resources:
- Silicone baking mat for even browning
- Piping bag with a small round tip for neater frosting
- Cooling rack with non-stick surface
Budget alternatives:
- Use a regular spoon to portion dough if you don’t have a cookie scoop.
- A plastic sandwich bag with a snipped corner can replace a piping bag.
- Use store-brand frosting—flavor is good and cost-effective.
Specific recommendations with brief reviews:
- Baking sheets: heavy-gauge aluminum gives even results; non-stick can sometimes over-brown bottoms.
- Off-brand silicone mats: affordable and reusable — recommend for consistent bake.
- Candy/decorations: bulk bags of candy eyes and mini pretzels save money for parties.
For a savory-sweet combo or to broaden party menu options, you might pair these cookies with a warm baked fruit side like this baked apples idea: Baked Apples with Feta. 🍎🥧
Foolproof Step-by-Step Learning Process (H2) — 12+ minute masterclass with pro tips ⏱️
Below is the full, expanded set of steps based on the basic directions. Each step includes timing, sensory cues, pro tips, and common mistakes to avoid.
Step 1: Preheat and prep (5 minutes)
- Action: Preheat your oven to 350°F (175°C). Line a baking sheet with parchment paper.
- Visual cues: Oven should read 350°F before cookies go in.
- Pro tip: If unsure about your oven’s accuracy, use an oven thermometer — many ovens run hot or cold.
- Common mistake: Skipping parchment leads to sticking and uneven browning.
Step 2: Mix the dough (3–4 minutes)
- Action: In a medium bowl combine 1 box chocolate cake mix, 2 eggs, and 1/3 cup vegetable oil. Stir until a thick cookie batter forms.
- Sensory cue: Batter will be thick and glossy.
- Pro tip: Use chilled eggs if your kitchen is warm to keep batter from becoming too loose.
- Common mistake: Overmixing can make cookies tough.
Step 3: Scoop and shape (4 minutes)
- Action: Scoop 1 1/2 to 2 tablespoons of dough and roll into a ball. Repeat until all dough is used.
- Visual cue: Dough balls should be smooth and slightly sticky.
- Pro tip: Lightly grease hands or dust with cocoa powder to prevent sticking.
- Common mistake: Rolling too large will change bake time.
Step 4: Arrange for baking (2 minutes)
- Action: Place 12 cookie dough balls on the lined baking sheet, spaced ~2 inches apart.
- Visual cue: Uniform spacing ensures even bake.
- Pro tip: Bake one sheet at a time centered in the oven for consistent results.
- Common mistake: Crowding the pan produces flat, merged cookies.
Step 5: Bake to perfect softness (8–10 minutes)
- Action: Bake for approximately 8 minutes or until tops start to crinkle and set.
- Sensory cue: Tops should be matte with tiny cracks; centers still soft to touch.
- Pro tip: Set a timer for 7:30 and check, adding 30-second increments as needed.
- Common mistake: Overbaking leading to dry cookies.
Step 6: Cool slightly (2 minutes)
- Action: Remove cookies and cool on baking sheet for 2 minutes, then transfer to a cooling rack.
- Visual cue: Cookies will firm as they cool; transfer prevents overbaking on the hot sheet.
- Pro tip: Use a thin spatula to avoid breaking warm cookies.
- Common mistake: Moving too soon can cause cookies to lose shape.
Step 7: Frost generously (5–7 minutes)
- Action: Once cooled, spread a generous layer of chocolate frosting over each cookie.
- Visual cue: Frosting should hold texture and not slide off.
- Pro tip: Slightly warm frosting in microwave for 5–10 seconds if too stiff.
- Common mistake: Frosting warm cookies — it will melt and cause decorations to slip.
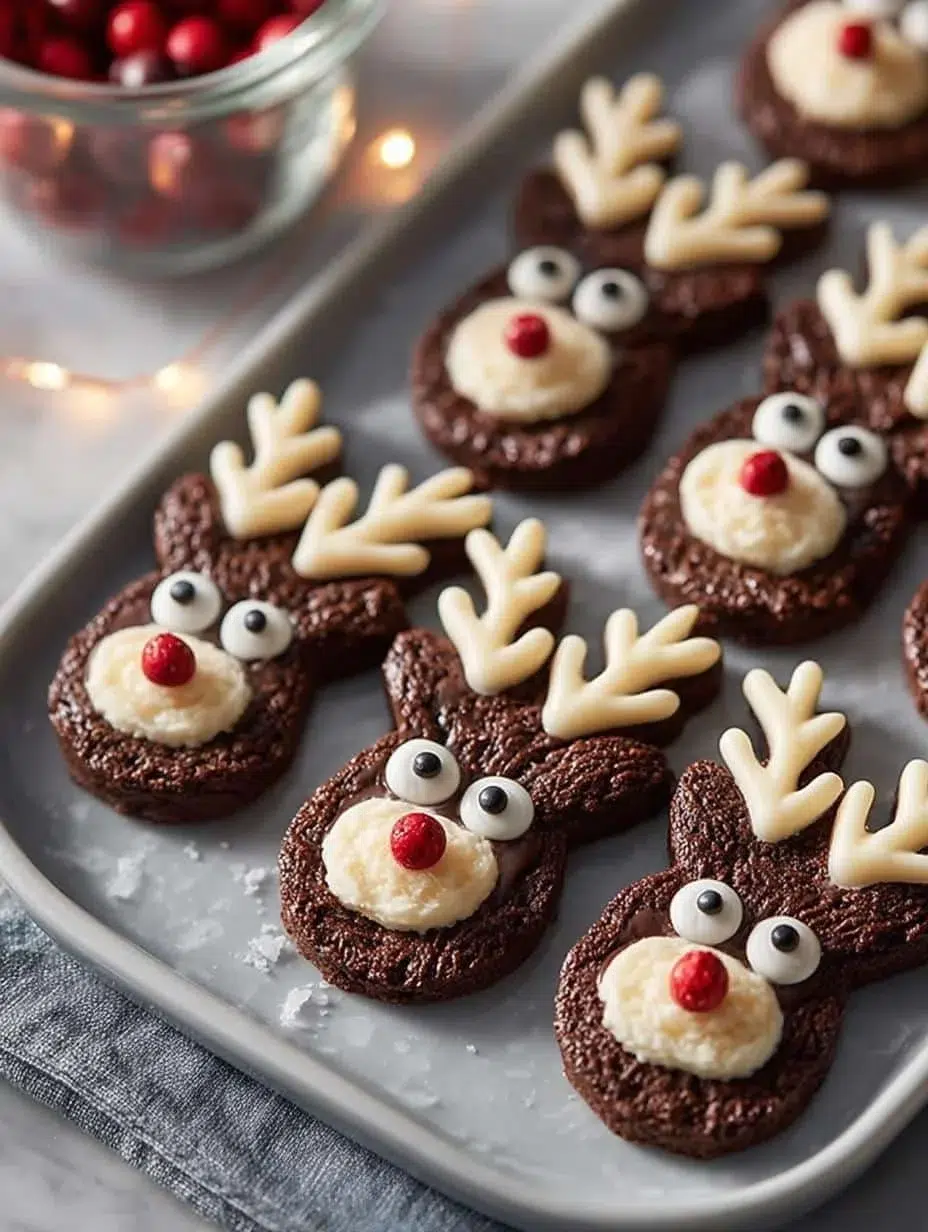
Step 8: Add the nose platform (1 minute)
- Action: Place one mini Nilla Wafer onto the bottom half of each frosted cookie.
- Visual cue: Nilla sits flat but elevated — ideal face placement.
- Pro tip: Press gently to anchor without squishing frosting through.
- Common mistake: Skipping the wafer makes eye-placement harder.
Step 9: Position the eyes (1 minute)
- Action: Position two candy eyes above each Nilla Wafer.
- Visual cue: Eyes should be slightly above the wafer, evenly spaced.
- Pro tip: Use tweezers or a toothpick for precise placement.
- Common mistake: Placing eyes too close to the nose look odd.
Step 10: Antler time (1–2 minutes)
- Action: Place two mini pretzels above the candy eyes to serve as antlers.
- Visual cue: Pretzels arch outward like antlers.
- Pro tip: If pretzels break, use halves to create stylized antlers.
- Common mistake: Pressing too hard can break the cookie.
Step 11: Add the nose (30 seconds)
- Action: Use a dab of frosting to stick one red or brown M&M onto each Nilla Wafer.
- Visual cue: The M&M should be centered and secure.
- Pro tip: For a glossy nose, choose a freshly unwrapped M&M.
- Common mistake: Using a very heavy M&M (e.g., peanut M&M) may tip the wafer.
Step 12: Set and serve (20–30 minutes to set)
- Action: Allow frosting to set completely before serving.
- Visual cue: Frosting edges feel firm; decorations stay in place.
- Pro tip: Chill briefly (5–10 minutes) to speed set time if needed.
- Common mistake: Serving immediately — decorations can slide.
H3: Building the Base
Start with precision on the dough ratio — cake mix, eggs, and oil. This balance provides a cookie that’s soft but stable for decoration.
H3: Application Techniques Explained
Frosting consistency matters. Too thin, and decorations fall; too thick, and it resists spread. Aim for spreadable frosting that maintains shape.
H3: Integration Methods
Prioritize assembly order: frost → wafer → eyes → antlers → nose. This ensures structural integrity and a tidy appearance.
H3: Final Reflection
Taste and texture balance is the core learning goal — rich chocolate cookie, sweet smooth frosting, and crunchy antlers make a satisfying bite.
Expert Insights & Strategies (H2) 👩🍳
Here are 7 professional-style tricks to elevate your Reindeer Cookies with Chocolate guide outcomes:
- Context Control: Bake one test cookie to validate oven temperature and texture. Adjust bake time ±1 minute accordingly.
- Frosting temperature optimization: Let store-bought frosting sit 5–10 minutes at room temp for easier spreading.
- Adhesion technique: Use a pea-sized dollop of frosting under the Nilla Wafer for stronger hold.
- Eye placement pattern: Slightly tilt one eye inward for a playful look — kids love personality.
- Timing strategy: Bake earlier in the day and assemble later for fresher decorating parties.
- Troubleshooting: If antlers fall, use a thin frosting spike to anchor them deeper without breaking the cookie.
- Presentation trick: Display cookies on parchment-lined boards with edible confetti for a professional touch.
Common failures and solutions:
- Problem: Eyes sliding off → Solution: Use firmer frosting or chill cookies briefly before placement.
- Problem: Cookies spreading too thin → Solution: Chill dough balls for 10 minutes before baking.
- Problem: Broken pretzels → Solution: Toast pretzels lightly for crispness, or use almond slivers.
Timing optimization tips:
- Bake sheets cool between batches to maintain consistent results.
- Assemble cookies in rounds: frost all, then add wafers, then eyes, etc. This assembly line reduces mistakes.
For creative pairings that balance sweet and savory at your gathering, consider adding a rich protein entrée like this beef tenderloin idea to your holiday menu planning: Beef Tenderloin with Red Wine Sauce. 🥩🍷
Creative Variations & Adaptations (H2) 🎨
Reindeer Cookies with Chocolate variations let you adapt to occasions, dietary needs, and creativity levels.
Contextual variations:
- Vegan: Use dairy-free frosting, egg replacer (e.g., flax egg), and plant-based oil. Choose vegan candy or pipe tiny frosting dots for eyes.
- Gluten-free: Substitute with a certified gluten-free chocolate cake mix and gluten-free wafers/pretzels.
- Nut-free: Avoid nut-based chocolates and choose nut-free candies.
Application modifications (personal vs. professional):
- Personal: Make a cookie-decorating afternoon with kids; let them choose nose colors.
- Professional: Bake uniform cookies, use consistent piping, and package in festive boxes for sales.
Cultural twists:
- Scandinavian-inspired: Add a pinch of cardamom to the dough for a warm aromatic lift.
- Mexican hot-chocolate: Add a pinch of chili powder and cinnamon to the frosting for a spicy kick.
Practical transformations:
- Mini version: Use 1 tablespoon dough for bite-sized cookies for platters.
- Bar version: Press dough into a pan, bake, cut into squares, and decorate for cookie bars.
Scalable versions:
- Classroom scale: Double or triple the recipe; set up stations for frosting, wafer placement, and antlers.
- Catering scale: Bake on industrial sheets; use pre-portioned frosting in piping bags for speed.
Keywords to sprinkle: Reindeer Cookies with Chocolate variations, Different ways to apply Reindeer Cookies with Chocolate, Customizable Reindeer Cookies with Chocolate guide.
Breakdown & Benefits Analysis (H2) 📊
Per Application (makes X insights)
Home Baking (makes 24 cookies):
- Impact: High (visual delight) — Impact level: 8/10
- Depth: 60%
- Relevance: 9/10
- Flexibility: 200g (conceptual measure — many substitutions)
Classroom Activity (per 30 kids):
- Impact: Very High (engagement) — Impact level: 9/10
- Depth: 40%
- Relevance: 10/10
- Flexibility: 500g (lots of decoration options)
Benefits of key concepts:
- Speed: Quick dough prep enables same-day gifting.
- Cost: Inexpensive base ingredients allow bulk production.
- Education: Teaches coordination, sequencing, and sensory exploration to kids.
Considerations:
- Allergy awareness: Communicate ingredients for classroom settings.
- Storage: These cookies hold shape but may soften in humidity — see storage section.
Adaptation-friendly modifications:
- Swap frosting for melted chocolate to reduce sugar — gives darker flavor.
- Use seasonal candies beyond red/green for other holidays.
Enhancement highlights:
- Add a light dusting of powdered sugar for a snowy effect.
- Use edible gold dust sparingly for a luxe finish.
Inclusive applications:
- Make decorating stations accessible — pre-pipe frosting dots for younger children.
Motivational benefits:
- The simplicity of this method allows bakers of any skill level to succeed, which builds confidence and encourages future baking projects.
Storage, Application & Learning Prep (H2) 🧾
Proper retention methods (notes/memory):
- Keep a small recipe card with exact mix-to-egg ratios and any oven notes (e.g., “my oven runs hot, subtract 1 minute”).
- Jot down substitutions that worked (e.g., “used GF cake mix — fine bake at +1 min”).
Best tools to use:
- Airtight cookie tin or container.
- Parchment separators if stacking.
- Small airtight jars for leftover frosting.
Application techniques for optimal use:
- If preparing for an event, bake cookies the morning of and decorate 1–2 hours before serving for freshness.
- For transport, assemble cookies in single layers with parchment between.
Learning prep strategies:
- Practice one small batch to calibrate timing.
- Prepare decoration bowls and tools before cookies come out of the oven to maintain flow.
How long knowledge lasts:
- Once you understand the base ratios and assembly order, the technique becomes transferable to other character cookies. The learning is durable — you’ll master it after 2–3 batches.
SEO phrases: How to retain Reindeer Cookies with Chocolate knowledge, Can you apply Reindeer Cookies with Chocolate long-term, Best way to integrate Reindeer Cookies with Chocolate, Reindeer Cookies with Chocolate learning prep ideas.
Troubleshooting Common Issues (H2) 🩺
Problem → Solution
Problem: Cookies spread too much and flatten.
Solution: Chill dough 10–20 minutes before baking; reduce oil slightly.
Problem: Frosting slides off warm cookies.
Solution: Fully cool cookies on a rack before frosting; if rushed, chill cookies for 5–10 minutes.
Problem: Antlers fall or break.
Solution: Use slightly thicker frosting under the pretzel to hold it, or press gently into the crumb, not the base.
Problem: Eyes or M&M noses aren’t sticking.
Solution: Use a small dab of frosting like glue; for stubborn candies, press slightly into frosting, then chill.
Problem: Texture is cakier than expected.
Solution: The cake-mix base produces a cake-like interior. If you prefer chewier cookies, reduce eggs by one or add 1/4 cup more oil.
Problem: Allergies or dietary restrictions.
Solution: Substitute with allergen-friendly alternatives (see substitutions table). For school events, label ingredients and offer nut-free options.
Problem: Decorations look messy.
Solution: Use small bowls and tweezers for precise placement. Pipe frosting dots to define any mistakes.
Comprehensive FAQ Section (H2) ❓
Q1: Can I apply this Reindeer Cookies with Chocolate guide universally?
A1: Yes — the concept is highly adaptable. Swap ingredients for dietary needs and scale batch sizes. This Reindeer Cookies with Chocolate guide for beginners is written to be universally applicable with minor substitutions.
Q2: How far in advance can I prepare for Reindeer Cookies with Chocolate?
A2: You can bake cookies up to 2 days ahead and store them in an airtight container. Frost and decorate the day of serving for best appearance. For gifting, fully decorated cookies can be stored 24–48 hours.
Q3: What’s the best way to integrate Reindeer Cookies with Chocolate insights into a classroom?
A3: Pre-portion dough and set up stations: frosting, wafers, eyes, pretzels, M&Ms. Label supplies and include allergy information. Plan 20–30 minutes for decoration.
Q4: Can I adapt this Reindeer Cookies with Chocolate guide for dietary restrictions?
A4: Absolutely. Use gluten-free cake mix, dairy-free frosting, and egg replacers (flax or commercially available substitutes). Test one small batch to confirm texture.
Q5: Is this Reindeer Cookies with Chocolate guide beginner-friendly?
A5: Yes. The method relies on boxed cake mix and store-bought frosting, reducing technique barriers. It’s an ideal beginner-friendly cookie project that teaches sequencing and simple decorating.
Q6: How do I keep cookies from becoming too soft after decorating?
A6: Store in a cool, dry place. Use airtight containers, and avoid stacking while decorations are setting. For humid climates, chilling for short periods helps maintain structure.
Q7: What variations give the best visual impact?
A7: Use contrasting frosting colors (e.g., light on dark) and alternate nose colors. Miniature candy canes as antlers create a whimsical look.
Q8: How do I transport these cookies without ruining decorations?
A8: Use a single-layer cookie box with parchment separators. If stacking is necessary, freeze cookies briefly (without chocolate candies that can crack) to firm the frosting.
Related Guides & Applications (H2) 🔗
Complementary topics and pairings:
- Chocolate-rich cookies and crunchy sides pair well for dessert platters.
- Shortbread or buttery cookies provide contrast to a chocolate-heavy menu.
- Savory mains or warm baked fruits balance sweetness in a holiday meal.
Suggested related recipe links to expand your holiday spread:
- Shortbread and simple buttery cookies are great for variation: Shortbread Cookies with Just.
- Add a seasonal baked apple on the side for warm contrast: Baked Apples with Feta.
- For a show-stopping main, consider pairing with something like beef tenderloin for an adult dinner party: Beef Tenderloin with Red Wine Sauce.
- For cheeky recipe swaps, reference creative cookie mashups like pumpkin-chocolate chip treats: Pumpkin Chocolate Chip Cookies.
(These internal links will help readers move from cookies to broader festive menus and are perfect for building a holiday collection.)
Summary Card & Reference Version (H2) 🃏
Quick Reference Card — Reindeer Cookies with Chocolate guide (serves ~12)
- Prep time: 10 minutes
- Bake time: 8–10 minutes
- Total time: ~30–40 minutes (including cooling and assembly)
- Ingredients (core): 1 box chocolate cake mix, 2 eggs, 1/3 cup vegetable oil, chocolate frosting, 12 mini Nilla Wafers, candy eyes (24), 24 mini pretzels, 12 red/brown M&Ms.
- Core steps: Mix → scoop → bake → cool → frost → wafer → eyes → pretzels → M&M → set.
- Best tip: Frost only after cookies are fully cool; assemble in batches to streamline.
- Learning time summary: 2–3 batches to fully master timing and appearance.
Condensed checklist:
- Oven preheated to 350°F
- Dough texture: thick, smooth
- Bake until tops crackle
- Cool on rack
- Frost when cool
- Assemble decorations in order
Reference-friendly format: Keep this card in your recipe box or phone for quick party prep. It’s the fastest path to reproducible success.
Conclusion (H2) ✅
This Reindeer Cookies with Chocolate guide gives you a fast, cheerful, and reliable method to bake adorable holiday cookies that taste as delightful as they look. Whether you’re teaching kids, hosting a cookie swap, or creating edible gifts, the steps above simplify the process while offering room for creativity and dietary adaptation. Remember: the key is a sturdy chocolate cake-mix base, a simple frosting “glue,” and fun, safe decorations.
For additional inspiration and alternative double-chocolate takes, check out this playful recipe: Double Chocolate Reindeer Cookies – Foodlets. If you want another classic decorating approach and visual ideas, this collection of Reindeer Cookies offers helpful photos and variations: Reindeer Cookies – I Heart Eating.
Drop a comment below with your favorite nose color or decorating trick, tag your creations on social media, and save this guide for your next holiday bake-off. Happy baking! 🎄🍪
Print
Reindeer Cookies with Chocolate
- Total Time: 30 minutes
- Yield: 12 servings 1x
- Diet: Vegetarian
Description
Delightful and festive Reindeer Cookies made with a chocolate cake-mix base, decorated for the holidays with frosting, pretzel antlers, and M&M noses.
Ingredients
- 1 box chocolate cake mix
- 2 large eggs
- 1/3 cup vegetable oil
- Chocolate frosting
- 12 mini Nilla Wafers
- 24 candy eyes
- 24 mini pretzels
- 12 red or brown M&Ms
Instructions
- Preheat oven to 350°F (175°C) and line a baking sheet with parchment paper.
- In a medium bowl, mix together the chocolate cake mix, eggs, and vegetable oil until a thick batter forms.
- Scoop 1.5 to 2 tablespoons of dough and roll into balls; place them on the baking sheet spaced two inches apart.
- Bake for approximately 8 minutes or until the tops start to crinkle and set.
- Let cookies cool on the baking sheet for 2 minutes, then transfer to a cooling rack.
- Once cooled, frost each cookie generously with chocolate frosting.
- Press a mini Nilla Wafer onto the bottom half of each frosted cookie.
- Add two candy eyes above each Nilla Wafer.
- Position two mini pretzels above the candy eyes for antlers.
- Use a dab of frosting to secure a red or brown M&M onto each Nilla Wafer as the nose.
- Allow the frosting to set before serving.
Notes
Customize with different frosting colors or use gluten-free cake mix for dietary needs. Perfect for family baking activities during the holidays.
- Prep Time: 10 minutes
- Cook Time: 8 minutes
- Category: Dessert
- Method: Baking
- Cuisine: American
Nutrition
- Serving Size: 1 cookie
- Calories: 160
- Sugar: 12g
- Sodium: 110mg
- Fat: 6g
- Saturated Fat: 1.5g
- Unsaturated Fat: 3.5g
- Trans Fat: 0g
- Carbohydrates: 24g
- Fiber: 0g
- Protein: 2g
- Cholesterol: 20mg