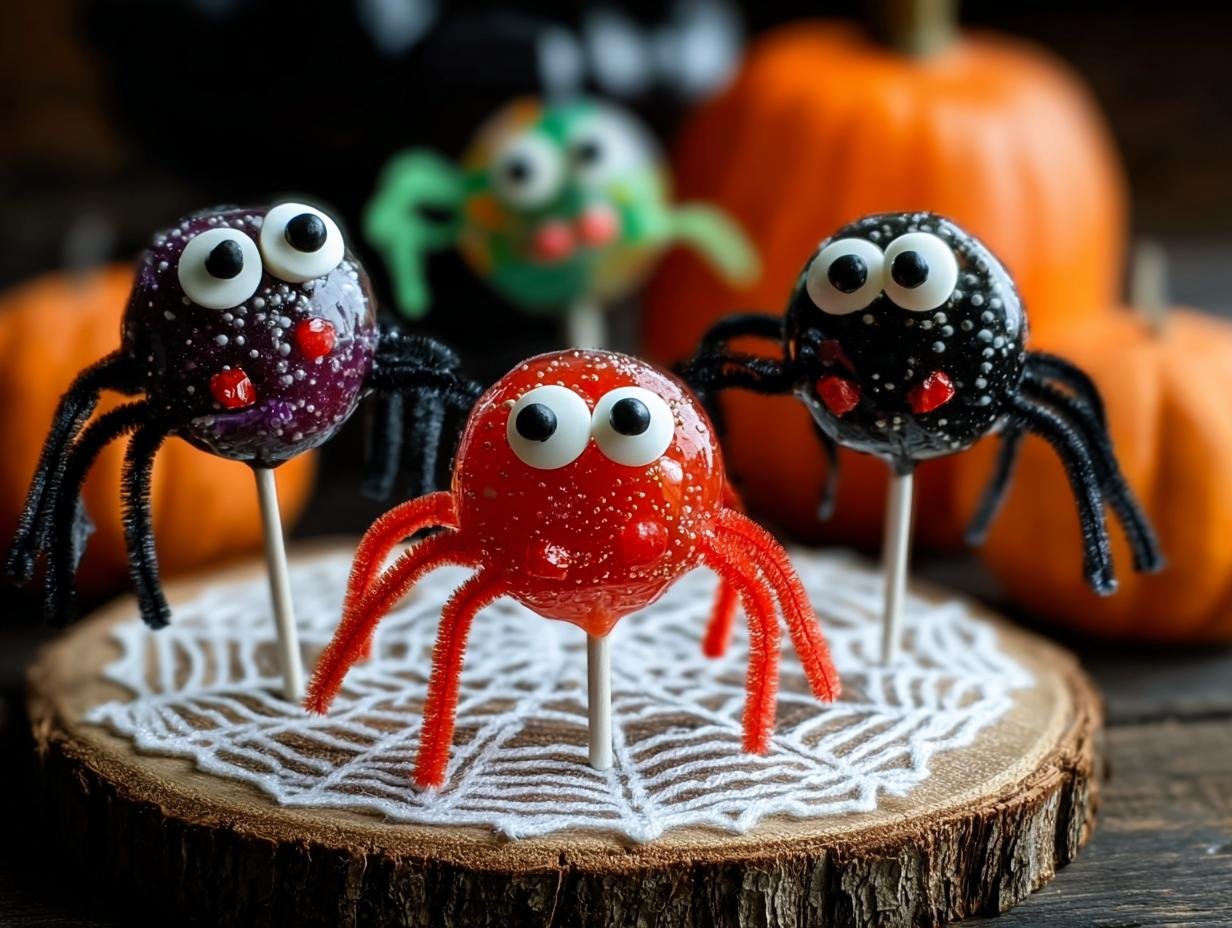
Spider lollipops are an absolute Halloween must-have! I remember the first time I saw these little creepy crawly creations at a school party years ago; my eyes lit up with delight. They looked so fun and spooky, and thankfully, they turned out to be incredibly easy to make! This simple craft transforms ordinary candy into festive Halloween spider treats that kids adore. Get ready to impress your little monsters with these adorable DIY spider lollipops. Let’s get crafting!
Why You’ll Love These Spider Lollipops
These aren’t just any treats; they’re little bundles of Halloween joy! You’ll absolutely adore how simple these are to assemble, making them perfect for a quick craft session with the kids. They’re incredibly budget-friendly, too, turning basic candy into something magical without breaking the bank. Plus, they’re a huge hit at parties, serving as fantastic Halloween party spider favors that kids will be excited to take home. Get ready for smiles and giggles with these delightful spider candy creations. These spider sweets are guaranteed to be a crowd-pleaser!
- Super fun and engaging for kids of all ages.
- Incredibly easy to assemble, even for little hands.
- Perfectly budget-friendly for a festive Halloween touch.
- Great for classroom parties and trick-or-treat goodie bags.
- Transforms ordinary lollipops into spooky characters.
- Minimal mess and easy cleanup.
- Encourages creativity with optional decorations.
Ingredients for DIY Spider Lollipops
Gathering your spider lollipop ingredients is a breeze, and you probably have most of them already! This recipe is all about transforming simple candies into spooky delights. Here’s what you’ll need:
- 12-24 wrapped lollipops – I love using Tootsie Pops or Dum Dums because their shape works well, but any round, hard candy lollipop will do. Ensure they are individually wrapped for safety and hygiene.
- 12-24 black pipe cleaners – You’ll need 4 pipe cleaners per lollipop to create 8 legs. These fuzzy stems are perfect for making realistic-looking spider legs.
- 1 small bag of googly eyes – These are essential for giving your spiders their creepy-crawly personality! Small ones work best so they don’t overwhelm the candy.
- Hot glue gun or craft glue – A hot glue gun is quick and effective for attaching the eyes, but regular craft glue works too if you’re crafting with younger kids (just allow extra drying time).
- Optional: Mini bows, stickers, or glitter glue – These are for adding extra flair and making your edible spider decorations even more unique.
How to Make Spider Lollipops
Let’s dive into this super fun how to make spider lollipops tutorial! This easy spider lollipop recipe is more of a craft than a bake, and it’s perfect for getting kids involved in Halloween prep. You’ll be amazed at how quickly you can transform simple candies into spooky little characters. The process is straightforward, with just a few simple steps. Get ready to unleash your inner crafter and create a whole army of creepy crawly cuties!
Step-by-Step Crafting Process
Preparing the Spider Legs
- Step 1: Grab your black pipe cleaners. For each lollipop, you’ll need four full pipe cleaners.
- Step 2: Carefully cut each of the four pipe cleaners in half. This will give you eight smaller pieces, which will become the spider’s legs.
- Step 3: Take two of the cut pipe cleaner halves and twist them together in the middle. Do the same with the other two halves. You should now have two doubled-up pipe cleaner pieces.
- Step 4: Twist these two doubled-up pieces together in the middle. This creates a sturdy base for your spider’s legs.
Attaching the Legs
- Step 5: Take your wrapped lollipop and your prepared pipe cleaner leg base.
- Step 6: Tightly twist the center of the pipe cleaner legs around the lollipop stick, as close to the candy base as possible. This secures the legs in place.
- Step 7: Gently bend the eight pipe cleaner legs outward, spacing them evenly around the lollipop stick. Aim for a natural, sprawling spider look. Don’t worry if they aren’t perfectly symmetrical; spiders aren’t!
Adding the Eyes and Decorations
- Step 8: Now for the personality! Grab your googly eyes and your hot glue gun (or craft glue).
- Step 9: Apply a small dot of glue to the back of two googly eyes.
- Step 10: Carefully press the glued eyes onto the front of the lollipop candy. Hold them in place for a few seconds until the glue sets. You now have a face!
- Step 11: (Optional) Get creative! You can add tiny bows to the legs, use glitter glue to add some sparkle, or stick on tiny paper shapes for extra flair. This is where your spider sweets really come to life.
- Step 12: Let all the glue dry completely. This is crucial before handling or packaging your adorable spider candy. Your finished spider-shaped lollipops are ready to spook!
Pro Tips for the Best Spider Candy
Want to make your spider sweets truly spectacular? I’ve learned a few tricks over the years that make these little guys even better. Following these tips will ensure your creations are not only cute but also durable and impressive. Let’s make your spider lollipops the star of the show!
- Always use craft glue for attaching eyes if kids are helping; it’s safer and still effective.
- Pre-cut your pipe cleaners and have googly eyes ready before you start, making the process smoother.
- Twist legs tightly around the stick to prevent them from sliding down.
- Let glue dry completely before moving or packaging your spiders.
What’s the secret to perfect spider-shaped lollipops?
The key is a secure attachment! Twist the pipe cleaners firmly around the lollipop stick, right at the base of the candy. For the eyes, a tiny dab of hot glue ensures they stay put, preventing any premature creepy-crawly escapes.
Can I make these spider sweets ahead of time?
Absolutely! These spider sweets are perfect for making in advance. You can assemble them a week or two before Halloween and store them in airtight containers or cellophane bags to keep them fresh and dust-free.
How do I avoid common mistakes with spider lollipops?
A common pitfall is not letting the glue dry completely, leading to wobbly legs or eyes. Another is not twisting the pipe cleaners tightly enough. Ensure a good, firm twist around the stick so those legs stay put!
Best Ways to Serve Your Halloween Spider Treats
Once your army of creepy crawlies is ready, it’s time to show them off! These Halloween spider treats are incredibly versatile. Imagine them nestled in a candy bowl at your Halloween party, each one a tiny, edible decoration. They also make fantastic Halloween party spider favors; simply pop each one into a small cellophane bag, tie it with a festive ribbon, and hand them out as guests depart. For an extra spooky touch, arrange them on a platter alongside other Halloween goodies like ghost cookies or pumpkin cupcakes. Your guests will be delighted by these fun and festive spider-shaped lollipops!
Variations of Spider Lollipops You Can Try
Don’t feel limited to just black pipe cleaners and plain lollipops! These DIY spider lollipops are a fantastic canvas for creativity. You can easily switch up the look to match your party theme or just for fun. I love experimenting with different bases to see what new spider candy characters emerge. Let’s explore some fun twists on these spooky spider candy recipes!
- Rainbow Legs: Instead of black pipe cleaners, try using multiple colors! You can use one color for each leg, or twist together two different colors for striped spider legs. This adds a vibrant pop to your spider sweets.
- Different Lollipop Bases: While round lollipops are classic, don’t hesitate to try others. Swirl lollipops can look like psychedelic spiders, and even Tootsie Roll pops offer a different texture and shape for your creepy crawly lollipops.
- Glitter & Sparkle: For truly dazzling edible spider decorations, add a touch of glitter glue directly onto the candy or pipe cleaner legs before they dry. A fine glitter glue can make your spiders shimmer under party lights!
- Themed Spiders: Match your spiders to your party theme! Use pink pipe cleaners and tiny bows for “girly” spiders, or add tiny paper hats for festive occasions.
Frequently Asked Questions About Spider Lollipops
What are spider lollipops?
Spider lollipops are a fun, crafty treat where ordinary wrapped lollipops are transformed into spooky spider characters using simple craft supplies like pipe cleaners and googly eyes. They’re a popular choice for Halloween because they’re inexpensive, easy to make, and visually appealing, making them a hit with both kids and adults looking for festive Halloween treats.
Are these spider sweets safe for young children to make?
Yes, with adult supervision! While the pipe cleaners are generally safe, a hot glue gun requires careful handling. For younger crafters, I recommend using craft glue instead of hot glue for attaching the eyes and any decorations. Always ensure you use pre-wrapped lollipops for hygiene and safety, and craft these spider sweets together for a fun bonding activity.
What are some creative spider lollipop ideas for kids?
There are so many fun spider lollipop ideas for kids! Beyond the classic black pipe cleaner legs, you can use colorful pipe cleaners to create rainbow spiders or even striped ones. Let kids decorate their spider-shaped lollipops with glitter glue, tiny stickers, or even small paper hats for a festive touch. You can also try using different flavored or colored lollipops as the base for unique edible spider decorations.
How do I store my finished spider candy?
Once your adorable spider candy creations are completely dry, it’s best to store them in individual cellophane bags, tied with a festive ribbon or twist tie. This keeps them clean and prevents the pipe cleaners or eyes from getting snagged. You can then arrange them in a basket or box. They’ll stay fresh and spooky for a couple of weeks, making them perfect for Halloween party favors or stocking up for trick-or-treaters.
Print
Spider Lollipops: 12 Easy Spooky Halloween Treats
- Total Time: 15–20 minutes per dozen
- Yield: 12–24 lollipops
- Diet: Vegetarian
Description
Create fun and festive spider lollipops for Halloween. This easy DIY craft transforms ordinary candy into spooky, kid-friendly treats perfect for parties or trick-or-treating.
Ingredients
- Wrapped lollipops (e.g., Tootsie Pops, Dum Dums)
- Black pipe cleaners (4 per lollipop for 8 legs)
- Small googly eyes
- Hot glue gun or craft glue
- Optional: Mini bows, stickers, glitter glue for decoration
Instructions
- Cut each pipe cleaner in half to create 8 spider legs per lollipop.
- Twist the pipe cleaner legs tightly around the lollipop stick, near the base of the candy.
- Bend the pipe cleaners outward to resemble spider legs.
- Glue two small googly eyes onto the front of the candy. Allow to dry.
- Add optional decorations like mini bows, stickers, or glitter glue for extra flair.
- Let all glue dry completely before packaging or displaying your spider candy.
- Repeat for all lollipops to create your army of spider sweets.
Notes
- Use craft glue instead of hot glue for younger children.
- Always use pre-wrapped lollipops for safety.
- Pre-cut pipe cleaners for easier crafting with kids.
- Customize with different colored pipe cleaners for themed spider treats.
- Store finished spider lollipops in cellophane bags tied with ribbon.
- Prep Time: 5 minutes per lollipop
- Cook Time: 0 minutes
- Category: Halloween, DIY Treats, Kids Party
- Method: Craft
- Cuisine: American
Nutrition
- Serving Size: 1 lollipop