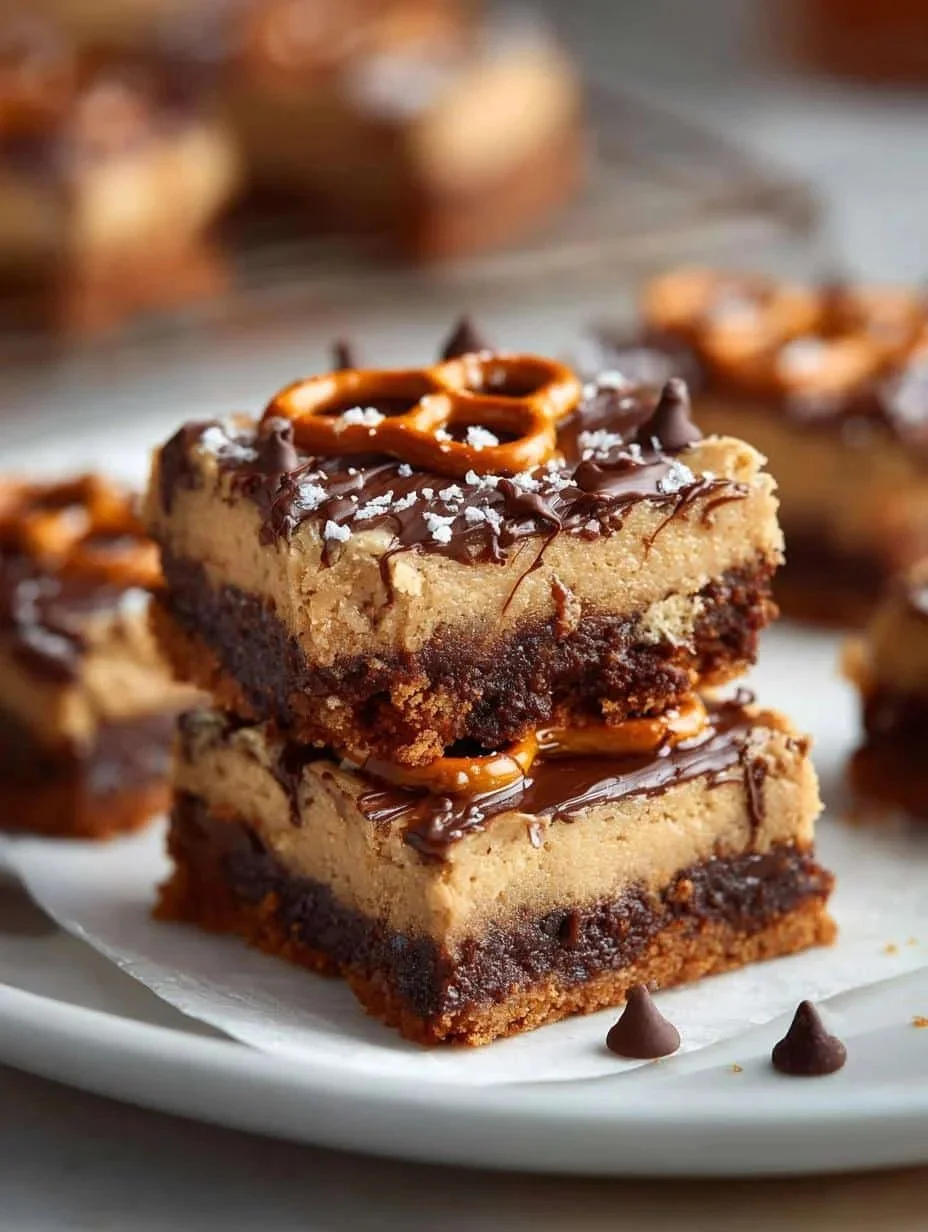
Kitchen Sink Cookie Bars guide: Your Foolproof, Irresistible Pan of Sweet & Salty Magic
You’ll absolutely love this Kitchen Sink Cookie Bars guide — it’s the easiest, most game-changing way to bake a crowd-pleasing tray of gooey, crunchy, salty-sweet bars in under 30 minutes of hands-on time. Whether you’re rescuing a potluck, feeding a hectic family, or simply craving a mood-lifting treat, this guide delivers quick, reliable results with pantry-friendly ingredients and endless customization. Ready for a recipe that’s indulgent, forgiving, and endlessly adaptable? In the next few minutes you’ll learn clear steps, smart substitutions, professional tips, and creative variations so you can master Kitchen Sink Cookie Bars at home — even if you’ve never baked more than toast before. Peek ahead to find pro troubleshooting, storage advice, and a compact reference card you can save or print. Let’s get baking and make something truly irresistible. 🍫🥨✨
(For a fun riff on layered tray bars that inspired many home bakers, see this Magic Cookie Bars.)
Attributes Origin & Cultural Context (H2) 🥧
Kitchen sink desserts have a delightful cultural backstory: they evolved from postwar, no-fuss baking where cooks used every available scrap from the pantry — nuts, chocolate, leftover candies, and sometimes salty bits. The name “kitchen sink” nods to the “everything but the kitchen sink” approach. Over decades, these bars became a staple of potlucks, school bake sales, and family gatherings because they’re forgiving, scalable, and crowd-pleasing.
My family’s version began with a Saturday afternoon experiment when I was a kid — we emptied a candy jar and a snack drawer into a cookie dough base and pressed it into a pan. The result was a choc-chip, pretzel-and-caramel mosaic that disappeared before the tea was steeped. That memory taught me the power of texture contrast: chewy dough, crunchy pretzels, melty chocolate, and sticky caramel all in one bite.
Regional variations abound. In the American South you’ll find pecans and white chocolate, while coastal bakers might add sea-salted toffee or macadamia nuts. Urban home bakers sometimes fold in unique elements like Biscoff crumbs or cookie butter swirls; for inspiration see this riff on Biscoff in brownies at Biscoff Brownies with Cookie. What makes this version special is its balance — not too sweet, clear texture contrasts, and a base method that teaches you how to build flavor intentionally.
Why This Kitchen Sink Cookie Bars Guide is a Game-Changer (H2) ⚡
This Kitchen Sink Cookie Bars guide is designed to get you from pantry to perfect squares with minimal fuss. Here’s why it will change the way you bake these bars:
Lightning Fast: The method is streamlined so you can go from measuring to oven in about 15-20 minutes. That means last-minute party saves and quick baking therapy. This is the best Kitchen Sink Cookie Bars guide for beginners who want fast wins.
Budget-Friendly: Most ingredients are staples — flour, sugar, butter, eggs, chocolate chips. Swapping pricey add-ins with pantry alternatives (see substitutions below) keeps costs low without sacrificing texture. If you’re feeding a crowd, these stretch far.
Family Approved: The textures and flavors appeal across ages. Little hands love folding in mix-ins, while adults appreciate strategic salt-sweet balance. These bars make a great activity and treat rolled into one.
Nutritionally Satisfying (in moderation): Combining protein-rich nuts or whole-grain mix-ins and choosing dark chocolate can make these feel more balanced. Baking and sharing also deliver social and emotional benefits — an easy mood lift backed by simple culinary therapy.
Infinitely Customizable: This is a method more than a rigid recipe. Swap mix-ins, change the salt level, or bake in different pans to get fudgier or chewier results. “How to understand Kitchen Sink Cookie Bars at home easily” becomes a matter of mastering the base and knowing when to tweak.
Pantry-Friendly: No specialty runs required. Most kitchens already have everything needed. That pantry advantage makes this an “always-possible” dessert.
Long-tail readers searching for “Quick Kitchen Sink Cookie Bars guide” or “Expert-level Kitchen Sink Cookie Bars at home” will find the practical, stepwise approach here easy to follow — it’s both a how-to and a framework for creative baking.
Complete Concept Breakdown (H2) 🧩
Understanding Kitchen Sink Cookie Bars is easier when you break the concept into core categories.
Essential base concepts:
- Foundation (Dough): The base determines chewiness and structure. This guide uses a butter, sugar, egg, and flour base with baking soda/powder for a slightly cakier-yet-chewy result.
- Texture Contrast: The magic is combining chewy dough, crunchy pretzels or nuts, and melty chocolate/caramel.
- Salt-Sweet Balance: A couple pinches of salt amplify sweetness and prevent cloying richness.
Enhancers (examples & analogies):
- Salt: Think of it like the frame on a painting — it makes the colors pop.
- Acidic element (vanilla or a touch of espresso): Deepens chocolate notes.
- Crunch: Pretzels, toasted nuts, or crisped cereal do the heavy lifting for mouthfeel.
Optional add-ins:
- Chocolates: Milk, semisweet, or dark chips; chopped bars; white chocolate chips.
- Salty: Pretzels, crushed potato chips, salted nuts.
- Chewy: Caramel bits, toffee, marshmallows.
- Unique: Cookie crumbs, Biscoff, candied ginger.
Applications and examples:
- Party bars: extra chocolate and pretzel crunch for portability.
- Lunchbox squares: smaller chunks, less caramel to avoid stickiness.
- Dessert tray: mix different add-ins across the same batch to offer variety.
Smart substitutions (contextual swaps):
- Butter → margarine or coconut oil (availability alternative; affects flavor).
- Light brown sugar → dark brown or molasses for deeper toffee flavor.
- Chocolate chips → chopped chocolate bars for melty pockets.
- Pretzels → salted crackers or crushed cornflakes for crunch.
If you want more creative textures and cookie-layer ideas, check out these crunchy cookie inspirations at Chocolate Hazelnut Crunch Cookies. Where to learn each concept? Start by mastering the dough, then practice two or three mix-in combos until you can predict the result.
Pro learning tips:
- Keep a simple log: record oven temp, bake time, and mix-ins for repeatable success.
- Test with a 9×13 pan once you have the base down — scaling up or down is mostly about thickness and bake time.
Required Tools & Resources (H2) 🛠️
Essentials:
- 9×13 inch baking pan (or similar shallow pan)
- Parchment paper or nonstick spray
- Mixing bowls (one medium, one large)
- Rubber spatula and wooden spoon
- Measuring cups and spoons
- Oven thermometer (optional but helpful)
Nice-to-have:
- Digital scale for precise results
- Silicone spatula for clean pan pressing
- Stand mixer or hand mixer (speeds up creaming but not required)
Budget alternatives:
- Use a glass or metal baking dish you already have — adjust bake time for thickness.
- Measure by volume if you don’t have a scale; slightly round ingredient amounts to favor slight extra flour for structure.
Specific recommendations:
- I prefer a heavy aluminum 9×13 pan for even browning; line it with parchment for neat squares.
- For a homemade toffee kick, keep a jar of caramel bits or crushed English toffee in the pantry. For more crunchy-sweet experiments, see this addictive pan-cookie technique (Christmas Crack Cookies).
Foolproof Step-by-Step Learning Process (H2) 🎯
This stepwise method trains you to understand and adapt the process. Each step includes timing, visual cues, and pro tips.
Step 1: Preheat & Prep (5 minutes)
- Action: Preheat oven to 350°F (175°C). Line a 9×13 pan with parchment paper, leaving an overhang for easy removal.
- Visual cue: Oven should reach temperature; parchment should sit flat.
- Pro tip: Use the oven thermometer to ensure accurate heat. A miscalibrated oven changes texture significantly.
- Common mistake: Skipping parchment — bars stick and are hard to remove.
Step 2: Melt the Butter (2–3 minutes)
- Action: Melt butter in a medium microwave-safe bowl for 20–30 seconds until just melted. Let cool slightly.
- Sensory cue: Butter should be liquid but not scalding hot.
- Pro tip: Slightly cooled melted butter helps incorporate sugars without cooking the egg.
Step 3: Combine Sugars & Eggs (3–4 minutes)
- Action: Add light brown sugar and granulated sugar to melted butter; stir. Mix in the egg, egg yolk, and vanilla until fully incorporated.
- Visual cue: Mixture will look glossy and slightly thickened.
- Pro tip: Using both a whole egg and an extra yolk boosts chewiness and richness.
- Common mistake: Overbeating after adding flour — leads to dense bars.
Step 4: Dry Ingredients & Dough Forming (3–5 minutes)
- Action: Stir in baking soda, baking powder, and salt. Gradually add flour and mix until the dough comes together.
- Visual cue: Dough should be cohesive, slightly sticky, not dry.
- Pro tip: If dough seems dry, add 1 teaspoon milk or extra yolk; if too wet, add a tablespoon of flour.
- Mistake to avoid: Packing flour; spoon and level for accurate measuring.
Step 5: Fold in Mix-Ins (2–4 minutes)
- Action: Fold in chocolate chips, pretzels, and caramel pieces until evenly distributed.
- Visual cue: Mix-ins are well-dispersed but not crushed.
- Pro tip: Reserve a handful of chocolate chips and pretzel crumbs to sprinkle on top before baking for an attractive finish.
- Mistake: Overmixing — breaks up chunks and makes bars uniform instead of textured.
Step 6: Press into Pan (2–3 minutes)
- Action: Grease or line the pan. Press the cookie dough evenly into the pan.
- Sensory cue: The surface will be smooth and evenly thick.
- Pro tip: Use a piece of parchment under your hand to press dough without sticking.
Step 7: Bake (16–20 minutes)
- Action: Bake at 350°F for 16–20 minutes until edges are golden and center looks set but not dry.
- Visual cue: Edges should pull away slightly; center will set but still be soft when touched.
- Pro tip: For softer, chewier bars, remove at 16 minutes; for a firmer bar, give it 18–20 minutes.
- Mistake: Overbaking — yields dry, cakey bars.
Step 8: Cool & Slice (30–60 minutes)
- Action: Remove from oven; cool completely in pan before slicing into squares.
- Sensory cue: Cooling allows caramel to set and bars to firm up.
- Pro tip: Chill briefly to speed slicing if you’re short on time. Use a sharp knife warmed under hot water and wiped dry for clean cuts.
H3 Building the Base
- Start simple: master the base with chocolate chips and pretzels first. Once predictable, expand the add-ins.
H3 Application Techniques Explained
- For gift-ready bars, cut into uniform sizes, wrap in parchment, and stack with cellophane.
H3 Integration Methods
- If adding delicate items (e.g., freeze-dried fruit), fold them in gently after the dough is formed to prevent moisture migration.
H3 Final Reflection
- After your first few pans, note what worked and what didn’t in a baking log: oven quirks, favorite add-ins, and bake times.
Expert Insights & Strategies (H2) 💡
Here are professional-level tips that shift good bars to great:
- Temperature control: Cool melted butter slightly before combining with eggs to prevent scrambling and ensure a smooth emulsion.
- Mix-in placement: Reserve 10–15% of mix-ins to sprinkle on top for appealing texture contrast.
- Salt strategy: Use flaky sea salt on top right after baking to elevate flavors and create the ideal sweet-salty finish.
- Timing optimization: If feeding a crowd, bake multiple thinner pans at once for even, quicker heat distribution.
- Troubleshooting: If bars spread too thin, add 1–2 tablespoons extra flour next batch and press thicker in the pan.
- Texture trick: For extra chew, swap one tablespoon of flour for one tablespoon of instant mashed potato flakes — it sounds odd, but it locks in moisture.
- Presentation technique: Toasted nuts add flavor depth and visual appeal; toast on a sheet pan for 6–8 minutes at 350°F.
- Professional finishing: Glaze or drizzle melted chocolate in lines for an elevated look.
Common failures and solutions:
- Soggy center → underbaked or too thick; increase bake time or spread thinner.
- Overly dry → overbaked or too much flour; reduce time or add yolk next batch.
- Mix-ins sink → fold less and press gently; pre-chill dough briefly if very soft.
As pastry chef mentors often say, baking is chemistry — control variables, take notes, and iterate.
Creative Variations & Adaptations (H2) 🎨
Kitchen Sink Cookie Bars are a blank canvas. Try these categories of variations:
Contextual variations:
- Breakfast-friendly: Swap some sugar for maple syrup and add oats and toasted walnuts.
- Party-friendly: Add rainbow sprinkles and M&M’s for a child-friendly tray.
Application modifications:
- Gluten-free: Use a 1:1 GF flour blend and slightly reduce baking time; texture will be denser but still delightful.
- Vegan: Replace butter with coconut oil, eggs with flax eggs, and use dairy-free chocolate chips.
Cultural twists:
- Mediterranean twist: Add chopped baklava bits, pistachios, and orange zest.
- British-inspired: Mix in crushed tea biscuits and a drizzle of salted caramel.
Practical transformations:
- Bite-sized: Cut into small squares for dessert platters or skew onto sticks for easy serving.
- Layered bars: Press half the dough, add a thin caramel or jam layer, then top with the remaining dough for a layered surprise.
Scalable versions:
- For smaller batches, use an 8×8 pan; reduce bake time by 2–4 minutes.
- For cookie-style, scoop and bake as cookies — extend bake time slightly and flatten before baking.
Keywords like "Kitchen Sink Cookie Bars variations" and "Different ways to apply Kitchen Sink Cookie Bars" should trigger creative searches — this section gives you practical options.
Breakdown & Benefits Analysis (H2) 📊
Per Application (makes X insights)
- Party tray (12–16 squares): Impact: high. Depth: 70%. Relevance: 9/10. Flexibility: 200g.
- Lunchbox portion (24 small squares): Impact: moderate. Depth: 60%. Relevance: 8/10. Flexibility: 150g.
- Gift tins (20 small bars): Impact: high. Depth: 80%. Relevance: 9/10. Flexibility: 180g.
Benefits of key concepts:
- Texture contrast increases palatability and perceived value.
- Pantry-based approach reduces cost and increases frequency of use.
- Customizability supports dietary needs (gluten-free, vegan adaptations).
Considerations:
- Sticky add-ins (caramel) need proper cooling for clean slicing.
- High-sugar content means these bars are best eaten fresh within a few days or frozen.
Enhancement highlights:
- A sprinkle of flaky salt is a low-effort multiplier.
- Toasting nuts enhances aroma and complexity.
Inclusive applications:
- Use nut-free mix-ins for school-safe options.
- Offer mini gluten-free pans for guests with dietary restrictions.
Motivational benefits:
- These bars are social — baking them with kids or friends creates positive memories and culinary confidence.
Growth-boosting properties:
- Once you understand the base, you can expand into other bars, brownies, or cookie hybrids.
Storage, Application & Learning Prep (H2) 🧊
Proper retention methods:
- Room temp: Keep in an airtight container for up to 3 days.
- Refrigeration: Up to 7 days — brings a firmer texture.
- Freezing: Wrap tightly and freeze for up to 3 months; thaw at room temp.
Best tools to use for storage:
- Airtight containers, parchment separators between layers, and freezer-safe boxes.
Application techniques for optimal use:
- Warm slightly before serving (10–15 seconds in a microwave) to soften caramel and intensify flavors.
- For gift-giving, stack with parchment and tie with ribbon for presentation.
Learning prep strategies:
- Read the basic directions through once before beginning.
- Assemble mix-ins and measure dry ingredients (mise en place) to avoid scrambling during mixing.
- Expect to practice once or twice to dial in your oven’s timing and preferred chew level.
How long knowledge lasts:
- The foundational method is evergreen — once you internalize proportions and bake times, you can adapt indefinitely. Keep a simple note card with your favorite combo for fast repetition.
For more crispy-sweet cookie bar techniques, this gooey butter cookies guide offers transferable tips: Christmas Gooey Butter Cookies.
Troubleshooting Common Issues (H2) 🛠️
Problem → Solution format:
Problem: Bars are too dry or cakey.
Solution: Reduce bake time, use one less tablespoon of flour next batch, or add another yolk for moisture.
Problem: Bars are underbaked or gooey in the center.
Solution: Bake 2–4 minutes longer and check for set center. If consistently underbaked, decrease pan height or spread dough thinner.
Problem: Mix-ins sink to the bottom.
Solution: Toss heavier mix-ins in a tablespoon of flour before folding in, or press them into the dough surface halfway through baking.
Problem: Bars stick to pan.
Solution: Line pan with parchment overhang and allow complete cooling before lifting. Spray lightly if needed.
Problem: Surface cracks or edges are overly crisp.
Solution: Lower oven temp by 10–15°F and extend bake time slightly; remove at first sign of set center to preserve chewiness.
Problem: Flavor feels flat.
Solution: Add a pinch of espresso powder or a touch more salt to brighten chocolate notes.
If you run into persistent issues, record the problem and solution in a baking log so you’ll fix it next time.
Comprehensive FAQ Section (H2) ❓
Q: Can I apply this Kitchen Sink Cookie Bars guide universally?
A: Yes — the base method is adaptable. Swap mix-ins and minor ingredient adjustments for dietary needs. For best results, follow the core ratios and adjust bake time based on pan size.
Q: How far in advance can I prepare Kitchen Sink Cookie Bars?
A: Baked bars can be prepared a day ahead at room temp, or frozen up to 3 months. If prepping dough, chill up to 24 hours before baking.
Q: What’s the best way to integrate Kitchen Sink Cookie Bars insights into other desserts?
A: Use the texture and salt-sweet principle in brownies, cookie sandwiches, or layered dessert bars. Try folding similar mix-ins into cookie dough or brownie batter for crossover treats.
Q: Can I adapt this Kitchen Sink Cookie Bars guide for beginners?
A: Absolutely — it’s an easy Kitchen Sink Cookie Bars learning path. Follow the basic directions exactly the first time, then experiment in small increments.
Q: Does the guide require special equipment?
A: No. A 9×13 pan, basic bowls, and measuring tools are sufficient. Extra tools (stand mixer, digital scale) improve consistency but aren’t required.
Q: What are safe swaps for allergens like nuts or dairy?
A: For nut-free, use seeds (pumpkin, sunflower) or pretzels. For dairy-free, substitute coconut oil or vegan butter and dairy-free chocolate.
Q: How will I know when bars are perfectly baked?
A: Look for golden edges and a center that looks set but slightly soft. The bars will firm up while cooling. Use the shorter end of the bake-time range for chewier results.
Q: Any tips for creative serving ideas?
A: Warm bars and serve with vanilla ice cream, drizzle with extra caramel, or halve them for rich cookie sandwiches.
Related Guides & Applications (H2) 🔗
Want to expand your dessert repertoire? These complementary guides pair well with kitchen sink bars:
- Layered tray bars and magic squares (see Magic Cookie Bars) for inspiration.
- Brownie and cookie hybrids, like Biscoff brownies, offer similar mix-in play (Biscoff Brownies).
- For crunchy cookie ideas and texture play, visit Chocolate Hazelnut Crunch Cookies.
These resources form a learning path from simple bars to nuanced, layered desserts.
Summary Card & Reference Version (H2) 📝
Quick Reference — Kitchen Sink Cookie Bars guide
- Prep time: 10–15 minutes
- Bake time: 16–20 minutes
- Yield: 12–16 squares (9×13 pan)
- Key proportions: 1 cup butter, 1 cup light brown sugar, 1/2 cup granulated sugar, 1 egg + 1 yolk, 2.5 cups flour, 1 tsp baking soda, 1/2 tsp baking powder, pinch salt
- Mix-ins: 1.5–2 cups combined (chips, pretzels, caramel)
- Oven temp: 350°F (175°C)
- Cooling: 30–60 minutes before slicing
Learning time: 1 baking session for mastery; additional practice to personalize texture and mix-ins.
Keep this as a printed card or phone note for fast repetition.
Conclusion (H2) ✅
Thanks for reading this Kitchen Sink Cookie Bars guide — I hope you’re excited to try the method and make it your own. For more visual inspiration and alternative ingredient ideas, these two recipes offer lovely variations and presentation ideas you might enjoy: Kitchen Sink Cookie Bars – Design Eat Repeat and Sweet and Salty Kitchen Sink Cookie Bars – Buuck Farms Bakery.
Drop a comment below with your favorite mix-in combo, tag your creations on social media, and save this guide for easy access next time you need a quick, crowd-pleasing dessert. Happy baking! 🍪🎉
If you want, I can format a printable recipe card version of the steps, a shopping list, or a one-page troubleshooting chart. Which would be most useful?
Print
Kitchen Sink Cookie Bars
- Total Time: 35 minutes
- Yield: 12-16 squares 1x
- Diet: Vegetarian
Description
Delicious and customizable cookie bars loaded with sweet and salty mix-ins, perfect for gatherings or a treat for yourself.
Ingredients
- 1 cup unsalted butter
- 1 cup light brown sugar
- 1/2 cup granulated sugar
- 1 egg
- 1 egg yolk
- 1 teaspoon vanilla extract
- 2 1/2 cups all-purpose flour
- 1 teaspoon baking soda
- 1/2 teaspoon baking powder
- 1/2 teaspoon salt
- 1 1/2 to 2 cups mix-ins (chocolate chips, pretzels, caramel bits, etc.)
Instructions
- Preheat oven to 350°F (175°C) and line a 9×13 inch pan with parchment paper.
- Melt the butter in a medium bowl for 20–30 seconds until just melted; let cool slightly.
- Mix melted butter with light brown sugar and granulated sugar until combined, then add the egg, egg yolk, and vanilla extract.
- In a separate bowl, combine flour, baking soda, baking powder, and salt, then gradually mix into the wet ingredients until cohesive.
- Fold in the mix-ins until evenly distributed.
- Press the cookie dough evenly into the prepared pan and sprinkle reserved mix-ins on top if desired.
- Bake for 16-20 minutes until edges are golden and center looks set.
- Cool completely in the pan before slicing into squares.
Notes
These bars are highly customizable; feel free to add any leftover candies, nuts, or unique ingredients you have on hand.
- Prep Time: 15 minutes
- Cook Time: 20 minutes
- Category: Dessert
- Method: Baking
- Cuisine: American
Nutrition
- Serving Size: 1 square
- Calories: 250
- Sugar: 12g
- Sodium: 200mg
- Fat: 14g
- Saturated Fat: 8g
- Unsaturated Fat: 4g
- Trans Fat: 0g
- Carbohydrates: 32g
- Fiber: 1g
- Protein: 3g
- Cholesterol: 40mg