Halloween Brain Cupcakes have arrived to add a delightfully gruesome touch to your Halloween festivities! These aren’t just desserts; they’re edible works of art, designed to impress your guests with their spooky realism and fantastic flavor. Imagine the gasps of delight (and maybe a little fright!) when they see these creepy confections. The best part? They look incredibly complex, but I’ve found they’re surprisingly easy to decorate, making them perfect for even novice bakers looking to create some truly memorable spooky treats. Let’s get baking… or rather, decorating!
Why You’ll Love These Halloween Brain Cupcakes
These aren’t your average party favors; these Halloween cupcakes are designed to be the star of your dessert table! You’ll adore how incredibly easy they are to transform into spooky masterpieces, even if you’re not a professional baker. The fun factor is off the charts, making the decorating process an activity the whole family can enjoy. They’re perfect for any Halloween gathering, from classroom parties to adult-only bashes, guaranteeing big smiles and memorable photo ops. The visual impact is simply stunning, and the taste is just as delightful as their creepy appearance. Get ready to wow everyone with these frightfully fun treats!
- Incredibly simple decorating process
- High fun factor for all ages
- Perfect visual impact for parties
- Surprisingly easy for beginners
- Guaranteed conversation starter
- Deliciously sweet and satisfying
- Create lasting Halloween memories
Ingredients for Your Gruesome Halloween Brain Cupcakes
Gather these goodies to create your frightfully delicious Halloween Brain Cupcakes. You’ll start with a dozen of your favorite vanilla or strawberry cupcakes, making sure they are completely cooled before we begin decorating. For the eerie brain frosting, you’ll need 1 cup unsalted butter, softened, along with 3 to 4 cups powdered sugar for that perfect fluffy texture. A teaspoon of vanilla extract and a pinch of salt will enhance the flavor, while 1 to 2 tablespoons of milk or cream help achieve the ideal consistency. Don’t forget your gel colors – a vibrant pink is essential, and a tiny bit of warm brown or ivory will help us mute the tone for a more realistic, ghastly look. Finally, for that essential gory touch, you’ll need raspberry jam, coulis, or red gel. This jam is key to creating the bloody effect that makes these cupcakes so terrifyingly fun!

How to Create Terrifying Halloween Brain Cupcakes
Now for the fun part – turning these cupcakes into ghastly brains! This process is surprisingly straightforward, and the results are wonderfully creepy. We’ll guide you through each step, from tinting the perfect eerie frosting to piping those realistic brain folds and adding a touch of macabre “blood.” Get ready to impress everyone with your very own brain cake creations!
Step 1: Prepare the Eerie Pink Buttercream
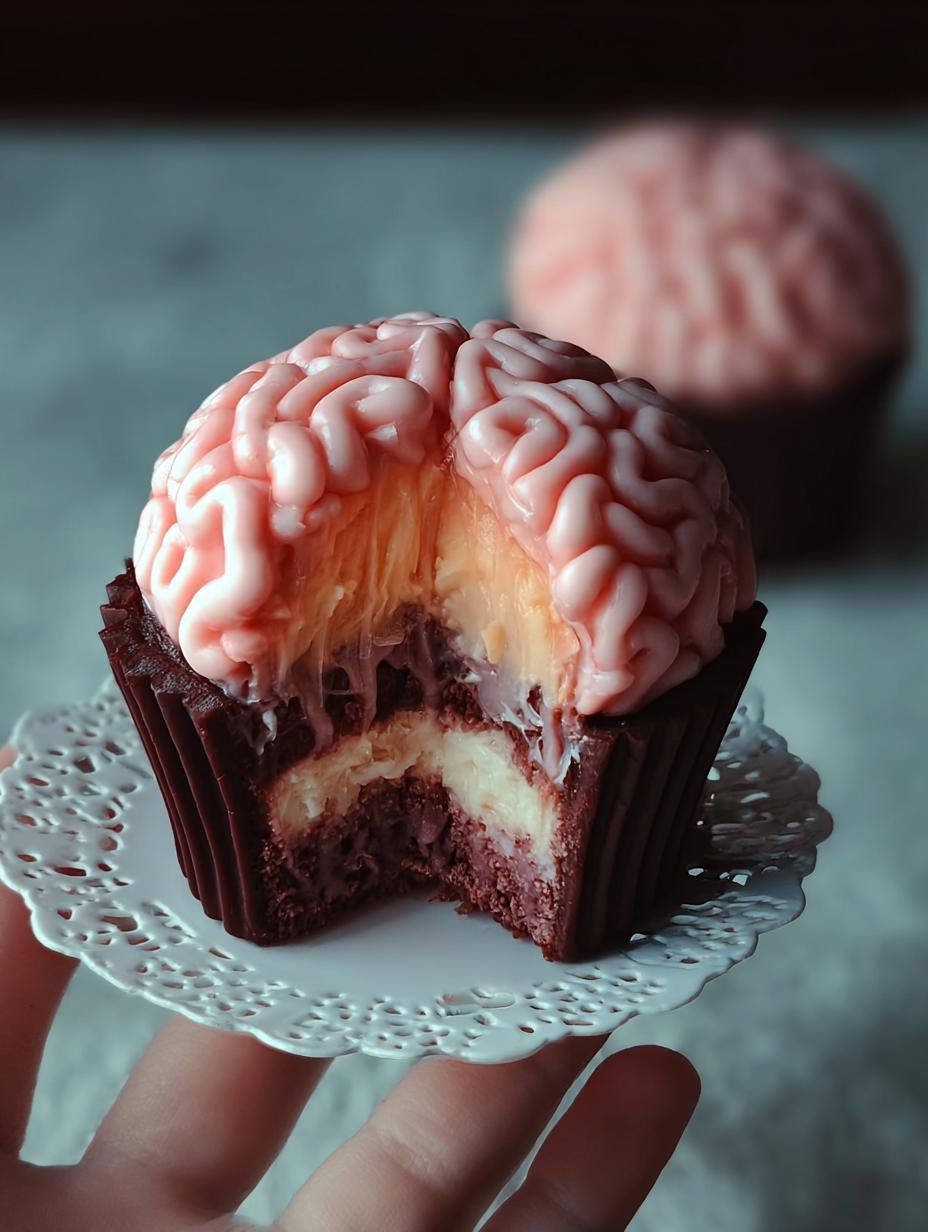
First, let’s get that buttercream looking perfectly ghastly. Tint your softened butter and powdered sugar mixture a light pink. To make it look more realistic and less like bubblegum, add a tiny drop of warm brown or ivory gel color to mute the pink. Once you have your desired eerie hue, spread a thin, even base coat of this pink buttercream over each of your cooled cupcakes. Then, using a spatula or the back of a spoon, gently score a shallow center line down the middle of each cupcake to create the division for the brain!
Step 2: Sculpting the Brains
This is where the magic happens! Fit a piping bag with a medium-sized round tip (like a Wilton #10 or #12). Now, starting on one side of that center line you just scored, pipe one long, continuous squiggle. Keep the pressure steady and allow the frosting to create natural-looking folds. Repeat this on the other side of the line, and then go back and add a second layer of squiggles on top of the first. Don’t worry about perfection; irregular loops and gentle overlaps are key to making these look like real brains! Chill the cupcakes for about 5 minutes to help the piped frosting set.

Step 3: Adding the Bloody Details
For that truly terrifying touch, it’s time for the “blood.” Spoon a bit of raspberry jam, coulis, or red gel into the deeper crevices of your piped brain folds. You can let it drip slightly for an extra gory effect. If you want a surprise “bloody” center, you can carefully core the cupcakes before frosting and fill that cavity with jam for a gooey surprise when bitten into. This step really brings your Halloween Brain Cupcakes to life!
Pro Tips for the Ultimate Halloween Brain Cupcakes
Want to take your spooky creations to the next level? I’ve got a few tricks up my sleeve that guarantee these Halloween Brain Cupcakes will be a monstrous hit! For more baking inspiration, check out these delicious recipes.
- Don’t be afraid of imperfection when piping the brain folds; nature isn’t perfectly uniform, and neither should your brains be!
- For the best “blood” effect, make sure your raspberry jam or coulis is slightly warmed or thinned so it flows nicely into the crevices.
- If you’re decorating a large batch, consider chilling the frosted cupcakes in the fridge for about 10-15 minutes before adding the raspberry glaze to prevent it from sliding off.
What’s the secret to realistic brain folds?
The secret lies in your piping technique and tip size. Use a medium-sized round tip and focus on continuous, irregular squiggles. Embrace gentle overlaps and varied heights to mimic real brain anatomy. Don’t strive for perfect symmetry; a little chaos looks more authentic! Understanding the science behind baking, like how vanilla extract affects flavor, can also elevate your creations.
Can I make these Halloween Brain Cupcakes ahead of time?
Yes, you can! Frost the cupcakes completely and refrigerate them. It’s best to add the raspberry “blood” glaze just before serving to keep it looking fresh and prevent excessive run-off. Unfrosted cupcakes can be stored at room temperature for a day or two. For other make-ahead dessert ideas, consider a cheesecake or caramel apple cookies.
How do I avoid common mistakes with brain cupcakes?
Avoid piping the folds too uniformly or with the same pressure throughout. Also, be mindful of how much raspberry glaze you’re adding; too much can make them overly sticky. Chilling the frosted cupcakes briefly before glazing helps prevent the “blood” from running down the sides.
Serving Your Ghastly Halloween Brain Cupcakes
These frightfully fun Halloween Brain Cupcakes are best served shortly after their final ghastly touches are applied. The vibrant raspberry “blood” looks most realistic and appealing when it’s freshly drizzled. They are absolutely perfect for any Halloween party, acting as both a delicious dessert and a fantastic conversation starter. Imagine your guests’ delighted screams when they see these creepy creations! These party desserts are sure to be a memorable highlight of your spooky celebration, making your Halloween gathering truly unforgettable.
Nutrition Facts for Halloween Brain Cupcakes
Let’s take a peek at the nutritional breakdown for these delightfully gruesome Halloween Brain Cupcakes. Each sweet and spooky creation offers a satisfying treat for your Halloween party.
- Serving Size: 1 cupcake
- Calories: 380
- Fat: 18g
- Saturated Fat: 11g
- Protein: 3g
- Carbohydrates: 52g
- Fiber: 1g
- Sugar: 42g
- Sodium: 180mg
Nutritional values are estimates and may vary based on specific ingredients used.
Storing Your Spooky Halloween Brain Cupcakes
Once your ghastly Halloween Brain Cupcakes are fully decorated, proper storage is key to keeping them looking their terrifying best. Always ensure the cupcakes are completely cooled before frosting and decorating. For best results, store them in an airtight container. You can refrigerate them for up to 5 days, which also helps keep the frosting firm and prevents the “blood” from becoming too runny. However, I highly recommend adding that final raspberry glaze or “blood” effect just before serving. This ensures the glaze looks fresh and vibrant, and that the frosting hasn’t absorbed any excess moisture, keeping your Halloween cupcakes looking perfectly spooky and delicious for your guests!
Variations for Even More Spooky Treats
If you’re looking to get even more creative with your spooky desserts, these Halloween Brain Cupcakes are a fantastic base for all sorts of frightful fun! Beyond the classic pink brain look, you can easily change up the flavors and effects. Try using a rich chocolate cupcake base for a darker, more mysterious treat. For the “blood,” experiment with a thinned chocolate syrup for a dark, viscous look, or use bright red gel icing for a truly gruesome, high-contrast effect. You could even try different piping techniques for other spooky designs, like a monster’s eyeball or a creepy spiderweb. These variations ensure your Halloween cupcakes are always unique and perfectly suited to your party theme!
Print
Halloween Brain Cupcakes: Gruesome & Easy Treats
- Total Time: 20 minutes
- Yield: 12 cupcakes 1x
- Diet: Vegetarian
Description
Create spooky and fun Halloween Brain Cupcakes with pink buttercream frosting and raspberry “blood” glaze. This easy recipe uses simple piping techniques for a realistic brain effect, perfect for Halloween parties.
Ingredients
- 12 vanilla or strawberry cupcakes
- 1 cup unsalted butter
- 3 – 4 cups powdered sugar
- 1 tsp vanilla extract
- Pinch of salt
- 1 – 2 tbsp milk or cream
- Gel colors: pink, warm brown or ivory
- Raspberry jam, coulis, or red gel (or mix corn syrup + cocoa for “blood”)
Instructions
- Tint buttercream a light pink color, adding a tiny drop of warm brown or ivory to mute the tone.
- Spread a thin base coat of the pink buttercream over the cooled cupcakes. Score a shallow center line with a spatula to divide the “brain” hemispheres.
- Fit a piping bag with a round tip (Wilton #10 or #12). Pipe one long, continuous squiggle on each side of the center line to create the brain folds.
- Add a second layer of squiggles on top of the first for more volume, embracing irregular loops and gentle overlaps. Chill the cupcakes for 5 minutes to set the piped frosting.
- Spoon raspberry jam, coulis, or red gel into the crevices of the piped frosting to create a gory “blood” effect. For an “oozing” center, core the cupcakes before frosting and fill with jam.
- Serve your Halloween Brain Cupcakes soon after decorating. For best results, freeze for 5 minutes before glazing to minimize run-off.
Notes
- For a surprise “bloody” bite, core the cupcakes and fill with jam before frosting.
- Freeze the frosted cupcakes for 5 minutes before adding the glaze to help it set and prevent excessive run-off.
- Store decorated Halloween Brain Cupcakes in the refrigerator for up to 5 days. Add the final glaze just before serving for the freshest appearance.
- Prep Time: 20 minutes
- Cook Time: 0 minutes
- Category: Dessert
- Method: No-bake decoration
- Cuisine: American
Nutrition
- Serving Size: 1 cupcake
- Calories: 380
- Sugar: 42 g
- Sodium: 180 mg
- Fat: 18 g
- Saturated Fat: 11 g
- Unsaturated Fat: 6 g
- Trans Fat: 0 g
- Carbohydrates: 52 g
- Fiber: 1 g
- Protein: 3 g
- Cholesterol: 55 mg