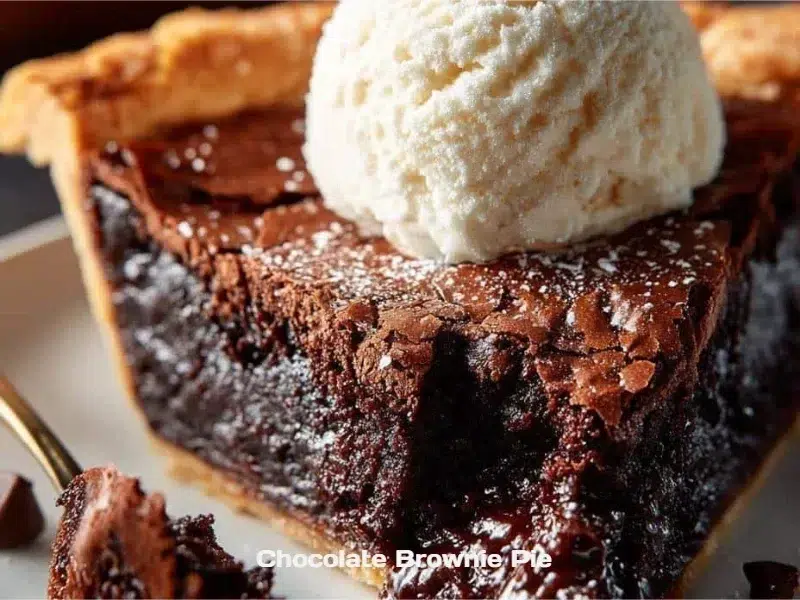
Chocolate Brownie Pie guide — The Ultimate Chocolate Brownie Pie You’ll Love 🍫🥧
Ready for the most irresistible Chocolate Brownie Pie guide that takes just a few simple concepts to master? You’ll absolutely love how this foolproof, family-approved dessert comes together: quick to mix, forgiving in the oven, and unforgettable on the first warm bite. In this guide, I’ll walk you through origins, core concepts, step-by-step methods, expert tips, creative twists, troubleshooting, and how to keep learning and adapting this recipe. Expect a recipe that’s budget-friendly, pantry-friendly, and infinitely customizable — plus practical ways to understand Chocolate Brownie Pie explained for bakers at every level. If you’re also exploring creative dessert mashups, check out a festive take like the chocolate brownie yule log for inspiration. Let’s get baking and learning! 🍽️
Basic Directions:
- Prepare the brownie batter in a medium bowl following the package instructions, then gently fold in the chocolate chips.
- Transfer the prepared brownie mixture into the unbaked pie crust, spreading it evenly to the edges.
- Bake in a preheated 350°F oven for 25–30 minutes until the center is just set, then remove and let cool slightly before slicing.
- Serve warm or slightly cooled, optionally adding ice cream or chocolate drizzle if desired.

Attributes Origin & Cultural Context (H2) 🌍
Chocolate brownie pie is a modern hybrid: the chewy, dense center of a brownie married to the flaky, comforting framework of a pie crust. Brownies themselves trace back to late 19th–early 20th century America; combining them with a pie shell is a playful, regional innovation that blends two dessert traditions into one show-stopping dish. In my family, this version became a holiday staple after my aunt skipped the traditional double-crust pies and slid a fudgy brownie mix into a store-bought crust to save time — the result was so popular it replaced the apple pie one year.
What makes this version special is its balance: a crisp or flaky edge from the crust, a fudgy center from the brownie batter, and endless adaptability. Regional variations exist — some bakers add a streusel topping in the Midwest, while others incorporate espresso in coastal bakeries for depth. For a twist connecting this dessert to other favorites, pair its richness with fruit-driven desserts like apple brownies or turn it into a miniature tart for tea service. This combination of convenience and nostalgia is why many call this the classic Chocolate Brownie Pie guide and why it’s perfect for sharing.
Keywords: Traditional Chocolate Brownie Pie guide • Authentic Chocolate Brownie Pie origin • Classic Chocolate Brownie Pie history
Why This Chocolate Brownie Pie Guide is a Game-Changer (H2) ⚡💡
This Chocolate Brownie Pie guide stands out because it blends speed, simplicity, and exceptional results — everything you need to achieve expert-level Chocolate Brownie Pie at home. Here’s why it’s a game-changer:
Lightning Fast: You can go from pantry to oven-ready in under 15 minutes. Using just one bowl and a pre-made or homemade crust keeps prep minimal. That means more time for conversation and less for cleanup. How to understand Chocolate Brownie Pie at home easily becomes realistic when steps are straightforward and transfer directly to action.
Budget-Friendly: Most ingredients are pantry basics — flour, cocoa, sugar, butter, or a box mix. No need for specialty equipment. If you’re stretching a budget, substituting a homemade crust for store-bought or using dark cocoa versus specialty chocolate will keep costs down without sacrificing flavor. This makes it the Best Chocolate Brownie Pie guide for beginners and busy families.
Family Approved: Kids love the fudgy texture and adults appreciate its nostalgic factor. It’s accessible for all ages — safe mixing jobs for kids and easy plating for family dinners. You’ll find that "easy Chocolate Brownie Pie learning" isn’t just theory; it’s practice-friendly.
Nutritiously Delicious: While indulgent, small tweaks (like adding unsweetened cocoa, reducing sugar slightly, or incorporating pureed black beans or cottage cheese as partial substitutes) can lift nutritional value without losing the dessert’s soul. This helps make the dessert more inclusive and mindful.
Infinitely Customizable: Think swirls of caramel, toasted nuts, orange zest, or layered cheesecakes. With a few swaps, you can make this vegan, gluten-free, or coffee-forward. "Quick Chocolate Brownie Pie guide" paths allow for low-lift experiments so learners can iterate.
Pantry-Friendly: Common ingredients and a single pan approach mean it’s a reliable go-to dessert. The learning process becomes cumulative: each bake teaches about timing, texture, and crust behavior — so you’ll know "how to understand Chocolate Brownie Pie" more deeply every time.
This section emphasizes how small choices (timing, chocolate type, crust type) change texture and flavor, and how this guide simplifies those decisions. For beginners and confident bakers alike, this tutorial frames the method as repeatable and adaptable — the real hallmark of a guide that works.
Long-tail keywords: How to understand Chocolate Brownie Pie at home easily • Best Chocolate Brownie Pie guide for beginners • Quick Chocolate Brownie Pie learning method • Expert-level Chocolate Brownie Pie at home
Complete Concept Breakdown (H2) 🧠
Understanding Chocolate Brownie Pie explained means breaking the dessert into core concepts and options. Here’s a clear breakdown.
Essential base concepts:
- Crust: Determines texture contrast. Options include flaky pie crust, graham cracker crumb, or sweet shortcrust. A flaky crust yields a crisp edge; a crumb crust makes it more like a pie-bar hybrid.
- Batter Consistency: The batter must be thick enough to set but moist enough to stay fudgy. Underbake slightly to achieve a gooey center.
- Bake Time & Temperature: 350°F is typical; timing is adjusted by pan depth and oven variance. Use visual cues (slightly set center, toothpick with moist crumbs) rather than just minutes.
- Chocolate Type: Cocoa powder for intensity, melted chocolate for richness, or chocolate chips for pockets of molten chocolate.
Enhancers (examples, analogies):
- Salt: Like punctuation, it brightens chocolate.
- Espresso: Think of it as a flavor amplifier — it makes the chocolate taste deeper without tasting like coffee.
- Orange Zest: Adds a citrus lift, creating complexity — like adding a splash of brightness to a heavy stew.
Optional add-ins:
- Nuts (toasted pecans, walnuts)
- Swirls (peanut butter, caramel)
- Fruit accents (raspberry jam swirls)
Applications and examples:
- Party centerpiece — make in a deep-dish pie for easy slicing.
- Individual portions — mini tart shells for events.
- Layered dessert — brownie pie base topped with mousse for dramatic effect.
Chocolate Brownie Pie concept substitutions:
- Contextual swaps: Replace a pie crust with a cookie crust for portability.
- Availability alternatives: Use cocoa and butter instead of a high-end chocolate bar when needed.
- Simplified options: Use a boxed brownie mix to shorten learning curve.
- Depth modifications: Add espresso + dark chocolate for more complex depth; omit for simpler flavor.
Where to learn [unique concept]: Start with this guide, then expand into showing visual examples (photos of underbaked, just-set, and fully set centers). For quick inspiration, try pairing with textured desserts like crumbly apple pie egg rolls for contrast.
SEO phrases: Essential concepts for Chocolate Brownie Pie • Best examples for Chocolate Brownie Pie • Chocolate Brownie Pie concept substitutions • Where to learn unique concept
Practical tip: Keep a small notebook to log bake times and modifications. That habit converts baking attempts into a personalized recipe manual.
Required Tools & Resources (H2) 🛠️
Essential tools:
- 9-inch pie dish (metal or glass) — a metal pan tends to brown edges quicker.
- Mixing bowl(s) — one medium mixing bowl can be enough.
- Spatula and whisk — for even folding.
- Oven thermometer — to verify true oven temperature.
- Cooling rack — for proper setting.
Nice-to-have:
- Offset spatula — for smoothing batter.
- Silicone baking mat — for microslide cleanup.
- Kitchen scale — for accuracy when adapting recipes.
Budget alternatives:
- Use a sturdy oven-safe skillet as an alternative to a pie dish.
- Replace a kitchen scale with measuring cups; note volume variations when replicating for precision.
- A store-bought crust is a time and cost saver.
Specific recommendations:
- For consistent crust browning, a heavy-duty metal pie pan is recommended if you want crisp edges; glass shows browning visually and can help novice bakers judge doneness by watching the crust color.
Helpful link for creative pairings (internal resource): check a protein-rich twist like the bake cottage cheese brownie for a texture experiment that adds lift.
Foolproof Step-by-Step Learning Process (H2) 🧩
This is the practical heart of the guide. Follow these steps with sensory cues and pro tips.
Step 1: Define Your Foundation (5 minutes)
Start by choosing your crust and whether you’ll use a box mix or from-scratch batter. Pro tip: For learning, start with a box mix to focus on baking timing and heat distribution first. Common mistake: changing too many variables at once — stick to one change per bake.
Step 2: Prep the Crust (5–10 minutes)
If using a pre-made crust, remove packaging and set on a baking sheet. Homemade? Blind-bake a flaky crust for 8–10 minutes at 375°F if you want extra crispness. Sensory cue: crust should smell gently buttery and show light golden edges. Pro tip: Chill crust before adding batter to reduce shrinking.
Step 3: Mix the Batter (5–8 minutes)
Combine wet and dry ingredients; fold in chocolate chips gently. Look for smooth, glossy batter with no streaks of flour. Pro tip: Don’t overmix once dry ingredients are added — overworked batter yields cakier texture. Common mistake: over-beating eggs.
Step 4: Fill & Smooth (2–3 minutes)
Transfer batter into crust and smooth the top. Visual cue: batter should come close to the rim but not overflow. Pro tip: If you’re adding swirls (caramel, nut butter), use a knife to make decorative patterns for even distribution.
Step 5: Bake (25–30 minutes)
Bake at 350°F. Check at 20 minutes: edges should pull away slightly, center still jiggles a bit. A toothpick should come out with moist crumbs, not wet batter. Pro tip: Rotate the pie halfway for even browning if your oven has hotspots. Common mistake: relying only on time; ovens vary.
Step 6: Cool & Set (30–60 minutes)
Let the pie cool at least 30 minutes before slicing for cleaner cuts. For a fudgier center, cool slightly less; for sliceable bars, cool fully. Pro tip: Place on a cooling rack to avoid soggy crust from trapped steam.
Step 7: Finish & Serve (2–5 minutes)
Add toppings like ice cream, powdered sugar, or a drizzle. Sensory cue: warm center with slightly crisp edges creates the ideal contrast. Pro tip: Serve warm with a cold scoop of vanilla ice cream for temperature contrast that’s universally loved.
H3: Building the Base — Crust Considerations
- Shortcrust vs. crumb crusts: Shortcrust gives structure; crumb crust is faster and less labor-intensive.
- Thickness: 1/8–1/4 inch is ideal for balance.
H3: Application Techniques Explained
- For individual portions, press batter into tartlet tins and reduce bake time to 12–15 minutes.
- For deeper pans, increase bake time and check with the toothpick method.
H3: Integration Methods
- Swirling toppings: Add dollops after filling, then swirl in one motion to avoid overmixing.
- Layering: For a layered dessert, bake the brownie pie base before adding mousse or cream layers.
H3: Final Reflection
Keep notes: oven temp, pan type, bake time, chocolate type. Each variable logged improves repeatability.
Lengthy practice makes it intuitive — every bake teaches how to adjust for your oven, pan, and personal texture preference.
Expert Insights & Strategies (H2) 🧑🍳
Here are professional-style strategies from pastry pros and seasoned home bakers:
- Chocolate quality scales: Use at least 60% cacao for depth — cheaper chocolate melts differently; compensate with slightly longer mixing.
- Salt balancing: A tiny pinch of flaky sea salt on top right before serving amplifies flavor.
- Time control: Slight underbaking yields gooey centers; slightly overbake for bar-style consistency. Use a timer and visual cues rather than relying strictly on the clock.
- Temperature layering: Warm the pie dish briefly before filling (not hot) to aid even baking when using thicker pans.
- Textural contrast: Toast chopped nuts to bring a crunchy counterpoint to the fudginess.
- Integration troubleshooting: If centers sink after cooling, the oven temperature was likely too low or the batter overmixed — restore by reducing bake time next iteration.
- Presentation tricks: Score clean slices with a hot knife for glossy cuts. Wipe between slices for neat plating.
- Make-ahead timing: The pie holds well at room temperature for several hours and in fridge for up to 4 days — warm gently before serving to revive fudginess.
Common failures and solutions:
- Soggy crust: blind-bake crust or use a thinner filling.
- Dry center: slightly reduce bake time or increase fat (butter/oil).
- Uneven bake: rotate pan and test with toothpick.
Timing optimization: Track your oven’s hotspots and build a simple table to adjust bake positions. This short data set will minimize surprises.
Creative Variations & Adaptations (H2) 🎨
Chocolate Brownie Pie variations are ways to keep the base concept fresh:
Contextual variations:
- Holiday: Add peppermint or crushed candy canes and top with whipped cream for winter celebrations.
- Summer: Fold in chopped strawberries or raspberry jam swirls for brightness.
- Coffeehouse: Incorporate espresso powder and top with coffee-infused whipped cream.
Application modifications:
- Vegetarian/Vegan: Use flax eggs and melted vegan margarine; choose a vegan crust.
- Gluten-free: Use a certified gluten-free flour blend and check crust ingredients.
- High-protein: Swirl in cottage-cheese-based fillings for a lift; see creative pairing in the bake cottage cheese brownie for texture inspiration.
Cultural twists:
- Mexican-style: Add a pinch of cinnamon and chili for warm spice notes.
- European: Use a rich shortcrust and dark chocolate for an adult-friendly, less-sweet version.
Practical transformations:
- Mini pies for potlucks: Use muffin tins lined with crust rounds and fill as individual desserts.
- Brownie pie bars: Bake in a square pan with crust pressed to the bottom for portable slices.
Scalable versions:
- Small batch: Half the batter for a 6-inch pie.
- Large batch: Double recipe for two 9-inch pies or a sheet-pan version for parties.
Keywords: Chocolate Brownie Pie variations • Different ways to apply Chocolate Brownie Pie • Customizable Chocolate Brownie Pie guide
Example internal link for a playful dessert idea: try pairing with seasonal treats such as bake Halloween cream pie ideas for themed events.
Breakdown & Benefits Analysis (H2) 📊
Per Application (makes X insights)
Family Dessert (makes 8 servings)
Impact: High — crowd-pleaser
Depth: 70% fudgy vs. 30% crust
Relevance: 10/10
Flexibility: 400g (approx. batter mass)Party Centerpiece (serves 12)
Impact: Very High — visual and flavor centerpiece
Depth: 60% fudgy, 40% crust
Relevance: 9/10
Flexibility: 600gPortable Bars (10–12 bars)
Impact: Moderate — easier to serve
Depth: 80% fudgy, 20% crust
Relevance: 8/10
Flexibility: 450g
Benefits of key concepts:
- Contrast: Crust vs. brownie center creates a satisfying textural interplay.
- Simplicity: Many iterations use the same batter, minimizing cognitive load for learners.
- Adaptation-friendly: From dietary swaps to flavor experiments, this method accommodates many needs.
Considerations:
- Storage impacts texture (refrigeration firms the center).
- Ingredient quality affects final taste more than minor procedural differences.
Enhancement highlights:
- Salt and citrus zest punch up chocolate.
- Nut toasting increases aroma and crunch.
Inclusive applications:
- Adjust sweetness for children or adults with a sweet tooth.
- Provide gluten-free or vegan options so more guests can enjoy.
Motivational benefits:
- Quick wins build baker confidence.
- Iterative learning encourages experimentation.
Growth-boosting properties:
- Each bake improves judgment on doneness and texture — turning trial into skill.
Storage, Application & Learning Prep (H2) 🧾
Proper retention methods (notes/memory):
- Keep a baking log: record pan type, oven temp, bake time, chocolate used, and final texture.
- Photographic memory: take a quick photo of the pie right after baking and after cooling; visual cues help calibration.
Best tools to use:
- Oven thermometer to verify temp.
- Instant-read thermometer for internal cake temp (about 200–205°F for fudgy center, but visual cues are primary).
- Airtight container for storage.
Application techniques for optimal use:
- Reheat slices at 300°F for 4–6 minutes for a warmed slice; or in microwave in 10–15 second bursts.
- For serving at events, bake earlier in the day and warm right before guests arrive.
Learning prep strategies:
- Master one variable at a time: try changing chocolate type in one bake, then crust type in the next.
- Schedule repeat practices: three bakes in three weeks will reveal patterns faster than sporadic attempts.
How long knowledge lasts:
- Baking techniques stick quickly with repeated practice; expect solid procedural memory after 5–7 attempts.
- Keep notes for long-term recall — small logs help maintain consistent results over months.
SEO phrases: How to retain Chocolate Brownie Pie knowledge • Can you apply Chocolate Brownie Pie long-term • Best way to integrate Chocolate Brownie Pie • Chocolate Brownie Pie learning prep ideas
Troubleshooting Common Issues (H2) 🛠️
Problem → Solution
- Soggy Bottom
- Problem: Moist under-baked center or steam trapped under crust.
- Solution: Blind-bake crust for 8–10 minutes; bake on a preheated baking sheet; cool completely on a rack.
- Cracks on Top
- Problem: Overbaked or batter too dry.
- Solution: Reduce bake time slightly; add a tablespoon of oil or melted butter for moisture.
- Sunken Center After Cooling
- Problem: Undercooked middle or too-aggressive movements when cooling.
- Solution: Check for doneness visually: center should be slightly jiggly. Let it cool undisturbed.
- Burned Edges, Raw Center
- Problem: Oven hotspot or too-high heat.
- Solution: Lower temp by 15–25°F and extend time; rotate pan halfway.
- Crumbly Texture
- Problem: Overmixing or too much flour.
- Solution: Mix lightly; weigh flour or spoon-and-level to avoid packing.
- Lack of Chocolate Depth
- Problem: Low-cacao chocolate or lack of balance.
- Solution: Add espresso powder or use higher percentage cocoa.
These fixes will help you iterate quickly and gain confidence with each bake.
Comprehensive FAQ Section (H2) ❓
Can I apply this Chocolate Brownie Pie guide universally?
Yes — the fundamentals work in most kitchens. Adapt crust and chocolate to dietary needs (gluten-free, vegan) and scale portions. The method is flexible for many contexts.How far in advance can I prepare Chocolate Brownie Pie?
You can bake it a day ahead and store covered at room temperature. Refrigerate for up to 4 days; gently warm before serving for the best texture.What’s the best way to integrate Chocolate Brownie Pie insights into other desserts?
Use the brownie batter concept as a layer under mousses, or transform into bars. The fudgy center translates well to trifles and layered desserts.Can I adapt this Chocolate Brownie Pie guide for beginners?
Absolutely. Start with a box mix and store-bought crust, then make one substitution at a time to learn how each change affects outcome.Is this Chocolate Brownie Pie guide beginner-friendly?
Yes — it’s explicitly designed for easy learning with clear visual cues and minimal equipment.What’s the best tip for preventing a soggy crust?
Blind-bake or use a crumb crust and reduce moisture by avoiding overfilling. A preheated baking sheet helps too.Are there healthy swaps that keep the texture?
Yes — applesauce or pureed beans can substitute some fat while preserving moisture; see cottage-cheese angle for protein variation.How do I know when the center is done?
Look for a set edge and a slightly jiggly center. Toothpick should come out with moist crumbs. Visual and tactile cues are better than time alone.
Related Guides & Applications (H2) 🔗
Complementary topics and pairings to expand your dessert repertoire:
- For chocolate-focused seasonal treats, explore the chocolate brownie yule log for creative presentation.
- For combining fruit and chocolate techniques, check variations like apple brownies.
- If you enjoy portable desserts, refer back to pastry transformations like apple pie egg rolls.
- Experimentation in texture can benefit from protein-boosted swaps, as in the cottage cheese brownie approach referenced earlier.
These pairings create learning pathways and expand the ways you can apply the Chocolate Brownie Pie guide.
Summary Card & Reference Version (H2) 🗂️
Quick concept list:
- Crust: flaky, crumb, or shortcrust.
- Batter: glossy, slightly thick, fold in mix-ins.
- Bake temp: 350°F; time: 25–30 min (adjust by pan).
- Doneness: edges set, center slightly jiggly; toothpick with moist crumbs.
Learning time summary:
- Quick intro bake: 45–60 minutes (including cooling).
- Practice bakes for mastery: 5–7 iterations over weeks.
Condensed steps:
- Choose crust.
- Mix batter (don’t overmix).
- Fill and bake at 350°F.
- Cool, slice, enjoy.
Reference-friendly pointers:
- Keep a log with pan type and times.
- Start with boxed mix for focused learning.
- Add one variable at a time when experimenting.
Visual checklist:
- Oven thermometer checked ✓
- Pie dish ready ✓
- Batter smooth ✓
- Timer set ✓
This summary card acts like your on-bench reference the first several times you bake.
Conclusion & Reader Engagement (H2) 🎉
You’ve just finished a complete Chocolate Brownie Pie guide that’s built for quick wins, long-term learning, and joyful experimentation. Whether you’re looking for a fast family dessert, an impressive party centerpiece, or a playground for flavors, this method helps you understand Chocolate Brownie Pie easily and confidently. Try one small tweak every bake — a different chocolate, a swirl of caramel, or a citrus note — and you’ll be mastering Chocolate Brownie Pie at home in no time. If you want further recipe inspiration and variations, check these helpful references: Chocolate Brownie Pie | Kitchen 335 and Fudge Brownie Pie – Sally’s Baking.
Your next steps:
- Drop a comment below with your favorite twist! 💬
- Tag your photos on social media and inspire others. 📸
- Save and bookmark this guide for future bakes. 🔖
Thanks for baking with me — may your crusts be flaky and your centers perfectly fudgy. Happy baking!
Print
Chocolate Brownie Pie
- Total Time: 45 minutes
- Yield: 8 servings 1x
- Diet: Vegetarian
Description
A delicious and easy-to-make Chocolate Brownie Pie that combines the chewy texture of brownies with a flaky pie crust, perfect for any occasion.
Ingredients
- 1 pre-made pie crust
- 1 box brownie mix
- 1/4 cup vegetable oil
- 2 large eggs
- 1/2 cup chocolate chips
- Optional toppings: ice cream, chocolate drizzle, powdered sugar
Instructions
- Preheat the oven to 350°F (175°C).
- Prepare the brownie batter in a medium bowl following the package instructions, then gently fold in the chocolate chips.
- Transfer the brownie mixture into the unbaked pie crust, spreading it evenly to the edges.
- Bake for 25–30 minutes until the center is just set.
- Remove from the oven and let cool slightly before slicing.
- Serve warm or slightly cooled with optional toppings.
Notes
For a fudgier texture, cool the pie slightly less; for cleaner slices, cool fully. Try adding nuts or caramel swirls for a fun twist.
- Prep Time: 15 minutes
- Cook Time: 30 minutes
- Category: Dessert
- Method: Baking
- Cuisine: American
Nutrition
- Serving Size: 1 slice
- Calories: 350
- Sugar: 20g
- Sodium: 250mg
- Fat: 15g
- Saturated Fat: 7g
- Unsaturated Fat: 6g
- Trans Fat: 0g
- Carbohydrates: 50g
- Fiber: 2g
- Protein: 5g
- Cholesterol: 30mg