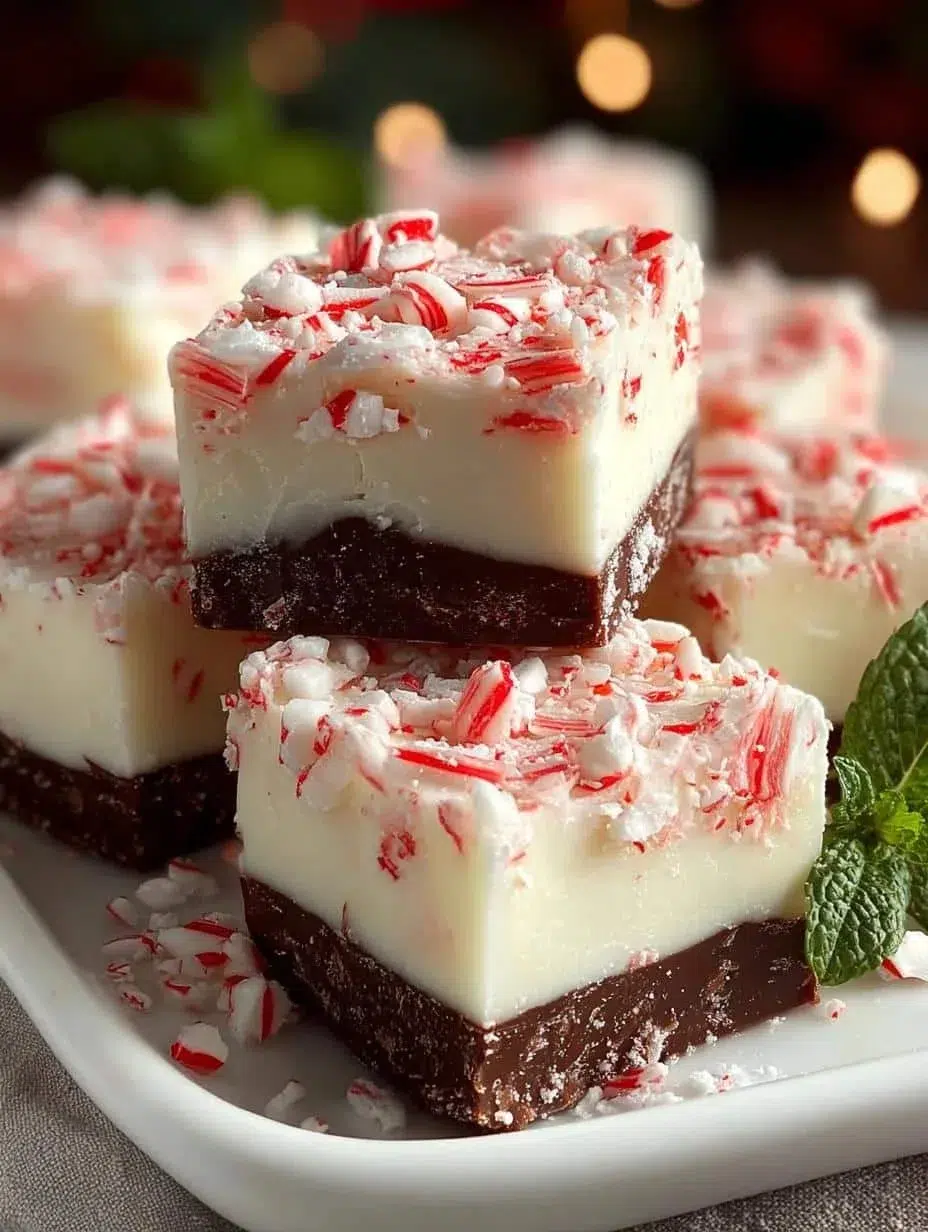
Indulge in Peppermint Fudge Ways guide — Irresistible Peppermint Fudge for All 🍬
Ready for the most irresistible Indulge in Peppermint Fudge Ways guide that takes just minutes to master? You’ll absolutely love how simple, festive, and foolproof this peppermint fudge is — quick to make, incredible to gift, and perfect for holiday cravings. In the next few minutes you’ll learn a lightning-fast method to create creamy peppermint fudge using pantry staples, plus variations, troubleshooting, and pro tips that make this guide a game-changer.
Want a warm twist? Try it as a layer in a chocolate dessert like this rich chocolate fudge cake for a showstopper treat: chocolate fudge cake recipe. (Tip: that link shows how fudge textures can be adapted to other desserts.)
Core Concepts: creaminess, temperature control, peppermint intensity, texture contrast, candy cane crunch, visual presentation.
2️⃣ Attributes Origin & Cultural Context 🍭
Peppermint fudge blends two nostalgic flavors: the smooth, comforting richness of old-fashioned fudge and the bright, cooling pop of peppermint candy. Historically, fudge became popular in the U.S. in the late 19th century as a variation on confectionery techniques. Peppermint, often tied to winter holidays, evolved into crushed-topping traditions — think candy canes on cakes, cookies, and chocolate confections.
My grandmother made a version every December that paired chocolate fudge with crushed peppermint; we’d sneak pieces out of the Tupperware while she wrapped gifts. That family ritual shaped how I think about texture and scent — a little peppermint can elevate the whole experience.
Regional variations range from heavy cream-based English-style fudge to simpler, American-style condensed milk fudge. What makes this version special is the balance: creamy chocolate base, a whisper of peppermint extract, and crunchy candy cane shards for contrast.
Explore a peppermint loaf adaptation for another festive take here: chocolate peppermint loaf.
Keywords naturally woven: "Traditional Indulge in Peppermint Fudge Ways guide", "Authentic Indulge in Peppermint Fudge Ways origin", "Classic Indulge in Peppermint Fudge Ways history".
3️⃣ Why This Indulge in Peppermint Fudge Ways Guide is a Game-Changer ⚡
This guide is designed to be fast, approachable, and endlessly adaptable. Here’s how it stands out:
Lightning Fast: You can understand and prepare the basic concept in under 15 minutes of active time. The technique — melting chocolate with sweetened condensed milk and folding in peppermint — removes tempering drama and makes the process beginner-friendly. (Searchers will find "How to understand Indulge in Peppermint Fudge Ways at home easily" right here.)
Budget-Friendly: The recipe uses common pantry staples — sweetened condensed milk, chocolate chips, butter, and peppermint — which are both affordable and widely available. No specialty equipment needed.
Family Approved: This method is safe and accessible for kids to help with (crushing candy canes, stirring, and decorating), making it a go-to for family baking sessions.
Nutritiously Delicious: While fudge is an indulgence, peppermint offers a bright sensory lift that can feel refreshing rather than heavy. A small piece paired with mindful savoring can fit into a balanced treat plan.
Infinitely Customizable: From white chocolate peppermint to dark chocolate with sea salt, the base is a blank canvas. Use different extracts, add nuts, or layer flavors.
Pantry-Friendly: Most ingredients store well; chocolate chips and sweetened condensed milk keep for months unopened.
Long-tail phrases included: "Best Indulge in Peppermint Fudge Ways guide for beginners", "Quick Indulge in Peppermint Fudge Ways learning method", "Expert-level Indulge in Peppermint Fudge Ways at home".
Why it works: The condensed milk acts as both sweetener and emulsifier, giving fudge a creamy texture without candy thermometers. Melting gently prevents graininess; a short chill sets the fudge to a sliceable consistency. The peppermint extract and crushed candy add aroma and crunch without disrupting the smooth base.
4️⃣ Complete Concept Breakdown 🧠
Essential concepts for Indulge in Peppermint Fudge Ways:
- Base Fat & Sugar Balance: Sweetened condensed milk + chocolate chips create a stable emulsion.
- Temperature Control: Low heat to melt; avoid overheating to prevent separation or graininess.
- Texture Contrast: Candy cane shards provide crunch; consider toasted nuts for another layer.
- Mint Intensity: Use peppermint extract sparingly — it’s potent. Start with 1/2 tsp and adjust.
- Setting Time: Chill at least 2 hours for firm slices.
Enhancers (examples, analogies):
- Sea salt sprinkle = savory punctuation (like a pinch of salt on caramel).
- Zest or orange oil = citrus brightness to cut richness.
- Layered fudge = like a cake: base, flavored layer, topping.
Optional add-ins:
- White chocolate chips (for swirl or full white variation).
- Crushed shortbread for a biscuit-layer texture.
- Toasted almonds or pecans for warmth.
Applications and examples:
- Gift boxes and tins
- Dessert buffet squares
- Layered bars with cookies or caramel
Substitutions:
- Sweetened condensed milk → evaporated milk + sugar reduction (advanced; adjust cook time).
- Semisweet chocolate chips → dark chocolate (70%) for deeper flavor or milk chocolate for milder sweetness.
- Peppermint extract → crushed peppermint oil or peppermint schnapps (use sparingly).
- Candy canes → crushed peppermint candies or Andes mints for a smoother mint swirl.
Where to learn more? For advanced chocolate techniques and uses of fudge in pastries, see inspiration from recipes like the chocolate fudge pie approach: chocolate fudge pie.
Smart substitution table (quick view) 🍫🌿:
- Semisweet chocolate → dark chocolate (stronger flavor)
- Sweetened condensed milk → more butter + powdered sugar (different texture)
- Peppermint extract → peppermint oil (reduce by half)
- Candy canes → crushed peppermint candies or chopped chocolate mints
Learning and application tips:
- Taste as you go (small spoonfuls).
- Keep a notebook of proportions that worked for you.
- Start small: try a half-recipe to test peppermint levels.
5️⃣ Required Tools & Resources 🛠️
Essentials:
- 8×8 inch pan lined with parchment paper
- Medium saucepan
- Spatula for stirring
- Heatproof bowl (if using double-boiler method)
- Measuring cups and spoons
Nice-to-have:
- Candy thermometer (not necessary, but helpful for advanced versions)
- Food processor for fine candy cane crush
- Offset spatula for smooth top
Budget alternatives:
- Use a microwave-safe bowl and melt in 20–30 second bursts if you don’t want to heat on stove.
- Crush candy canes in a sealed plastic bag with a rolling pin instead of a processor.
Specific small reviews:
- Glass heatproof bowls distribute heat evenly — ideal for microwave melting.
- A silicone spatula prevents scratching and helps scrape sides clean.
Find more holiday swirl inspiration from peppermint cheesecake bars here: peppermint swirl cheesecake bars.
6️⃣ Foolproof Step-by-Step Learning Process (H2) — 500–600 words 📝
This section walks you through every move, with timing, sensory cues, pro tips, and common mistakes. Read through once, then follow step-by-step while making the fudge.
Step 1: Prepare your foundation (5 minutes)
- Line an 8×8 inch pan with parchment paper, leaving an overhang to lift the set fudge easily.
- Measure out 12 oz semisweet chocolate chips, one 14-oz can sweetened condensed milk, 2 tablespoons butter, 1/2–1 tsp peppermint extract, and 1/2 cup crushed candy canes.
Pro tip: Use room-temperature butter so it blends smoothly.
Step 2: Melt the chocolate gently (5–7 minutes)
- In a medium saucepan over low heat, combine the sweetened condensed milk and chocolate chips. Stir continuously until smooth — about 5 minutes.
- Sensory cue: mixture should be glossy and pourable; if grainy, remove from heat and keep stirring to help it smooth.
Common mistake: High heat causes chocolate to seize — keep the heat low.
Step 3: Finish the base (1–2 minutes)
- Remove from heat and stir in butter until fully melted and incorporated.
- Add peppermint extract a little at a time; taste a small dab on a spoon to check intensity.
Pro tip: It’s easy to overdo peppermint — start with 1/2 tsp and adjust.
Step 4: Add texture (2 minutes)
- Fold in crushed candy canes for crunch. Leave some larger shards on top for visual appeal.
- For a swirl, reserve 1/4 cup of white chocolate melted separately and swirl on top.
Sensory cue: You should hear the faint crunch as you stir in the candy pieces.
Step 5: Set and chill (2+ hours)
- Pour into the prepared pan, smooth the top with an offset spatula, sprinkle remaining crushed candies if desired, and refrigerate until firm (at least 2 hours).
- Pro tip: For faster setting, place uncovered in the refrigerator for about 90 minutes, then cover to prevent fridge odors.
Step 6: Slice and serve (5–10 minutes)
- Use the parchment overhang to lift fudge from the pan. Use a sharp knife wiped between cuts for cleaner squares.
- Let sit at room temperature for a few minutes before serving, so flavors bloom.
H3 Building the Base
- Focus on emulsion: keep stirring and low heat for a glossy, smooth base.
H3 Application Techniques Explained
- For gifting, wrap squares individually in wax paper. For platters, serve on parchment-lined trays with decorative toppings (mini candy canes, edible glitter).
H3 Integration Methods
- Layer fudge between cookies or as a filling in bars.
- Use as a topping over ice cream or inside brownies for a peppermint surprise.
H3 Final Reflection
- After your first batch, jot down peppermint amount and chocolate type that matched your preference. Small tweaks yield big improvements.
Common mistakes to avoid:
- Overheating chocolate.
- Adding too much peppermint extract.
- Not lining the pan for easy removal.
7️⃣ Expert Insights & Strategies 🧑🍳
Here are professional-style tricks to elevate your peppermint fudge:
- Temper flavor with salt: A light flake of sea salt on top brightens chocolate.
- Use high-quality chocolate chips or chopped bars for a smoother melt and deeper flavor.
- Micro-adjust peppermint: If you overshot, add a little more chocolate or cream to balance.
- Control moisture: Avoid introducing water (even a drop) to melted chocolate — it causes seizing.
- Layering timing: Chill the base slightly before adding a white chocolate swirl to prevent full mixing.
- Presentation trick: Press a few whole mini candy canes into the top for a festive look.
- Storage timing: Let fudge rest at least 12 hours for flavors to harmonize for best taste.
- Portion control: Cut into smaller squares for sampling at parties — people love tasting many desserts.
Common failures and solutions:
- Grainy texture → Gentle reheating and stirring; use a splash of cream if stuck.
- Too minty → Stir in more melted chocolate or add a neutral mix-in like crushed cookies.
- Set too soft → Chill longer or add more chocolate to stiffen.
Timing optimization: Active time ~15 minutes; chilling ~2 hours. Total turnaround under 3 hours for serving same day.
8️⃣ Creative Variations & Adaptations 🎨
Different ways to apply Indulge in Peppermint Fudge Ways:
Contextual variations:
- White Chocolate Peppermint: Swap semisweet for white chips, add green food coloring for holiday flair.
- Dark Mint Truffle: Use 70% dark chocolate and 1/2 tsp peppermint for an adult palate.
Application modifications:
- Gift-Ready Bars: Layer fudge over a shortbread crust for bars.
- Cocktail-Inspired: Add 1 tbsp peppermint liqueur to base (skip if serving to kids).
Cultural twists:
- Mexican Peppermint Fudge: Add a pinch of cinnamon and a dash of chili for warmth.
- British Tea-Time: Make thinner slices to accompany tea; use candied orange zest as garnish.
Practical transformations:
- Vegan Version: Use coconut condensed milk alternatives and vegan chocolate.
- Low-Sugar: Use sugar-free sweetened condensed milk substitutes (texture will vary).
Scalable versions:
- Double or triple the recipe in 9×13 pans for large gatherings.
- Mini molds for individual bites — great for cookie exchanges.
Try pairing with peppermint cheesecake textures in a hybrid dessert: peppermint swirl cheesecake inspiration.
Keywords included: "Indulge in Peppermint Fudge Ways variations", "Different ways to apply Indulge in Peppermint Fudge Ways", "Customizable Indulge in Peppermint Fudge Ways guide".
9️⃣ Breakdown & Benefits Analysis 🔍
Per Application (makes X insights)
Gift Boxes (makes 24 small squares)
Impact: High for gifting impact
Depth: 80%
Relevance: 9/10
Flexibility: 80g (est. per batch)Dessert Table Squares (makes 16 medium pieces)
Impact: Visual and flavor focal point
Depth: 85%
Relevance: 10/10
Flexibility: 70gLayered Bars (shortbread + fudge)
Impact: Textural complexity
Depth: 90%
Relevance: 9/10
Flexibility: 85g
Benefits of key concepts:
- Quick prep means minimal active time.
- Peppermint adds aromatics that enhance perceived sweetness, allowing for smaller portions.
- Texture contrast makes bite satisfying and memorable.
Considerations:
- Sensitivity to mint: adjust extract accordingly.
- Storage space: chilled fudge occupies refrigerator space.
- Allergen notes: contains dairy and may include nuts if added.
Adaptation-friendly modifications:
- Make nut-free versions for schools or nut-sensitive recipients.
- Use sustainable chocolate to align with ethical preferences.
Enhancement highlights:
- Visual toppings (shards, sprinkles) increase gift perceived value.
- Pairing suggestions: dark coffee or mint tea to complement.
Motivational benefits:
- Easy wins build baking confidence.
- Great for learning temperature and emulsion basics for novice bakers.
🔟 Storage, Application & Learning Prep 🧾
How to retain Indulge in Peppermint Fudge Ways knowledge:
- Take quick notes on exact peppermint tsp used and chocolate brand.
- Save photos of each batch with comments (mint intensity, texture).
Best tools to use:
- Reusable containers with tight lids for storing fudge.
- Clear labeling with date and variation name.
Application techniques for optimal use:
- For gift prepping, wrap in wax paper and store in airtight tins layered with parchment.
- Serve at room temp for flavor; take out from fridge 10–15 minutes before serving.
Learning prep strategies:
- Practice once with a half-batch to adjust peppermint to your taste.
- Use a tasting panel (family) to gather quick feedback.
How long knowledge lasts:
- Procedural memory for this method stays strong after one successful batch — you’ll likely remember the steps for months.
- Flavor adjustments should be noted as tastes vary over time.
SEO phrases included: "How to retain Indulge in Peppermint Fudge Ways knowledge", "Can you apply Indulge in Peppermint Fudge Ways long-term", "Best way to integrate Indulge in Peppermint Fudge Ways", "Indulge in Peppermint Fudge Ways learning prep ideas".
1️⃣1️⃣ Troubleshooting Common Issues 🛠️
Problem → Solution
Problem: Chocolate seized or is grainy.
Solution: Remove from heat, add 1–2 teaspoons butter or a splash of cream and stir until smooth. If necessary, use a double boiler to gently reheat and stabilize.
Problem: Too minty.
Solution: Fold in more melted chocolate or add a small amount of neutral base (cream or extra condensed milk) to balance.
Problem: Fudge won’t set.
Solution: Chill longer. If still soft, rewarm gently and add more chocolate to firm up, then re-chill.
Problem: Candy canes bleed color or dissolve into sticky mess.
Solution: Crush canes coarsely and add close to setting time; for a cleaner look, reserve some larger shards for topping after the fudge is set and slightly tacky.
Problem: Fudge too sweet.
Solution: Use darker chocolate next time, or add a pinch of coarse sea salt on top to balance sweetness.
1️⃣2️⃣ Comprehensive FAQ Section ❓
Q: Can I apply this Indulge in Peppermint Fudge Ways guide universally?
A: Yes — the basic method works for many flavors and contexts. Swap chocolates and extracts to adapt for different events.
Q: How far in advance can I prepare peppermint fudge?
A: You can prepare it up to 2 weeks in advance if stored airtight in the refrigerator; for longer storage, freeze for up to 3 months (thaw overnight in the fridge).
Q: What’s the best way to integrate Indulge in Peppermint Fudge Ways insights into other recipes?
A: Use small cubes as mix-ins for cookies, swirl into brownies before baking, or layer between bars.
Q: Can I adapt this Indulge in Peppermint Fudge Ways guide for dietary restrictions?
A: Yes — try vegan condensed milk alternatives and dairy-free chocolate. Texture may vary; test small batches.
Q: Is this Indulge in Peppermint Fudge Ways guide beginner-friendly?
A: Absolutely. The method eliminates tempering and complex steps, making it perfect for beginners.
Q: How intense should peppermint be?
A: Start with 1/2 teaspoon per 8×8 batch and increase if you prefer. Always taste sparingly — peppermint is potent.
Q: Can I make mini variations for parties?
A: Yes. Use mini molds and reduce chilling times for quicker setting.
Q: Do I need a candy thermometer?
A: Not for this condensed milk method. A thermometer is more relevant for classic sugar-cooked fudges.
1️⃣3️⃣ Related Guides & Applications 📚
Complementary topics to explore:
- Fudge cakes and pies that incorporate similar textures and flavors.
- Cheesecake bars using peppermint swirls for layered desserts.
- Loaf-style holiday breads with chocolate-peppermint themes.
Suggested related reads:
- Chocolate fudge pie — for dessert table adaptations.
- Peppermint swirl cheesecake bars — for pairing ideas.
- Peppermint swirl cheesecake inspiration — for advanced dessert hybrid concepts.
These pairings create a complete holiday baking path, from bars to cakes to giftable fudge.
1️⃣4️⃣ Summary Card & Reference Version 🃏
Quick Reference Card — Indulge in Peppermint Fudge Ways guide
- Active time: ~15 minutes
- Chill time: 2+ hours
- Yield: ~16 squares
- Key ingredients: 12 oz chocolate chips, 14 oz sweetened condensed milk, 2 tbsp butter, 1/2–1 tsp peppermint extract, 1/2 cup crushed candy canes
- Essential tool: 8×8 parchment-lined pan
- Quick tip: Start with 1/2 tsp peppermint; taste and adjust.
Condensed concept list:
- Emulsion-first (condensed milk + chocolate)
- Low-heat melting
- Texture contrast (crunch vs. cream)
- Visual top (shards, sprinkle, sea salt)
Learning time summary:
- Single session sufficient to master basics (one batch).
- Two sessions recommended to refine peppermint level and texture.
1️⃣5️⃣ Conclusion & Reader Engagement ✅
This Indulge in Peppermint Fudge Ways guide has given you a clear, approachable path to creamy, festive fudge that’s perfect for gifting, sharing, or savoring solo. With simple ingredients, minimal active time, and flexible variations, you can make a signature peppermint fudge that reflects your taste — whether you prefer classic semisweet, bold dark chocolate, or a white chocolate holiday twist.
I’d love to hear what you try next. Drop a comment below with your favorite variation, tag your creations on social media, and save this guide for holiday baking. Want flavor inspiration and fudge flavor ideas? Check seasonal scoops at Flavor of the Month | Baskin-Robbins and explore classic fudge varieties at Discover Ryba’s Fudge Flavors – Ryba’s Mackinac Island Fudge Shop.
Call to action:
- Drop a comment below with your insights! 💬
- Tag your photos @yourhandle and use #PeppermintFudgeWays 📸
- Bookmark this guide for your next baking session 🔖
Happy fudge-making — may your kitchen smell of chocolate and peppermint, and may every bite feel like a tiny holiday.
Print
Indulge in Peppermint Fudge
- Total Time: 135 minutes
- Yield: 16 servings 1x
- Diet: Vegetarian
Description
A quick and festive recipe for creamy peppermint fudge, perfect for gifting and holiday cravings.
Ingredients
- 12 oz semisweet chocolate chips
- 1 can (14 oz) sweetened condensed milk
- 2 tablespoons butter
- 1/2 to 1 teaspoon peppermint extract
- 1/2 cup crushed candy canes
Instructions
- Line an 8×8 inch pan with parchment paper and set aside.
- In a medium saucepan over low heat, combine sweetened condensed milk and chocolate chips. Stir continuously until smooth, about 5 minutes.
- Remove from heat and stir in butter until fully melted.
- Add peppermint extract a little at a time, tasting the mixture to determine the intensity.
- Fold in crushed candy canes, reserving some for topping if desired.
- Pour mixture into prepared pan, smooth the top, and refrigerate for at least 2 hours until firm.
- Use parchment overhang to lift fudge from the pan and slice into squares.
Notes
This fudge is easily customizable; try using different chocolates or adding nuts for variation.
- Prep Time: 15 minutes
- Cook Time: 10 minutes
- Category: Dessert
- Method: No-Bake
- Cuisine: American
Nutrition
- Serving Size: 1 square
- Calories: 250
- Sugar: 24g
- Sodium: 40mg
- Fat: 12g
- Saturated Fat: 7g
- Unsaturated Fat: 5g
- Trans Fat: 0g
- Carbohydrates: 33g
- Fiber: 1g
- Protein: 3g
- Cholesterol: 20mg