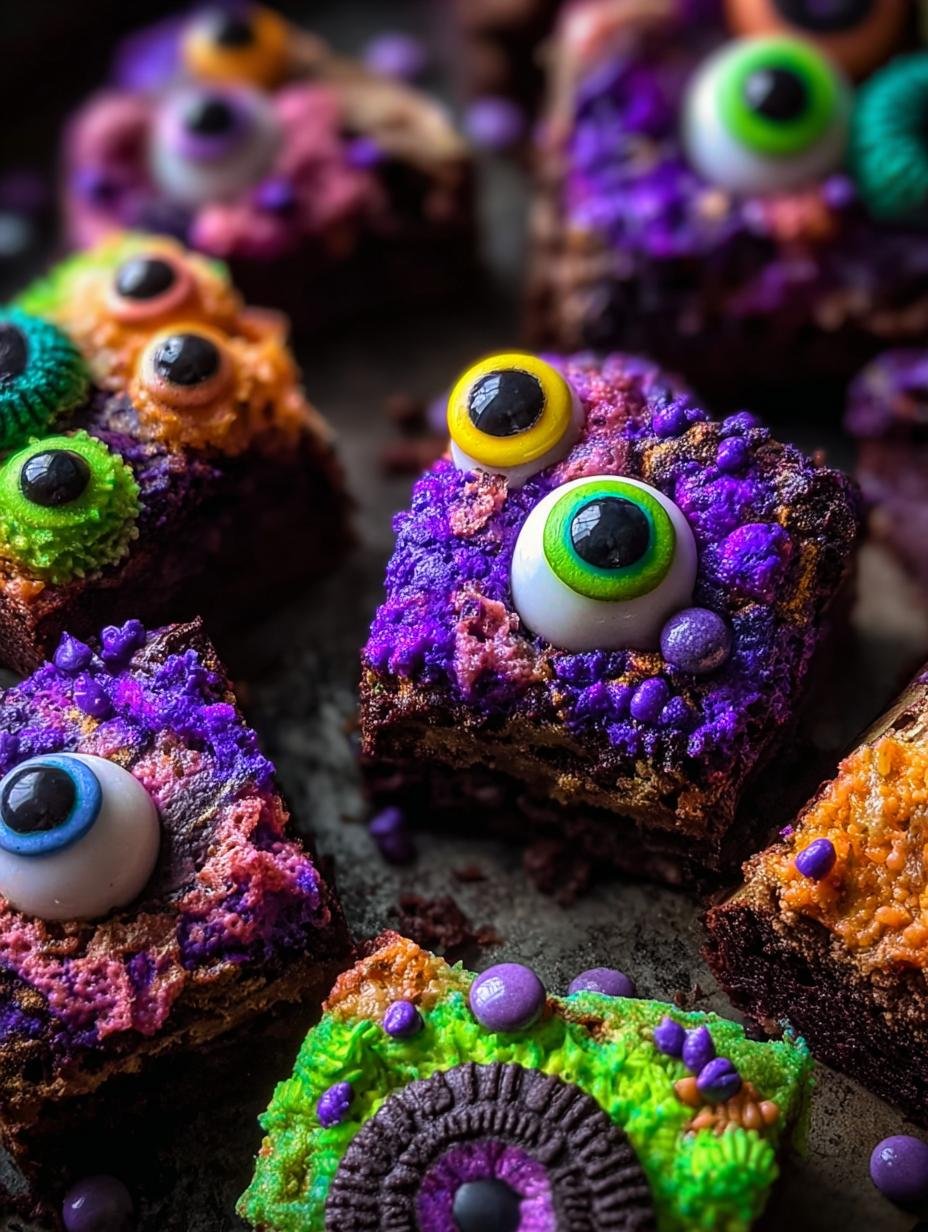
Halloween Monster Brownies have been my go-to spooky dessert ever since I first saw them at a friend’s Halloween party years ago. The sheer delight on everyone’s faces, especially the kids, as they dug into these ridiculously fun, fudgy creations was unforgettable. The vibrant neon frosting, the dozens of googly candy eyes, and the satisfying crunch from hidden candy bits make them not just a treat, but an experience. They’re the perfect centerpiece for any Halloween gathering, and surprisingly simple to whip up. Let’s get baking these easy Halloween treats!
Why You’ll Love These Halloween Monster Brownies
These aren’t just any brownies; they’re a party in a pan! Get ready to wow your guests with:
- An unbelievably rich, fudgy brownie base that’s incredibly satisfying.
- A fun, festive, and spooky design that’s perfect for any Halloween celebration.
- Customizable decorations with endless possibilities for candy and frosting colors.
- A crowd-pleasing dessert that’s simple enough for beginner bakers.
- The perfect balance of sweet, chocolatey goodness and delightful textures.
- A truly memorable treat that kids and adults alike will adore.
- These fudgy brownies are sure to be the star of your Halloween party table.
- An easy way to add some monstrous fun to your holiday baking.
Ingredients for Your Monsterously Good Halloween Brownies
Whipping up these fun monster brownies is a breeze with these simple ingredients. I’ve found that using room temperature eggs really helps achieve that perfect fudgy texture. For more baking tips, check out these therapeutic cooking tips.
- 1 cup (2 sticks) unsalted butter – melted for easy mixing
- 2 1/4 cups packed light brown sugar – adds moisture and a caramel note
- 1/2 cup granulated sugar – balances the sweetness
- 4 large eggs, room temperature – essential for structure and richness
- 2 teaspoons vanilla extract – for that classic warm flavor. Learn about the different types of vanilla.
- 1 cup cocoa powder (natural or Dutch-process) – the heart of our chocolatey base
- 1 1/4 cups all-purpose flour – the structure for our fudgy goodness
- 3/4 teaspoon fine salt – enhances all the flavors
- 1 cup semi-sweet chocolate chips – for extra pockets of melty chocolate
- 8 ounces whipped vanilla frosting (about 1 cup) – the base for our monster decorations
- Gel food coloring: neon green, purple, orange – to bring our monsters to life!
- 1 – 2 cups candy eyes, assorted sizes – the signature monster feature
- Optional mix-ins (1 to 1 1/2 cups): chopped Halloween candy, Oreo chunks, or cereal (Cocoa Puffs, Trix) – for added crunch and fun

How to Make These Spooktacular Halloween Monster Brownies
- Step 1: Preheat your oven to 350°F (175°C). Line a 9×13-inch baking pan with parchment paper and lightly grease it. This simple step ensures your brownies won’t stick and makes for easy cleanup.
- Step 2: In a large microwave-safe bowl, melt the 1 cup (2 sticks) unsalted butter. Once melted, whisk in the 2 1/4 cups packed light brown sugar and 1/2 cup granulated sugar until well combined. Let this mixture cool for about 3–4 minutes; it should be warm, not hot.
- Step 3: Whisk in the 4 large eggs one at a time, ensuring each is fully incorporated before adding the next. Stir in the 2 teaspoons vanilla extract. Your mixture should look smooth and glossy.
- Step 4: Sift the 1 cup cocoa powder, 1 1/4 cups all-purpose flour, and 3/4 teaspoon fine salt directly into the wet ingredients. Gently fold everything together with a spatula until just combined. Be careful not to overmix, as this can lead to tough brownies.
- Step 5: Fold in the 1 cup semi-sweet chocolate chips and any of your optional mix-ins like chopped candy or cookie pieces. The batter will be thick and rich, smelling wonderfully chocolatey.
- Step 6: Spread the thick batter evenly into your prepared pan. You might need to use your spatula to coax it into the corners.
- Step 7: Bake for 30–35 minutes. You’ll know these Halloween brownies are ready when a toothpick inserted into the center comes out with moist crumbs attached – not completely clean, but not wet batter either. The aroma filling your kitchen will be heavenly!
- Step 8: Let the brownies cool completely in the pan on a wire rack. This is crucial for getting clean cuts and for the frosting to set properly. Rushing this step will lead to messy cuts and melted frosting.
- Step 9: While the brownies cool, tint your 8 ounces whipped vanilla frosting. Divide it into bowls and add a few drops of gel food coloring (neon green, purple, orange) to each, stirring until you achieve vibrant, spooky colors for your Halloween brownies.
- Step 10: Once completely cool, spread or pipe the tinted frosting over the brownies. Get creative with swirls and patterns!
- Step 11: Immediately press the 1–2 cups candy eyes and any extra candy or cereal onto the frosting while it’s still a bit tacky. This helps them adhere firmly.
- Step 12: Slice the brownies into 24 squares. These spooky and delicious Halloween Monster Brownies are now ready to be devoured!

Tips for the Best Halloween Monster Brownies
Want to make your Halloween brownies truly unforgettable? Follow these simple pro tips for guaranteed success and maximum monster impact:
- For the fudgiest texture, don’t overbake! Pull them out when a toothpick has moist crumbs.
- Press candy eyes and decorations on while the frosting is still slightly tacky so they stick well.
- If you’re short on time, a good quality boxed brownie mix can be a shortcut, just add your mix-ins and decorations.
- For a cleaner look, use a piping bag with a round tip to apply the frosting.
What’s the secret to perfectly fudgy Halloween Monster Brownies?
The key to incredibly fudgy brownies is using melted butter and a good amount of brown sugar, plus avoiding overbaking. This combination creates a dense, moist crumb that’s pure chocolate bliss. For more decadent chocolate recipes, explore our recipes section.
Can I make Halloween Monster Brownies ahead of time?
Absolutely! You can bake the brownies up to two days in advance. Store them in an airtight container at room temperature. Decorate them the day you plan to serve them, or up to a day ahead if kept cool.
How do I avoid common mistakes with Halloween Monster Brownies?
Don’t overmix the batter; this makes brownies tough. Also, ensure the brownies are completely cool before frosting, or you’ll end up with a melted mess. Finally, use gel food coloring for vibrant hues without thinning the frosting. Learn more about baking with gel food coloring.
Best Ways to Serve Your Halloween Monster Brownies
These festive brownies are showstoppers on their own, but here are a few ideas to make your Halloween spread even more spectacular. Serve them as a delightful centerpiece dessert at your Halloween party, alongside a spooky punch or a creamy milkshake. They also make for fantastic, easy Halloween treats for a school bake sale or a neighborhood potluck. For an extra special touch, pair a fudgy brownie with a scoop of vanilla ice cream – the contrast in temperature and texture is divine! Consider pairing them with other dessert recipes for a complete treat table.
Nutrition Facts for Halloween Monster Brownies
These monstrously delicious treats are packed with flavor, and here’s a look at what you can expect in each serving. Remember, these figures are based on the recipe as written and may vary slightly.
- Calories: 311
- Fat: 16g
- Saturated Fat: 9g
- Unsaturated Fat: 7g
- Trans Fat: 0g
- Carbohydrates: 41g
- Fiber: 1g
- Sugar: 35g
- Protein: 3g
- Cholesterol: 70mg
- Sodium: 245mg
Nutritional values are estimates and may vary based on specific ingredients used and portion sizes.
How to Store and Reheat Your Halloween Monster Brownies
Keeping these spooky treats fresh is easy, ensuring your delicious Halloween Monster Brownies are always ready for a monster mash! After they’ve completely cooled, store them in a single layer in an airtight container. This prevents the decorations from getting smushed. For best results, consume them within 3 to 4 days when stored at room temperature. If you need to keep them longer, you can freeze them. Wrap individual brownies tightly in plastic wrap, then in aluminum foil, and freeze for up to 3 months. When you’re ready to enjoy them, thaw them overnight in the refrigerator. For a warm, gooey treat, you can gently reheat individual brownies in the microwave for about 10-15 seconds, or until warmed through. This quick reheating method is perfect for satisfying a sudden craving for these delightful chocolate treats!
Frequently Asked Questions About Halloween Monster Brownies
Can I use a different type of chocolate for these Halloween Monster Brownies?
You can absolutely experiment with different chocolates! While semi-sweet is classic, milk chocolate chips will make them sweeter, and dark chocolate chips will add a richer, more intense flavor to your monster brownies. Just ensure they’re good quality for the best melt.
What if I don’t have whipped frosting? Can I make my own?
Of course! You can make a simple buttercream frosting by creaming softened butter with powdered sugar and a splash of milk or cream. Beat until fluffy, then tint with gel colors. It might be a bit stiffer than whipped frosting, so adjust consistency as needed for decorating your Halloween brownies.
How do I get the candy eyes to stick to the frosting?
The trick is to add the candy eyes while the frosting is still a bit tacky. If your frosting has started to set, you can gently dab the back of the candy eye with a tiny bit of extra frosting or even a dab of corn syrup to help it adhere securely to your monster brownies.
Can I make these Halloween Monster Brownies gluten-free?
Yes, you can! Substitute the all-purpose flour with a good quality gluten-free all-purpose baking blend that contains xanthan gum. Ensure the blend is designed for 1:1 substitution. You might find that the texture is slightly different, but they’ll still be delicious Halloween brownies!
Variations of Halloween Monster Brownies You Can Try
Looking to switch things up or cater to specific needs? These Halloween brownies are super adaptable! Here are a few fun twists:
- Dietary-Friendly: For gluten-free guests, simply swap the all-purpose flour for a 1:1 gluten-free baking blend. For a vegan version, use vegan butter, a flax egg (1 tbsp flaxseed meal + 3 tbsp water, let sit 5 min), and vegan frosting.
- Flavor Boost: Add a teaspoon of espresso powder to the batter to deepen the chocolate flavor, or swirl in some fruit jam (like raspberry or cherry) for a surprising fruity center in your Halloween brownies.
- No-Bake Option: While baking creates the classic fudgy texture, you could adapt this into a no-bake bar using crushed cookies as a base and a thick chocolate ganache or frosting layer topped with decorations.
- Mini Monsters: Bake the batter in mini muffin tins for bite-sized treats. Adjust the baking time to about 15-18 minutes. These are perfect for little hands or as part of a larger dessert spread.


Spooky Halloween Monster Brownies: 12 Fun Tips
- Total Time: 45–50 minutes
- Yield: 24 brownies 1x
- Diet: Vegetarian
Description
Fudgy Halloween Monster Brownies with neon frosting, candy eyes, and crunchy mix-ins for a spooky, party-ready dessert. These Halloween Monster Brownies are simple to make and perfect for parties.
Ingredients
- 1 cup (2 sticks) unsalted butter
- 2 1/4 cups packed light brown sugar
- 1/2 cup granulated sugar
- 4 large eggs, room temperature
- 2 teaspoons vanilla extract
- 1 cup cocoa powder (natural or Dutch-process)
- 1 1/4 cups all-purpose flour
- 3/4 teaspoon fine salt
- 1 cup semi-sweet chocolate chips
- 8 ounces whipped vanilla frosting (about 1 cup)
- Gel food coloring: neon green, purple, orange
- 1 – 2 cups candy eyes, assorted sizes
- Optional mix-ins (1 to 1 1/2 cups): chopped Halloween candy, Oreo chunks, or cereal (Cocoa Puffs, Trix)
Instructions
- Preheat oven to 350°F. Line a 9×13-inch pan with parchment and lightly grease.
- Melt butter. Whisk in brown sugar and granulated sugar. Cool 3–4 minutes.
- Whisk in eggs one at a time, then vanilla.
- Sift in cocoa, flour, and salt. Fold until just combined.
- Fold in chocolate chips and optional candy.
- Spread into pan.
- Bake 30–35 minutes until a toothpick shows moist crumbs.
- Cool completely.
- Tint frosting with gel colors.
- Spread or pipe on top.
- Press candy eyes and extra candy/cereal.
- Slice 24 squares and serve.
Notes
- Use a boxed mix plus chopped candy for speed.
- Press eyes while the surface is tacky for better adhesion.
- Set up decorating bowls for parties for easy assembly.
- Store in a single layer to protect decorations.
- Prep Time: 10 minutes
- Cook Time: 30–35 minutes
- Category: Dessert
- Method: Baked
- Cuisine: American
Nutrition
- Serving Size: 1 brownie
- Calories: 311
- Sugar: 35g
- Sodium: 245mg
- Fat: 16g
- Saturated Fat: 9g
- Unsaturated Fat: 7g
- Trans Fat: 0g
- Carbohydrates: 41g
- Fiber: 1g
- Protein: 3g
- Cholesterol: 70mg