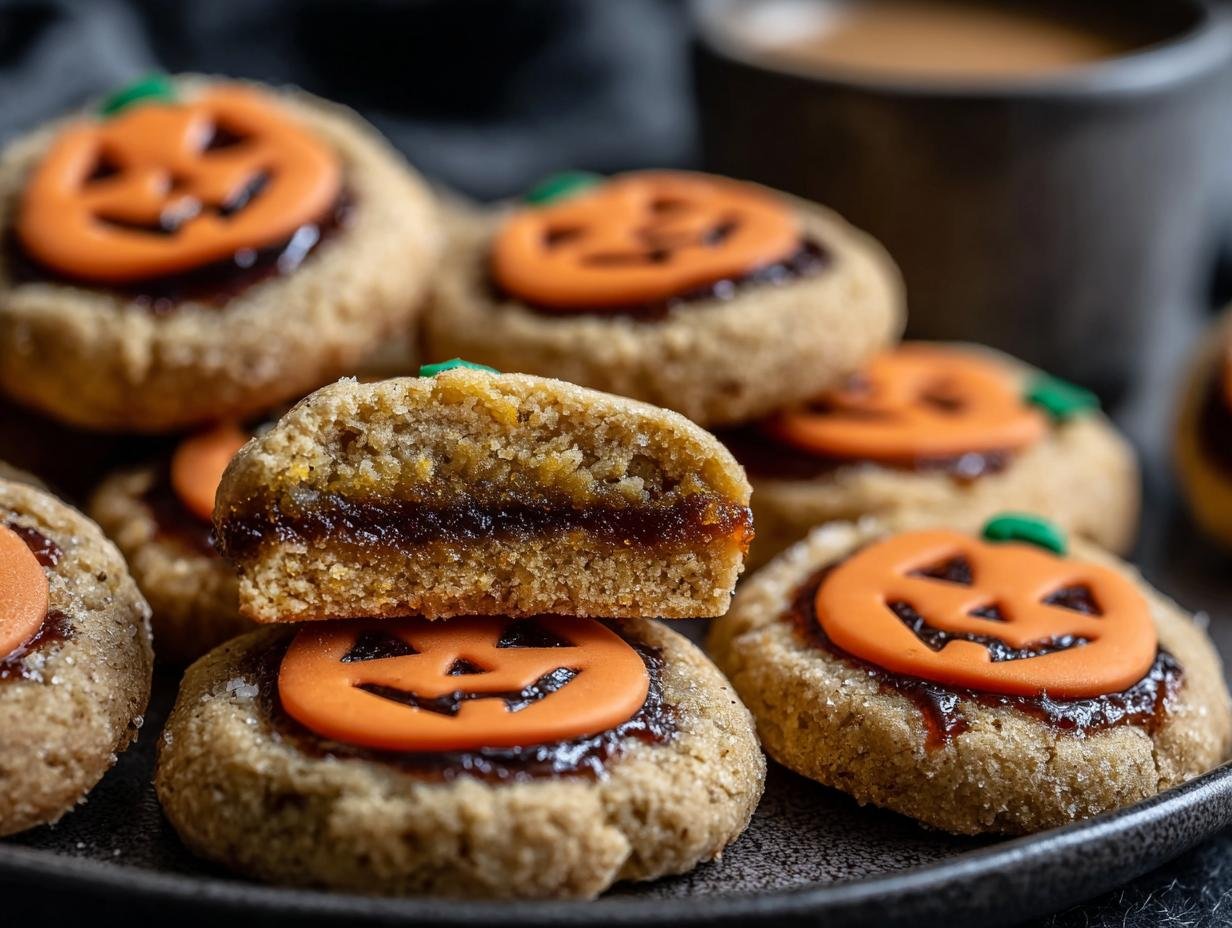
Halloween Date Filled Cookies have been a staple in my kitchen for years, bringing a touch of spooky sweetness to our autumn celebrations. I remember the first time I tried making them; the aroma of sweet dates and warm spices filled my home, making everyone gather in the kitchen, eager for a taste. These aren’t just any cookies; they’re soft, chewy delights with a gooey, caramelized date center that’s utterly irresistible. They’re the perfect treat to share, making them ideal for Halloween parties or just a cozy evening in. Get ready to whip up some of the most delicious and spooky date cookies you’ve ever tasted. Let’s get baking!
Why You’ll Love These Halloween Date Filled Cookies
These festive treats are more than just a cookie; they’re a delightful experience perfect for the spooky season. You’ll adore them because:
- They offer a unique sweet and chewy texture with a wonderfully gooey date center.
- Making them is surprisingly simple, making them an ideal choice for easy Halloween date cookies.
- The warm, comforting flavors are perfect for fall baking.
- They’re a fantastic way to create cherished memories with family and friends, making them truly homemade Halloween date cookies.
- The delicious date paste filling adds a natural sweetness that everyone will enjoy.
- They look incredibly festive and are sure to be a hit at any Halloween party.
- The smell of these baking will fill your home with a cozy, autumnal aroma.
- They’re incredibly versatile and can be customized with your favorite fall spices.
Ingredients for Halloween Date Filled Cookies
Gathering your ingredients is the first step to creating these delightful Halloween Date Filled Cookies. For the cookie dough, you’ll need 1 cup shortening, 1/2 cup granulated sugar, and 1/2 cup brown sugar, creamed together until fluffy for that perfect soft texture. Then, add 1 egg, 3 tbsp milk, and 1 tsp vanilla extract for moisture and flavor. The dry ingredients include 3 cups all-purpose flour, 1/2 tsp salt, and 1/2 tsp baking soda, which work together to create a tender cookie. For the irresistible filling, you’ll need 2 cups chopped dates, which form the base for a wonderfully gooey center, making them truly date paste filled Halloween cookies. You’ll also need 1/2 cup sugar and 1/2 cup water to cook the dates down, plus 2 tbsp lemon juice for a touch of brightness and 1/4 tsp salt to enhance the sweetness.

How to Make Halloween Date Filled Cookies
Let’s dive into how to make Halloween date cookies! These steps will guide you to creating wonderfully soft cookies with a luscious date center.
- Step 1: Preheat your oven to 375°F (190°C). Prepare a baking sheet by lining it with parchment paper; this ensures your cookies bake evenly and don’t stick.
- Step 2: In a large bowl, cream together the 1 cup shortening, 1/2 cup granulated sugar, and 1/2 cup brown sugar until the mixture is light and fluffy. This creaming process is key to achieving that wonderfully tender cookie texture.
- Step 3: Beat in the 1 egg, then stir in the 3 tbsp milk and 1 tsp vanilla extract until everything is well combined. The aroma of vanilla is already making my kitchen smell like fall!
- Step 4: In a separate bowl, sift together 3 cups all-purpose flour, 1/2 tsp salt, and 1/2 tsp baking soda. Gradually add these dry ingredients to the wet mixture, mixing until just combined. Don’t overmix!
- Step 5: Wrap the dough in plastic wrap and chill it in the refrigerator for at least 1 hour. This step is crucial for making the dough easier to handle and roll, preventing it from becoming too sticky.
- Step 6: While the dough chills, let’s make the date filling. In a saucepan, combine 2 cups chopped dates, 1/2 cup sugar, and 1/2 cup water. Bring this mixture to a boil, then reduce the heat and simmer for about 5 minutes, stirring occasionally, until it thickens into a paste. Stir in 2 tbsp lemon juice and 1/4 tsp salt. Let this filling cool completely. This makes for perfect Halloween stuffed cookies with dates.
- Step 7: Once the dough is chilled, roll it out on a lightly floured surface to about 1/8 inch thickness. Use a 2 1/2 inch round cutter to cut out cookie shapes.
- Step 8: Place about 1 tablespoon of the cooled date filling onto the center of half of the cookie rounds. Gently place another cookie round on top of the filling.
- Step 9: Press the edges of the cookie together firmly with a fork to seal the filling inside. This prevents any of that delicious date goodness from leaking out during baking.
- Step 10: Arrange the cookies on your prepared baking sheets. Bake for 10–12 minutes, or until the edges are lightly golden brown. The kitchen will fill with the most amazing sweet, slightly caramel-like scent.
- Step 11: Let the cookies cool on the baking sheets for a few minutes before transferring them to a wire rack to cool completely. Enjoy these delightful Halloween stuffed cookies with dates!

Pro Tips for the Best Halloween Date Filled Cookies
To ensure your Halloween date cookies are absolutely perfect every time, I’ve picked up a few tricks along the way. These tips will help you achieve that ideal chewy texture and gooey center!
- Always use good quality, soft dates for the filling; dried-out dates will make the filling hard to work with.
- Don’t skip chilling the dough! It makes a huge difference in handling and prevents the cookies from spreading too much.
- Ensure the date filling is completely cool before assembling the cookies. Warm filling can melt the dough and cause leakage.
- For extra festive flair, lightly dust the cooled cookies with powdered sugar or use Halloween-themed sprinkles.
What’s the secret to perfect Halloween Date Filled Cookies?
The secret lies in the balance of a soft, chewy cookie dough and a perfectly cooked, gooey date filling. Using good quality dates and ensuring they are cooked down to a jam-like consistency is key to the best date filled cookie recipe Halloween has to offer.
Can I make Halloween Date Filled Cookies ahead of time?
Yes! You can prepare the dough and the date filling up to 3 days in advance and store them separately in the refrigerator. Assemble and bake the cookies closer to when you plan to serve them for the freshest taste.
How do I avoid common mistakes with Halloween Date Filled Cookies?
Avoid overfilling your cookies, as this can cause the filling to leak out during baking. Also, be careful not to overmix the dough once the flour is added, which can lead to tough cookies instead of chewy ones.
Best Ways to Serve Halloween Date Filled Cookies
These delightful festive Halloween date cookies are perfect for so many occasions! For a classic Halloween party spread, arrange them alongside other spooky treats like ghost meringues or pumpkin-shaped sugar cookies. They pair wonderfully with a cold glass of milk or a warm mug of apple cider, which really brings out their sweet, spiced flavor. I also love to serve them as part of a dessert charcuterie board, alongside some sharp cheddar cheese and dark chocolate, which offers a sophisticated contrast to their sweetness. They truly are a versatile treat that adds a special touch to any fall gathering.
Nutrition Facts for Halloween Date Filled Cookies
When you’re enjoying these delightful Halloween Date Filled Cookies, it’s helpful to know their nutritional breakdown. Each cookie is a sweet treat, and understanding the specifics helps with portion control.
- Serving Size: 1 cookie
- Calories: 120
- Fat: 5g
- Saturated Fat: 2g
- Protein: 1g
- Carbohydrates: 18g
- Fiber: 1g
- Sugar: 12g
- Sodium: 50mg
Nutritional values are estimates and may vary based on specific ingredients used.
How to Store and Reheat Halloween Date Filled Cookies
These delightful Halloween baked goods with dates are best enjoyed fresh, but thankfully, they store beautifully! Once your cookies have completely cooled on a wire rack, transfer them to an airtight container. For storing them at room temperature, they’ll stay delicious for about 3 to 4 days. If you plan to keep them longer, the freezer is your best friend. Wrap them well in plastic wrap, then a layer of aluminum foil, and they can be frozen for up to 3 months. Thaw them overnight in the refrigerator for the best texture.
Reheating is simple! If they’ve been stored at room temperature, a quick 30-second zap in the microwave can bring back their fresh-baked warmth. For cookies straight from the freezer, let them thaw first, then you can gently warm them in a low oven (around 300°F or 150°C) for about 5 minutes until they are just heated through. This ensures that lovely gooey center is perfect every time!
Frequently Asked Questions About Halloween Date Filled Cookies
What are Halloween Date Filled Cookies?
These are delightful cookies specifically made for the Halloween season, featuring a soft, chewy cookie dough encasing a sweet, gooey filling made from dates. They are designed to be festive and delicious, making them a perfect treat for parties or trick-or-treaters. They are a wonderful example of Halloween cookie ideas dates offer.
Why make Halloween Date Filled Cookies?
You should make these cookies because they offer a unique flavor combination that’s both comforting and festive, perfect for autumn baking. They’re relatively easy to make and provide a wonderful homemade touch that store-bought treats can’t match. Plus, the gooey date center is a delightful surprise that sets them apart from typical Halloween baked goods.
Can I use a different kind of date for the filling?
While Medjool dates are often preferred for their sweetness and soft texture, you can use other varieties of soft dates. If your dates are a bit drier, you might need to add a little extra water when cooking the filling to achieve the right consistency, ensuring your Halloween stuffed cookies with dates have that perfect gooey center.
How do I get the cookies to look more festive?
To enhance their spooky appeal, you can use Halloween-themed cookie cutters, like bats or ghosts, instead of simple rounds. Once cooled, you can also dust them lightly with powdered sugar to mimic a ghostly effect, or even pipe simple Halloween designs onto them with orange or black icing. These little touches make them truly special festive Halloween date cookies.
Variations of Halloween Date Filled Cookies You Can Try
While the classic recipe for Halloween Date Filled Cookies is fantastic on its own, don’t be afraid to get creative! Here are a few ideas to make your spooky baking even more exciting and create wonderfully sweet Halloween date cookies.
- Add Spices: For a deeper, more autumnal flavor, stir a pinch of cinnamon, nutmeg, or even pumpkin pie spice into both the cookie dough and the date filling. These date and spice Halloween cookies will fill your home with an irresistible aroma.
- Gluten-Free Option: Easily make these cookies gluten-free by swapping the all-purpose flour for a good quality gluten-free all-purpose baking blend. Ensure your blend has xanthan gum for structure.
- Chocolate Lover’s Dream: Incorporate cocoa powder into the cookie dough for a rich chocolate cookie. You could even add a few mini chocolate chips to the date filling for an extra decadent surprise.
- No-Bake Version: For a quicker, no-bake treat, you can adapt the filling and mix it with crushed cookies or oats to form energy balls. Roll them in festive sprinkles for a fun, no-bake Halloween snack.


Halloween Date Filled Cookies: Delicious Spooky Treats
- Total Time: 1 hour 32 minutes
- Yield: 24 cookies 1x
- Diet: Vegetarian
Description
Soft, chewy Halloween Date Filled Cookies with a sweet, gooey date center — perfect for fall baking and festive parties.
Ingredients
- Cookie Dough:
- 1 cup shortening
- 1/2 cup granulated sugar
- 1/2 cup brown sugar
- 1 egg
- 3 tbsp milk
- 1 tsp vanilla extract
- 3 cups all-purpose flour
- 1/2 tsp salt
- 1/2 tsp baking soda
- Date Filling:
- 2 cups chopped dates
- 1/2 cup sugar
- 1/2 cup water
- 2 tbsp lemon juice
- 1/4 tsp salt
Instructions
- Preheat oven to 375°F (190°C).
- Cream shortening and sugars until fluffy. Add egg, milk, and vanilla. Mix well.
- Sift flour, baking soda, and salt, then add to the wet mixture. Chill dough 1 hour.
- In a saucepan, combine dates, sugar, and water. Bring to a boil, simmer 5 minutes. Add lemon juice and salt. Cool.
- Roll dough to 1/8 inch thickness. Cut with 2 1/2 inch round cutter.
- Place 1 tbsp filling on each cookie base. Top with another cookie and seal edges with fork.
- Bake 10–12 minutes until lightly golden. Cool before serving.
Notes
- Chill dough for easier rolling.
- Don’t overfill cookies to avoid leakage.
- Use fun Halloween-shaped cutters for a festive touch.
- Prep Time: 20 minutes
- Cook Time: 12 minutes
- Category: Dessert
- Method: Baking
- Cuisine: American
Nutrition
- Serving Size: 1 cookie
- Calories: 120
- Sugar: 12g
- Sodium: 50mg
- Fat: 5g
- Saturated Fat: 2g
- Unsaturated Fat: 2g
- Trans Fat: 0g
- Carbohydrates: 18g
- Fiber: 1g
- Protein: 1g
- Cholesterol: 10mg