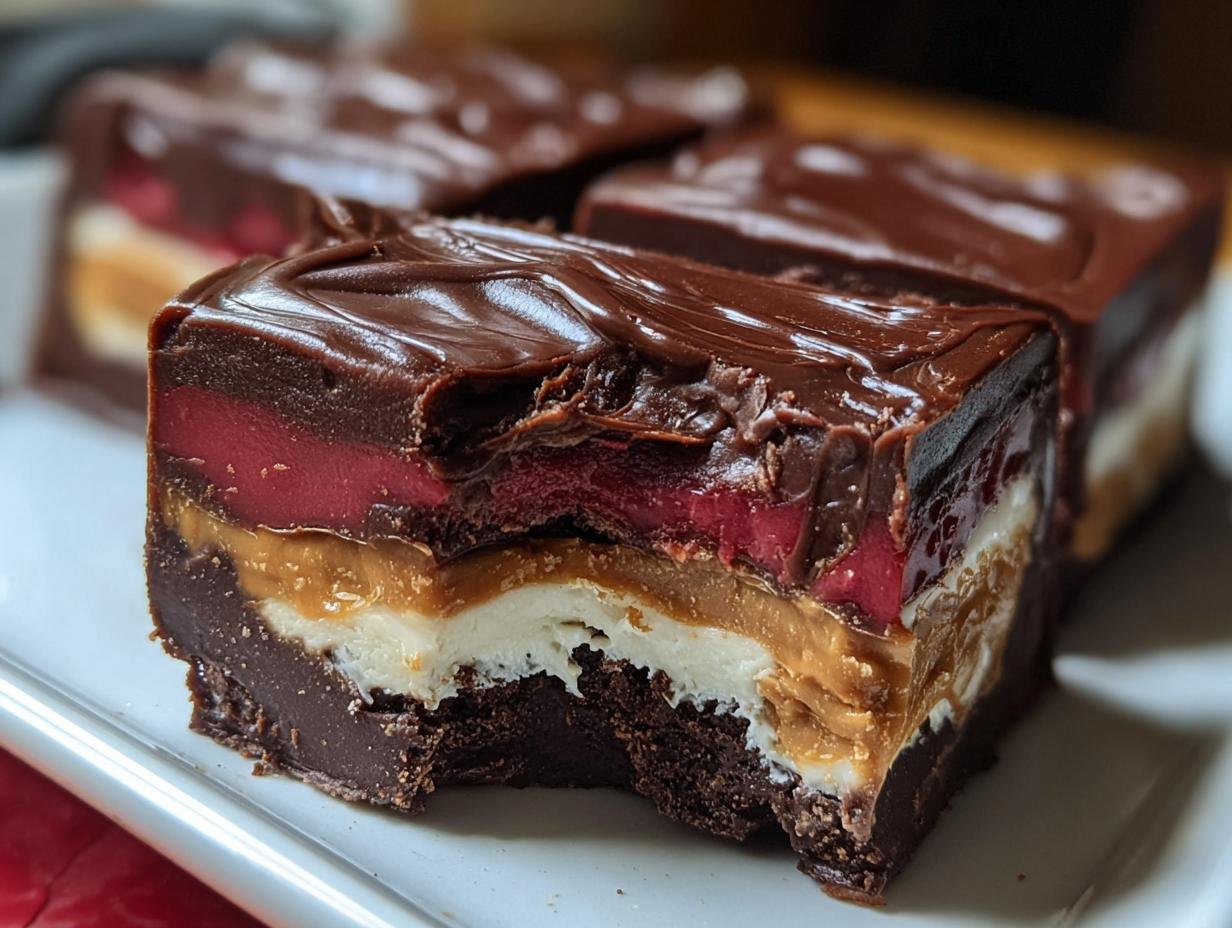
Vampire Fudge Spooky Sweet has a way of making any gathering feel a little more magical and a lot more delicious. I remember the first time I made it for a Halloween party; the rich, dark chocolate combined with that striking blood-red swirl just captivated everyone. The aroma of melting chocolate and creamy peanut butter filled my kitchen, promising a decadent treat. It’s more than just candy; it’s an experience! This simple Vampire fudge recipe is perfect for anyone looking to impress with spooky sweet fudge recipes. Let’s get cooking!
Why You’ll Love This Vampire Fudge Spooky Sweet
- An incredibly rich and decadent chocolate flavor that melts in your mouth.
- Super quick preparation time – you’ll be making this easy vampire fudge in no time!
- It’s surprisingly budget-friendly, using common pantry staples.
- A fantastic option for a visually stunning dessert that’s perfect for Halloween fudge ideas.
- Kid-friendly and a fun activity to make together as a family.
- The creamy peanut butter swirl adds a delightful contrast in texture and taste.
- It’s a vegetarian treat that everyone can enjoy.
- A guaranteed crowd-pleaser for any spooky celebration.
Ingredients for Vampire Fudge Spooky Sweet
Gathering your ingredients is the first step to creating this magical treat. You’ll need the essentials for a rich chocolate base, reminiscent of a classic dark chocolate fudge recipe, and the components for that signature spooky swirl. Here’s what you’ll need:
- 2 sticks (1 cup) unsalted butter – this provides the creamy foundation
- 1 (14 ounce) can sweetened condensed milk – for sweetness and smooth texture
- 1 (12 ounce) bag semi-sweet chocolate chips – these create the deep, rich chocolate flavor
- 1 (12 ounce) bag milk chocolate chips – adding a touch of sweetness and creaminess
- 1 cup creamy peanut butter – this is key for the luscious swirl
- 1 teaspoon vanilla extract – enhances the overall flavor profile
- 1/2 cup powdered sugar – to help thicken the peanut butter swirl
- 1/4 cup unsweetened cocoa powder – intensifies the chocolate flavor
- Red food coloring gel (a tiny amount) – for that perfect blood-red hue
- Optional: Pretzel sticks, crushed Oreos, chopped nuts for garnish – for added texture and presentation
How to Make Vampire Fudge Spooky Sweet
- Step 1: Prepare your pan by lining an 8×8 inch baking pan with parchment paper. Make sure to leave an overhang on the sides; this makes lifting the fudge out so much easier later!
- Step 2: Melt the butter in a large saucepan over medium-low heat. Stir it occasionally to make sure it melts evenly and doesn’t burn.
- Step 3: Gradually whisk in the sweetened condensed milk until the mixture is completely smooth and well combined. This creates the perfect base for our fudge.
- Step 4: Add both the semi-sweet and milk chocolate chips to the saucepan. Stir constantly until the chocolate is completely melted and the mixture is smooth and glossy. This is where the rich chocolate aroma really starts to fill the kitchen!
- Step 5: Stir in the vanilla extract to enhance all those delicious chocolate notes.
- Step 6: In a separate medium bowl, combine the creamy peanut butter with the powdered sugar. Whisk them together until the mixture is smooth and creamy.
- Step 7: Now for the spooky part! Add just a tiny amount of red food coloring gel to the peanut butter mixture. Mix thoroughly until you achieve an even, deep red color, creating that signature blood red vampire fudge look.
- Step 8: Pour about half of the melted chocolate mixture into your prepared baking pan. Spread it evenly to form the base layer.
- Step 9: Carefully spoon dollops of the red peanut butter mixture over the chocolate layer. Use a spoon or offset spatula to swirl the peanut butter into the chocolate, creating a beautiful marbled effect. This step is crucial for the visual appeal of our Vampire fudge recipe.
- Step 10: Pour the remaining chocolate mixture over the peanut butter swirls. Spread it gently to create a smooth top layer, sealing in those gorgeous swirls.
- Step 11: If you’re using any optional toppings, sprinkle them over the top layer now. This is how you can really customize your easy vampire fudge.
- Step 12: Cover the baking pan tightly with plastic wrap. Refrigerate for at least 4 hours, or ideally overnight, until the fudge is completely set and firm. This chilling time is essential for achieving the right texture.
- Step 13: Once set, carefully lift the fudge out of the pan using the parchment paper overhang.
- Step 14: Cut the fudge into small squares using a sharp knife. Wipe the knife clean between cuts for the neatest edges.
- Step 15: Arrange your beautifully made Vampire Fudge Spooky Sweet squares on a serving platter and serve chilled for the best experience.

Pro Tips for the Best Vampire Fudge Spooky Sweet
I’ve learned a few tricks to make this fudge absolutely perfect every time. Follow these tips to ensure your Vampire fudge recipe turns out beautifully:
- Always use gel food coloring for the peanut butter swirl. It provides a much more vibrant and concentrated red color than liquid food coloring, without adding extra moisture that could affect the texture.
- Don’t rush the melting process for the chocolate. Gentle heat and constant stirring are key to achieving that smooth, glossy finish. Burnt chocolate is a fudge-ruiner!
- When swirling, work relatively quickly but gently. You want a marbled effect, not a completely blended mixture, to get that signature spooky look.
- Ensure your fudge is completely chilled before cutting. This makes for much cleaner slices and a better final presentation.
What’s the secret to perfect Vampire Fudge Spooky Sweet?
The real secret to the best vampire fudge lies in the quality of your chocolate and the technique for the swirl. Ensure all the chocolate chips are fully melted and smooth before combining, and be patient with the swirling—a marbled effect is more appealing than a muddy one. For more insights on chocolate quality, you can explore resources on chocolate types and uses.
Can I make Vampire Fudge Spooky Sweet ahead of time?
Absolutely! This fudge is perfect for making ahead. You can prepare it up to 24 hours in advance and keep it covered in the refrigerator until you’re ready to cut and serve. It needs at least 4 hours to set properly. For other make-ahead dessert ideas, check out these make-ahead recipes.
How do I avoid common mistakes with Vampire Fudge Spooky Sweet?
The most common mistake is burning the chocolate; always use low heat and stir constantly. Another pitfall is not chilling the fudge long enough, which results in soft, messy slices. Make sure it’s fully set before cutting. Learning about proper chocolate tempering can also help avoid issues.
Best Ways to Serve Vampire Fudge Spooky Sweet
Once your Vampire Fudge Spooky Sweet is perfectly chilled and cut, it’s time to show it off! The classic way to serve this treat is by cutting it into neat, bite-sized squares. For an extra touch of Halloween magic, consider adding a few garnishes. A sprinkle of crushed Oreos can mimic dirt, while chopped nuts add a nice crunch. If you’re serving this as Halloween party fudge, arrange the squares on a tiered platter for a dramatic presentation. It pairs wonderfully with a glass of cold milk or even a spooky cocktail for the adults. For more dessert presentation ideas, explore other recipes.
Nutrition Facts for Vampire Fudge Spooky Sweet
When you’re enjoying a slice of this delicious Vampire fudge recipe, here’s a general idea of what you’re getting per serving (one square). Keep in mind that these are estimates and can vary slightly based on your specific ingredients and how you cut the fudge.
- Serving Size: 1 square
- Calories: 250
- Fat: 13g
- Saturated Fat: 8g
- Protein: 3g
- Carbohydrates: 30g
- Fiber: 1g
- Sugar: 26g
- Sodium: 45mg
Nutritional values are estimates and may vary based on specific ingredients used.

How to Store and Reheat Vampire Fudge Spooky Sweet
Keeping this delicious Vampire Fudge Spooky Sweet fresh is easy, making it a perfect make-ahead treat. Once your fudge has completely cooled and set, you’ll want to store it properly to maintain its texture and flavor. For short-term storage, place the cut squares in an airtight container. You can keep it in the refrigerator for about 3 to 4 days. This makes it incredibly convenient as an easy spooky dessert you can grab when a craving strikes. If you need to store it for longer, the freezer is your best friend. Wrap the fudge squares tightly in plastic wrap, then in aluminum foil, and they’ll keep well for up to 3 months. To reheat, simply let the frozen fudge thaw in the refrigerator overnight. You can also gently warm it in the microwave for a few seconds if you prefer a slightly softer texture, but be careful not to overheat it! For more tips on food storage, consult guides on food storage best practices.
Frequently Asked Questions About Vampire Fudge Spooky Sweet
What makes this fudge so “Vampire”-themed?
The name and theme come from the striking contrast between the deep, dark chocolate base and the vibrant, blood-red peanut butter swirl. It’s visually reminiscent of vampire lore, making it a perfect fit for Halloween or any occasion where you want truly spooky dessert recipes.
Can I substitute the peanut butter in this Vampire Fudge Spooky Sweet?
Yes, you can! While peanut butter is classic, you could try using almond butter or even a smooth cashew butter for a different nutty flavor. For a truly unique twist on vampire themed desserts, consider a cream cheese-based swirl with red coloring for a different kind of richness. You might also enjoy exploring other creative recipe variations.
How do I get the best swirl effect in my Vampire Fudge Spooky Sweet?
The key is to spoon dollops of the red peanut butter mixture over the chocolate base and then use a toothpick or the tip of a knife to gently swirl them together. Don’t over-swirl, or you’ll lose the distinct contrast that makes this fudge so visually appealing. Aim for marbled patterns rather than a fully blended mixture.
Is this Vampire Fudge Spooky Sweet suitable for a bake sale?
Absolutely! Its unique appearance and delicious taste make it a standout item for bake sales or Halloween parties. Cutting it into uniform squares and packaging them nicely will ensure they sell quickly. It’s a fantastic way to offer unique spooky dessert recipes that people will remember. For more ideas on culinary creativity, browse our other recipes.
Variations of Vampire Fudge Spooky Sweet You Can Try
While this Vampire fudge recipe is fantastic as is, I love getting creative in the kitchen! If you’re looking for some fun twists on these ghoulish fudge treats, here are a few ideas to spark your imagination. You can easily adapt this recipe to suit different tastes or dietary needs, making it even more versatile.
- White Chocolate Base: For a lighter, sweeter version, try swapping out the semi-sweet and milk chocolate chips for white chocolate chips. The red swirls will pop even more against a creamy white background, offering a delightful contrast to the traditional dark chocolate.
- Peanut Butter Free: If you or your guests have peanut allergies, you can easily make this fudge without peanut butter. Simply omit it and add a little extra vanilla extract to the chocolate base, or try a swirl made from cream cheese and powdered sugar, colored red. For guidance on vanilla extract, check out our guide.
- Spiced Chocolate: For a more complex flavor profile, add a pinch of cinnamon or a dash of cayenne pepper to the chocolate mixture. This adds a subtle warmth that pairs wonderfully with the sweet chocolate and peanut butter, making for truly creepy fudge recipes with a kick.
- Minty Swirl: Instead of red food coloring, try adding a few drops of peppermint extract to the peanut butter mixture and coloring it green or black. This gives a refreshing twist and a different kind of spooky appeal.

Vampire Fudge Spooky Sweet: 1 Rich Recipe
- Total Time: 270 minutes
- Yield: 16 servings 1x
- Diet: Vegetarian
Description
Vampire Fudge is a spooky and delicious chocolate treat with a vibrant red peanut butter swirl, perfect for Halloween or any time you want a decadent dessert. This easy recipe offers a rich chocolate flavor with a creamy texture and a visually striking appearance.
Ingredients
- 1 cup (2 sticks) unsalted butter
- 1 (14 ounce) can sweetened condensed milk
- 1 (12 ounce) bag semi-sweet chocolate chips
- 1 (12 ounce) bag milk chocolate chips
- 1 cup creamy peanut butter
- 1 teaspoon vanilla extract
- 1/2 cup powdered sugar
- 1/4 cup unsweetened cocoa powder
- Red food coloring gel (a tiny amount)
- Optional: Pretzel sticks, crushed Oreos, chopped nuts for garnish
Instructions
- Line an 8×8 inch baking pan with parchment paper, leaving an overhang on the sides for easy removal.
- In a large saucepan over medium-low heat, melt the butter completely, stirring occasionally to prevent burning.
- Gradually whisk in the sweetened condensed milk until the mixture is smooth and completely combined.
- Add both the semi-sweet and milk chocolate chips to the saucepan. Stir constantly until the chocolate is completely melted and the mixture is smooth and glossy.
- Stir in the vanilla extract.
- In a separate medium bowl, combine the peanut butter and powdered sugar. Whisk until the mixture is smooth and creamy.
- Add a tiny amount of red food coloring gel to the peanut butter mixture and mix thoroughly until an even, deep red color is achieved.
- Pour half of the melted chocolate mixture into the prepared baking pan and spread it evenly to create a base layer.
- Carefully spoon dollops of the red peanut butter mixture over the chocolate layer. Use a spoon or offset spatula to swirl the peanut butter into the chocolate, creating a marbled effect.
- Pour the remaining chocolate mixture over the peanut butter swirls and spread it evenly to create a smooth top layer.
- If desired, sprinkle optional toppings like crushed Oreos, chopped nuts, or pretzel sticks over the top layer.
- Cover the baking pan tightly with plastic wrap and refrigerate for at least 4 hours, or preferably overnight, until the fudge is completely set.
- Once set, carefully lift the fudge out of the pan using the parchment paper overhang.
- Cut the fudge into small squares using a sharp knife, wiping the knife clean between cuts for neat edges.
- Arrange the Vampire Fudge squares on a serving platter and serve chilled.
Notes
- Use medium-low heat when melting butter and chocolate to prevent burning.
- Lining the pan with parchment paper makes removing the fudge much easier.
- A small amount of red food coloring gel is sufficient for a dramatic effect.
- Feel free to experiment with different toppings for added texture and flavor.
- Store leftover Vampire Fudge in an airtight container in the refrigerator for up to a week.
- Prep Time: 15 minutes
- Cook Time: 15 minutes
- Category: Dessert
- Method: Swirling/Marbling
- Cuisine: American
Nutrition
- Serving Size: 1 square
- Calories: 250
- Sugar: 26g
- Sodium: 45mg
- Fat: 13g
- Saturated Fat: 8g
- Carbohydrates: 30g
- Fiber: 1g
- Protein: 3g