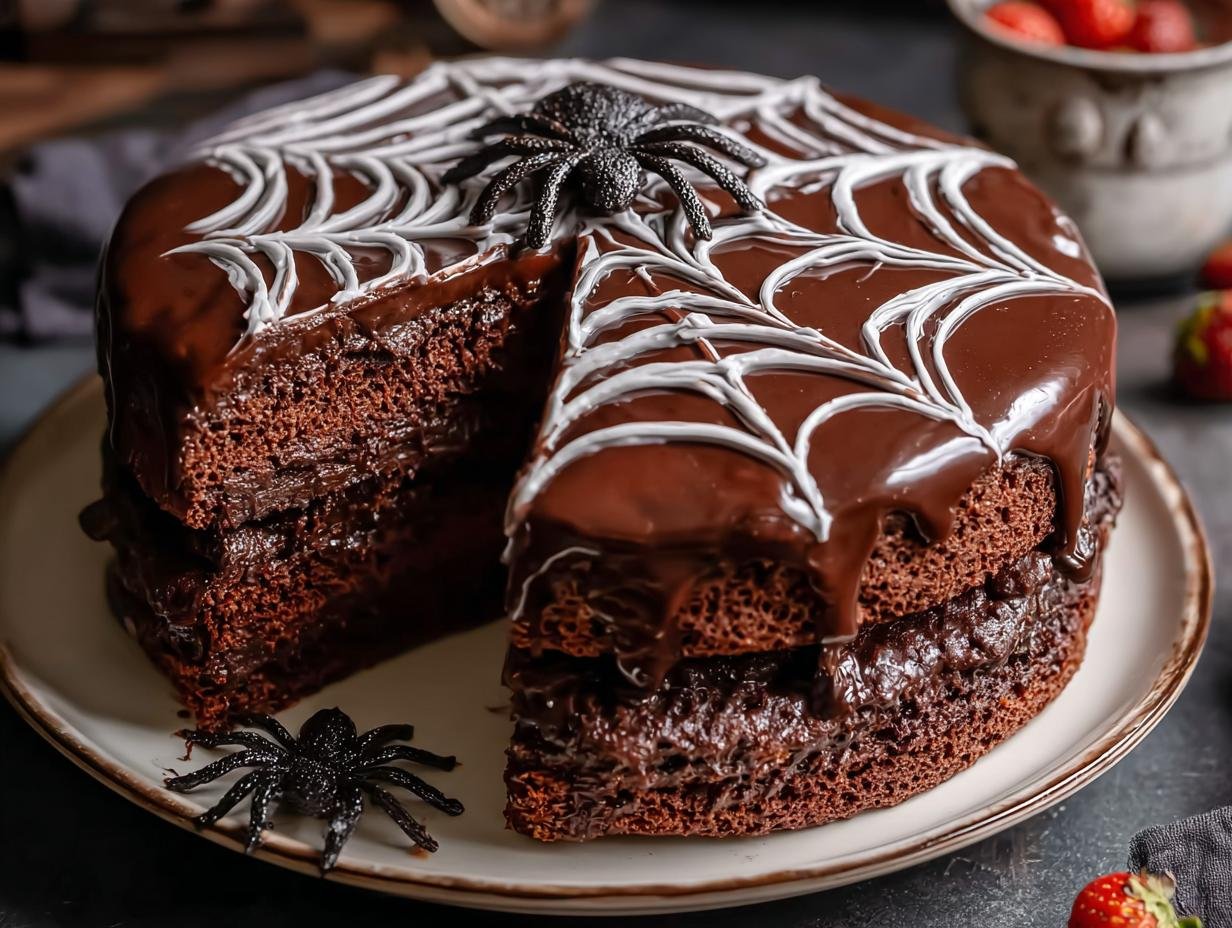
Spiderweb Chocolate Cake has been my go-to for adding a touch of spooky magic to my Halloween celebrations. I remember the first time I saw a chocolate cake with a spiderweb design – it looked so intricate and impressive, I just knew I had to try making one myself. The rich, dark chocolate aroma fills my kitchen as it bakes, promising a moist and decadent treat. This recipe makes creating that iconic spiderweb frosting surprisingly simple, even for a beginner baker. Get ready to wow your guests with this impressive, yet totally achievable, spooky chocolate dessert. Let’s get baking!
Why You’ll Love This Spiderweb Chocolate Cake
This cake is a guaranteed hit for any occasion, especially Halloween! Here’s why it’s a must-try:
- The taste is incredibly rich and moist, thanks to the combination of coffee and sour cream.
- It’s surprisingly quick to prepare, with a total time of just over an hour.
- While it’s a decadent dessert, the use of cocoa powder and dark chocolate offers a slightly less sweet profile than some cakes.
- It’s budget-friendly, using common pantry staples for both the cake and frosting.
- This is an easy spiderweb chocolate cake that looks incredibly impressive.
- It’s perfect for getting the whole family involved in the decorating process.
- This spooky chocolate spiderweb dessert is always a conversation starter at parties.
- It’s a fantastic way to embrace the chocolate cake spooky theme.
Ingredients for Your Spiderweb Chocolate Cake
Gathering your ingredients is the first step to creating this show-stopping treat. You’ll need a few things for the cake itself, and then some more for the magical spiderweb chocolate cake frosting. The richness comes from a blend of common baking staples.
- 1 cup sour cream – This is key for moisture and a tender crumb.
- 2 cups buttermilk – Adds a lovely tang and helps activate the leaveners.
- 3 large eggs – Make sure they’re at room temperature for the best incorporation.
- 1 ½ cups strong hot coffee – This deepens the chocolate flavor without making the cake taste like coffee.
- ¾ cup vegetable oil – For that wonderfully moist texture.
- 1 tbsp vanilla extract – A classic flavor enhancer.
- 3 cups all-purpose flour – The base of our cake.
- 2 ⅔ cups granulated sugar – For sweetness and structure.
- ½ cup cocoa powder – Use a good quality one for a deep chocolate taste.
- 1 ½ tsp baking powder – For lift.
- 1 tbsp baking soda – Works with the acidic ingredients to make the cake rise.
- ¾ tsp kosher salt – Balances the sweetness.
- For the Spiderweb Chocolate Cake Frosting:
- 1 ½ cups unsalted butter, softened – The foundation of our creamy frosting.
- ½ cup cocoa powder – Adds rich chocolate flavor to the frosting.
- ¾ tsp salt – Balances the sweetness.
- 1 lb confectioners’ sugar, sifted – For a smooth, lump-free frosting.
- ⅓ cup fudge – Adds an extra layer of chocolatey depth.
- ⅓ cup white chocolate, melted – Essential for creating the spiderweb effect.
- For the Spider Decoration:
- 1 brown peanut M&M – For the spider’s body.
- 1 brown M&M – For the spider’s head.
- 2 tbsp semi-sweet chocolate, melted – To pipe the spider’s legs.
How to Make a Spiderweb Chocolate Cake
Get ready to create a show-stopping dessert! This guide will walk you through exactly how to make a spiderweb chocolate cake that’s as delicious as it is spooky. The process is quite straightforward, and the results are truly impressive.
- Step 1: Preheat your oven to 350°F (175°C). Generously butter and flour a parchment-lined sheet cake pan. This ensures your cake releases beautifully after baking.
- Step 2: In a large bowl, sift together the 3 cups all-purpose flour, ½ cup cocoa powder, 1 ½ tsp baking powder, 1 tbsp baking soda, ¾ tsp kosher salt, and 2 ⅔ cups granulated sugar. Whisk them together until well combined.
- Step 3: In a separate bowl, whisk together the wet ingredients: ½ cup sour cream, 1 cup buttermilk, 3 large eggs, 1 ½ cups strong hot coffee, ¾ cup vegetable oil, and 1 tbsp vanilla extract. The hot coffee is a secret weapon for intensifying that deep chocolate flavor!
- Step 4: Pour the wet ingredients into the dry ingredients. Whisk everything together until just combined, then increase your mixer speed to medium and beat for two minutes. You’re looking for a smooth, pourable batter.
- Step 5: Pour the batter into your prepared pan. Bake for approximately 50 minutes, or until a toothpick inserted into the center comes out clean. The aroma of chocolate will fill your kitchen! Let the cake cool completely on wire racks before frosting.
- Step 6: While the cake cools, prepare the frosting. In a bowl, beat 1 ½ cups unsalted butter until smooth. Add ½ cup cocoa powder, ¾ tsp salt, 1 lb confectioners’ sugar (sifted!), and ⅓ cup fudge. Whip until it’s wonderfully smooth and creamy. This is the base for our amazing spiderweb chocolate cake frosting.
- Step 7: Once the cake is completely cool, spread the chocolate frosting evenly over the top. This creates the perfect canvas for our design.
- Step 8: Now for the magic! Pipe a spiral of ⅓ cup white chocolate, melted onto the frosted cake, starting from the center and working your way out. This is the crucial first step in how to create spiderweb frosting.
- Step 9: Immediately take a toothpick or a thin skewer and drag it from the center of the cake outwards through the white chocolate lines. Repeat this around the entire spiral to create the iconic spiderweb cake design.
- Step 10: For the spider, pipe chocolate “L”-shaped legs using the 2 tbsp semi-sweet chocolate, melted. Chill these briefly until firm. Then, arrange a brown peanut M&M for the body and a small brown M&M for the head on the cake, attaching the legs. This completes our spooky chocolate spiderweb dessert!

Pro Tips for the Best Spiderweb Chocolate Cake
I’ve learned a few tricks over the years to make this spiderweb chocolate cake truly spectacular. Following these tips will ensure your cake is a showstopper and perfectly embodies the chocolate cake spooky theme you’re going for.
- Make sure your cake is completely cool before frosting. A warm cake will melt the frosting, ruining the design.
- Don’t overmix the batter; this can lead to a dense cake. Mix until just combined for a tender crumb.
- Use good quality cocoa powder for the deepest chocolate flavor. It makes a surprising difference!
- Pipe the white chocolate spiral and create the web design immediately after frosting. The frosting shouldn’t be crusted over.
What’s the secret to a perfect spiderweb effect chocolate cake?
The key to a perfect spiderweb effect chocolate cake is using slightly cooled, but still fluid, white chocolate for the spiral. Work quickly after frosting, and use a clean toothpick for each drag to ensure crisp lines. This is a fundamental part of spiderweb chocolate cake decorating.
Can I make this Halloween spiderweb cake ahead of time?
Yes, you absolutely can! Bake and cool the cake completely, then wrap it tightly in plastic wrap. Store it at room temperature for up to two days, or in the refrigerator for up to four days. Frost and decorate it on the day you plan to serve it for the best web effect.
How do I avoid common mistakes with spiderweb chocolate cake?
A common pitfall is frosting a warm cake, which melts the design. Always ensure your cake is completely cool. Another mistake is letting the frosting sit too long before creating the web; the white chocolate needs to be piped onto soft frosting. Finally, don’t press too hard when dragging the toothpick, or you might tear the frosting.
Best Ways to Serve Your Halloween Spiderweb Cake
Serving this spectacular cake is almost as fun as making it! For a truly memorable chocolate cake for Halloween party, consider pairing it with a scoop of creamy vanilla ice cream or a dollop of freshly whipped cream. The contrast in textures and temperatures is divine. You could also serve it alongside a chilled glass of milk or a warm cider for a cozy autumnal feel. This cake is a showstopper on its own, but a few fresh raspberries or a dusting of edible gold glitter can add an extra touch of magic for any dessert table.
Nutrition Facts for Spiderweb Chocolate Cake
Here’s a breakdown of what you can expect in each slice of this spooky treat. Remember, these are estimates, and your exact numbers might vary slightly based on ingredient brands and preparation.
- Calories: 410
- Fat: 18g
- Saturated Fat: 9g
- Protein: 5g
- Carbohydrates: 56g
- Fiber: 3g
- Sugar: 38g
- Sodium: 240mg
Nutritional values are estimates and may vary based on specific ingredients used.

How to Store and Reheat Your Spiderweb Chocolate Cake
Once your amazing spiderweb chocolate cake is baked and frosted, proper storage is key to keeping it fresh and that spooky design intact. Allow the cake to cool completely on a wire rack before you even think about frosting or storing it. For short-term storage, place the cake in an airtight container. You can keep your decorated cake in the refrigerator for about 3 to 4 days. If you have leftover slices, store them similarly. For longer storage, you can freeze the unfrosted cake layers, wrapped tightly in plastic wrap and then foil, for up to 3 months. When you’re ready to enjoy leftovers, you can reheat individual slices gently in the microwave for about 10-15 seconds to soften the frosting and cake. For some fun spiderweb chocolate cake inspiration for leftovers, you could add a few candy spiders or a sprinkle of edible glitter to a reheated slice.
Frequently Asked Questions About Spiderweb Chocolate Cake
What is the best way to get a clean spiderweb design?
To achieve that perfect, crisp spiderweb effect chocolate cake, make sure your frosting isn’t too stiff. Pipe a spiral of melted white chocolate onto the slightly set chocolate frosting. Then, use a toothpick or a thin skewer to drag lines from the center outwards. For a flawless finish, wipe your toothpick clean between each drag to avoid smudging the pattern. This is a fundamental technique in any spiderweb chocolate cake tutorial.
Can I use a different type of frosting for the spiderweb effect?
While white chocolate is classic for the spiderweb effect, you can experiment! A thin royal icing or even melted candy melts in a contrasting color can work. The key is that the piping consistency is smooth and fluid enough to be drawn into lines. Many bakers find that using a buttercream base and then piping the contrasting color on top is very forgiving, making it a great spiderweb chocolate cake baking tip.
How do I make the chocolate spider for the cake?
Creating the little chocolate spider is fun! You’ll melt some semi-sweet chocolate and pipe simple “L” shapes for the legs onto parchment paper. Once they’re firm, arrange them around a peanut M&M for the body and a smaller M&M for the head. It’s a simple addition that really enhances the spooky theme and makes your chocolate cake with spiderweb design even more impressive.
Variations of Spiderweb Chocolate Cake You Can Try
While this recipe delivers a classic spooky delight, don’t be afraid to get creative! You can easily adapt this spiderweb chocolate cake to suit different tastes and dietary needs. For a richer, more intense flavor, try making a dark chocolate spiderweb cake by using dark chocolate chips in the batter or frosting. If you prefer a lighter touch, a white chocolate spiderweb cake can be achieved by using a white chocolate cake base and a dark chocolate ganache for the web design. For a gluten-free option, simply swap the all-purpose flour for a good quality gluten-free baking blend. You could even experiment with different flavor extracts, like peppermint or almond, to give your Halloween dessert a unique twist!
Print
Spiderweb Chocolate Cake: 1 Hour Magic
- Total Time: 1 hour 10 minutes
- Yield: 12 servings 1x
- Diet: Vegetarian
Description
A rich and moist chocolate cake featuring a spooky spiderweb design, perfect for Halloween parties.
Ingredients
- For the Cake:
- ½ cup sour cream
- 1 cup buttermilk
- 3 large eggs
- 1 ½ cup strong hot coffee
- ¾ cup vegetable oil
- 1 tbsp vanilla extract
- 3 cups all-purpose flour
- 2 ⅔ cups granulated sugar
- ½ cup cocoa powder
- 1 ½ tsp baking powder
- 1 tbsp baking soda
- ¾ tsp kosher salt
- For the Frosting:
- 1 ½ cups unsalted butter
- ½ cup cocoa powder
- ¾ tsp salt
- 1 lb confectioners’ sugar, sifted
- ⅓ cup fudge
- ⅓ cup white chocolate, melted
- For the Spider:
- 1 brown peanut M&M
- 1 brown M&M
- 2 tbsp semi-sweet chocolate, melted
Instructions
- Preheat oven to 350°F. Butter and flour a parchment-lined sheet cake pan.
- Sift together flour, cocoa powder, baking powder, baking soda, salt, and sugar.
- In a large bowl, whisk eggs, sour cream, buttermilk, coffee, oil, and vanilla.
- Pour wet ingredients into dry ingredients. Whisk, then beat on medium speed for two minutes.
- Pour batter into the prepared pan and bake for 50 minutes, or until a toothpick inserted into the center comes out clean. Cool fully on wire racks.
- To make the frosting, beat butter until smooth. Add cocoa powder, sifted confectioners’ sugar, salt, and fudge. Whip until smooth.
- Spread frosting evenly onto the cooled cake.
- Pipe a spiral of melted white chocolate onto the frosted cake, starting from the center.
- Drag a toothpick from the center outward to create the spiderweb cake design.
- To create the spider, pipe chocolate “L”-shaped legs. Chill them, then arrange around a peanut M&M body with a small M&M head.
Notes
- For a richer flavor, use espresso instead of hot coffee.
- For an elegant finish, dust the cake with edible glitter.
- Let children help drag the toothpick to create the spiderweb frosting for added fun.
- Prep Time: 20 minutes
- Cook Time: 50 minutes
- Category: Dessert
- Method: Baking
- Cuisine: American
Nutrition
- Serving Size: 1 slice
- Calories: 410
- Sugar: 38g
- Sodium: 240mg
- Fat: 18g
- Saturated Fat: 9g
- Unsaturated Fat: 7g
- Trans Fat: 0g
- Carbohydrates: 56g
- Fiber: 3g
- Protein: 5g
- Cholesterol: 65mg