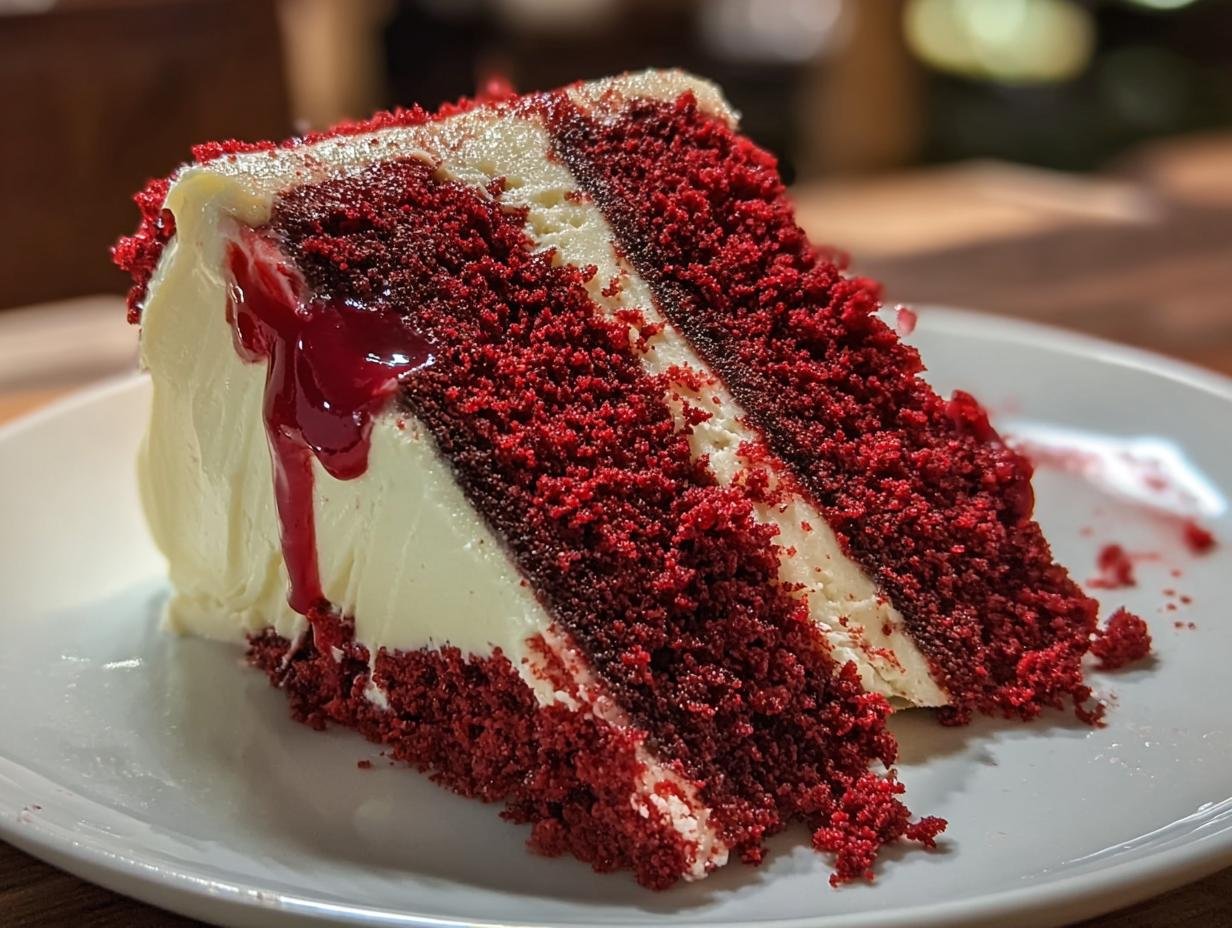
Halloween Red Velvet Cake has become my absolute go-to for a spooky dessert, and I’m so excited to share it with you! Ever since I first tried making this cake myself, the rich, deep red color and the subtle cocoa flavor have completely won me over. The way the tangy cream cheese frosting contrasts with the moist cake is just divine, and don’t even get me started on the dramatic red drip effect – it looks like something straight out of a haunted house! I love experimenting with different spooky red velvet cake ideas to really amp up the Halloween vibe each year. Get ready to impress everyone at your next gathering because, with this recipe, you’re about to create a truly memorable Halloween treat. Let’s get baking!
Why You’ll Love This Halloween Red Velvet Cake
This cake is a showstopper for so many reasons! It’s incredibly moist and has that classic, subtle cocoa flavor you expect from a great red velvet. Plus, it’s surprisingly simple to whip up, making it an easy Halloween red velvet cake for even beginner bakers. The tangy cream cheese frosting is the perfect counterpoint to the rich cake, and the dramatic red drip effect is pure Halloween magic. It’s truly the best red velvet cake for Halloween because it’s both delicious and visually stunning. You’ll love how it tastes, how it looks, and how it brings everyone together for a festive treat. It’s also a fantastic base for all sorts of creative Halloween decorations!
Ingredients for Your Halloween Red Velvet Cake
Gathering these simple ingredients is the first step in learning how to make Halloween red velvet cake that truly wows. You’ll need:
- 1 cup unsalted butter, softened – This gives the cake its tender crumb and rich flavor.
- 1 ¾ cups granulated sugar – For sweetness and structure.
- 2 large eggs – At room temperature, they incorporate better for a smoother batter.
- 1 tsp vanilla extract – Enhances all the other flavors.
- 2 cups all-purpose flour – The foundation of our cake.
- ⅓ cup Dutch-process cocoa powder – This gives our red velvet its signature subtle chocolatey notes and a deeper color.
- 1 tsp baking soda – Our leavening agent, working with the acidic ingredients.
- 1 tsp salt – Balances the sweetness and enhances flavor.
- 1 cup buttermilk – Crucial for that classic tangy flavor and moist texture.
- 1 tbsp white vinegar – Reacts with the baking soda for lift and helps activate the red color.
- 2 tbsp red food coloring (gel) – For that iconic, ghoulishly vibrant hue. Gel is best for intense color without adding too much liquid.
- 2 batches cream cheese frosting – The perfect creamy, tangy topping.
- Red candy melts for “blood” drips (optional) – For that extra spooky effect!
- Edible eyeballs or black sprinkles (optional) – To really bring your Halloween red velvet cake to life.
- Halloween cupcake toppers (optional) – For a final festive touch!
How to Make a Spooky Halloween Red Velvet Cake
Follow these simple steps to create a show-stopping dessert that’s perfect for your Halloween party. This Halloween red velvet cake recipe is designed to be straightforward, even with the fun decorating elements!
- Step 1: Begin by preheating your oven to 350°F (175°C). While the oven heats, properly grease and line two 8-inch round cake pans with parchment paper. This ensures your cakes release beautifully after baking.
- Step 2: In a large bowl, cream together the 1 cup unsalted butter, softened and 1 ¾ cups granulated sugar on medium-high speed until the mixture is wonderfully light and fluffy, which usually takes about 3–4 minutes.
- Step 3: Add the 2 large eggs one at a time, making sure to mix well after each addition. Stir in the 1 tsp vanilla extract for that classic sweet aroma.
- Step 4: In a separate bowl, whisk together the 2 cups all-purpose flour, ⅓ cup Dutch-process cocoa powder, 1 tsp baking soda, and 1 tsp salt.
- Step 5: Add half of the dry ingredients to the wet ingredients and mix until just combined. Don’t overmix at this stage.
- Step 6: Now, pour in the 1 cup buttermilk, 1 tbsp white vinegar, and 2 tbsp red food coloring (gel). Stir until the batter is smooth and a vibrant, spooky red.
- Step 7: Add the remaining dry ingredients and mix until the batter is completely smooth and evenly colored.
- Step 8: Divide the batter evenly between your prepared cake pans. The batter should fill them about two-thirds full.
- Step 9: Bake for 25–30 minutes. You’ll know they’re ready when a wooden skewer inserted into the center comes out clean. The aroma filling your kitchen will be amazing!
- Step 10: Let the cakes cool in their pans for about 15 minutes before carefully inverting them onto wire racks to cool completely. This prevents them from breaking.
- Step 11: Once cooled, level the cake rounds using a serrated knife. This creates a flat surface for stacking and frosting.
- Step 12: Place one cake layer on your serving plate. Spread a generous amount of cream cheese frosting over it, then top with the second cake layer. This is where the magic starts to happen for your red velvet cake with Halloween decorations.
- Step 13: Frost the top and sides of the entire cake with the remaining cream cheese frosting, creating a smooth finish.
- Step 14: For the dramatic blood drips, melt the red candy melts or mix corn syrup with red gel coloring. Drizzle this mixture carefully over the edges of the cake, allowing it to drip down the sides like spooky goo.
- Step 15: Finally, decorate with edible eyeballs, black sprinkles, or festive Halloween cupcake toppers as desired to complete your amazing Halloween Red Velvet Cake!

Pro Tips for the Best Halloween Red Velvet Cake
Elevating your cake from good to spooktacular is all about a few key tricks. These tips will help you achieve that perfect texture and vibrant look for your Halloween red velvet cake.
- Always use good quality Dutch-process cocoa powder for that authentic, subtle chocolate flavor and a deeper color base.
- Chill your cake layers before frosting. This makes them firmer and much easier to handle, leading to cleaner frosting lines, especially when adding decorations.
- For the most vibrant and consistent color, especially if you want a truly dark red velvet cake Halloween look, use gel food coloring. It packs more pigment without thinning the batter.
- This is a fantastic base for a simple Halloween red velvet cake recipe; don’t be afraid to get creative with your decorating beyond the drips!
What’s the secret to a perfect Halloween Red Velvet Cake?
The magic lies in the balance of buttermilk, vinegar, and baking soda, which creates a tender crumb and activates that signature tangy flavor. Using gel food coloring also ensures a deep, rich color without affecting the cake’s texture. For more baking tips, check out our guide to therapeutic cooking.
Can I make this Halloween Red Velvet Cake ahead of time?
Absolutely! You can bake and cool the cake layers up to a day in advance. Store them tightly wrapped in plastic wrap at room temperature. Frost and decorate just before serving for the freshest look and taste.
How do I avoid common mistakes with Halloween Red Velvet Cake?
A common pitfall is overmixing the batter, which can lead to a dense cake. Mix only until ingredients are just combined. Also, ensure your oven temperature is accurate; using an oven thermometer can prevent under or over-baking. Learn more about accurate oven temperatures from Food Network.
Best Ways to Serve Your Halloween Red Velvet Cake
This show-stopping Halloween Red Velvet Cake is a fantastic centerpiece for any October 31st celebration. For a truly festive red velvet cake for Halloween party, consider serving it with a scoop of vanilla bean ice cream or a dollop of whipped cream. The cool, creamy contrast is divine! You could also pair it with some spooky orange slices or a side of dark chocolate ganache for an extra decadent touch. It’s so delicious, your guests will be asking for seconds almost immediately! For more dessert inspiration, explore our cheesecake recipes.
Nutrition Facts for Halloween Red Velvet Cake
Here’s a breakdown of the deliciousness per slice, so you know what you’re indulging in. This festive treat is sure to be a hit at your Halloween bash!
- Calories: 480
- Fat: 25g
- Saturated Fat: 15g
- Unsaturated Fat: 8g
- Trans Fat: 0g
- Carbohydrates: 58g
- Fiber: 2g
- Sugar: 38g
- Protein: 4g
- Sodium: 320mg
- Cholesterol: 90mg
Nutritional values are estimates and may vary based on specific ingredients used, especially when adding optional decorations.

How to Store and Reheat Your Halloween Red Velvet Cake
Once your spectacular Halloween Red Velvet Cake has cooled completely, proper storage is key to keeping it fresh and spooky for your party guests. For short-term storage, place the cake in an airtight container or cover it securely with plastic wrap. This helps maintain its moisture and prevents it from drying out. You can keep your Halloween themed red velvet cake in the refrigerator for about 3 to 4 days. If you need to store it for longer, freezing is an excellent option. Wrap individual slices tightly in plastic wrap, then in aluminum foil, and freeze for up to 3 months. To reheat, let the frozen slices thaw overnight in the refrigerator. For a slightly warmer treat, you can gently reheat a slice in the microwave for 10-15 seconds on low power, just enough to take the chill off.
Frequently Asked Questions About Halloween Red Velvet Cake
What is a Halloween Red Velvet Cake?
A Halloween Red Velvet Cake is a classic red velvet cake recipe specifically decorated and themed for the Halloween season. It features the cake’s signature deep red color, often enhanced for a spookier look, and is usually paired with cream cheese frosting. The “Halloween” aspect comes from the decorations, like candy eyeballs, blood drips, or spooky toppers, making it a festive dessert for October 31st celebrations.
Can I make this Halloween Red Velvet Cake ahead of time?
Yes, absolutely! You can bake and cool the cake layers up to 24 hours in advance. Store them tightly wrapped in plastic wrap at room temperature. Frosting and decorating can be done a few hours before serving to keep it looking its best. This makes it a convenient option for busy hosts preparing for a Halloween party. For more make-ahead tips, consider our one-pot jambalaya recipe.
How do I get the best red color for my Halloween Red Velvet Cake?
For the most vibrant and consistent red hue, it’s best to use gel food coloring. These are more concentrated than liquid dyes and won’t thin out your batter. Ensure you add enough to achieve a deep, rich red. Sometimes, the reaction between the cocoa powder and buttermilk also helps bring out a reddish tone, creating a truly striking dark red velvet cake Halloween appearance.
What makes a Halloween Red Velvet Cake homemade special?
A homemade Halloween red velvet cake offers a personal touch that store-bought cakes can’t match. You control the quality of ingredients, ensuring a moist and flavorful cake. Plus, the joy of decorating it yourself with unique Halloween themes makes it a fun activity and a truly special centerpiece for your party. It shows you put in extra effort for your guests! You can find more baking inspiration on our recipes page.
Variations of Halloween Red Velvet Cake You Can Try
Looking to switch things up or cater to different needs? This versatile cake is perfect for creative twists. Here are a few ideas to make your dessert even more uniquely spooky!
- Ghostly Mini Bundt Cakes: Instead of a large cake, bake the batter in mini bundt pans. Once cooled, drizzle with white glaze and add candy eyes for a parade of adorable ghosts. This is a wonderfully simple way to create individual portions of a ghoulish red velvet cake Halloween treat.
- Spooky Spiderweb Cake: Frost your cooled cake with a smooth layer of cream cheese frosting. Then, use black icing or melted dark chocolate in a piping bag to draw concentric circles on top. Drag a toothpick from the center outwards to create a perfect spiderweb effect. It’s a classic and effective way to achieve a creepy red velvet cake Halloween look.
- Red Velvet Cupcakes: For individual servings, bake the same batter in cupcake liners. They bake faster and are perfect for a Halloween party where guests can grab and go. Top with your favorite cream cheese frosting and festive Halloween sprinkles.
- Dairy-Free Adaptation: You can often make this cake dairy-free by substituting the butter with vegan butter or coconut oil, and the buttermilk with a plant-based milk and vinegar mixture (like almond or soy milk).

Spooky Halloween Red Velvet Cake Delight
- Total Time: 50 minutes
- Yield: 12 servings 1x
- Diet: Vegetarian
Description
A spooky Halloween Red Velvet Cake with a rich cocoa flavor, tangy cream cheese frosting, and dramatic red drip effects, perfect for any Halloween party.
Ingredients
- 1 cup unsalted butter, softened
- 1 ¾ cups granulated sugar
- 2 large eggs
- 1 tsp vanilla extract
- 2 cups all-purpose flour
- ⅓ cup Dutch-process cocoa powder
- 1 tsp baking soda
- 1 tsp salt
- 1 cup buttermilk
- 1 tbsp white vinegar
- 2 tbsp red food coloring (gel)
- 2 batches cream cheese frosting
- Red candy melts for “blood” drips (optional)
- Edible eyeballs or black sprinkles (optional)
- Halloween cupcake toppers (optional)
Instructions
- Preheat your oven to 350°F. Grease and line two 8-inch round cake pans with parchment paper.
- In a large bowl, cream together the softened butter and granulated sugar on medium-high speed until light and fluffy, about 3–4 minutes.
- Add the eggs one at a time, mixing well after each addition. Stir in the vanilla extract.
- In a separate bowl, whisk together the all-purpose flour, Dutch-process cocoa powder, baking soda, and salt.
- Add half of the dry ingredients to the wet ingredients and mix until just combined.
- Pour in the buttermilk, white vinegar, and red food coloring. Stir until smooth and vibrantly red.
- Add the remaining dry ingredients and mix until the batter is smooth.
- Divide the batter evenly between the prepared cake pans.
- Bake for 25–30 minutes, or until a wooden skewer inserted into the center comes out clean.
- Let the cakes cool in the pans for 15 minutes before inverting them onto wire racks to cool completely.
- Once cooled, level the cake rounds using a serrated knife.
- Place one cake layer on your serving plate and spread a generous amount of cream cheese frosting over it. Top with the second cake layer.
- Frost the top and sides of the cake with the remaining cream cheese frosting.
- For the blood drips, melt red candy melts or mix corn syrup with red gel coloring. Drizzle the mixture over the edges of the cake, allowing it to drip down the sides.
- Decorate with edible eyeballs, black sprinkles, or Halloween cupcake toppers as desired for your Halloween Red Velvet Cake.
Notes
- For the most intense red color without altering the cake’s texture, use gel food coloring.
- Chill your cake layers before frosting to achieve cleaner lines and easier handling.
- Add candy eyes or festive Halloween toppers to enhance the spooky appearance of your Halloween Red Velvet Cake.
- Prep Time: 20 minutes
- Cook Time: 30 minutes
- Category: Dessert
- Method: Baking
- Cuisine: American
Nutrition
- Serving Size: 1 slice
- Calories: 480
- Sugar: 38g
- Sodium: 320mg
- Fat: 25g
- Saturated Fat: 15g
- Unsaturated Fat: 8g
- Trans Fat: 0g
- Carbohydrates: 58g
- Fiber: 2g
- Protein: 4g
- Cholesterol: 90mg